Keurig coffee makers have become a staple in many homes and offices. These machines offer quick and convenient brewing. But like all appliances they need regular care. The descale light on a Keurig signals it’s time for cleaning, however, sometimes the light may stay on even after descaling. In such cases, a simple reset can usually do the trick. This guide provides step-by-step instructions on how to reset the descale light for various Keurig models, ensuring your brewer is ready to brew your favorite cup of coffee.
To reset the Keurig descale light, unplug the machine for 10 minutes and then plug it back in. This often clears the light. If that doesn’t work run a descaling cycle using a descaling solution or vinegar. After descaling some models need a specific button sequence to turn off the light.
Keeping your Keurig clean ensures great-tasting coffee and extends the life of your machine. Regular descaling removes mineral buildup that can affect taste and function. It’s a simple process that keeps your brewer running smoothly.
Keurig: Resetting the Descale Light
General Reset Steps
- Power Off: Unplug your Keurig brewer and wait a few minutes.
- Button Combo: While unplugged, press and hold the specific button combination for your model (see table below).
- Plug In and Power On: Keep holding the buttons while plugging the brewer back in and powering it on.
- Release Buttons: Once the power light illuminates, release the buttons.
- Brew Cycle: Place a mug on the drip tray and run a brew cycle without a K-Cup. Repeat if necessary until the descale light turns off.
Model-Specific Button Combinations
| Keurig Model | Button Combination |
|---|---|
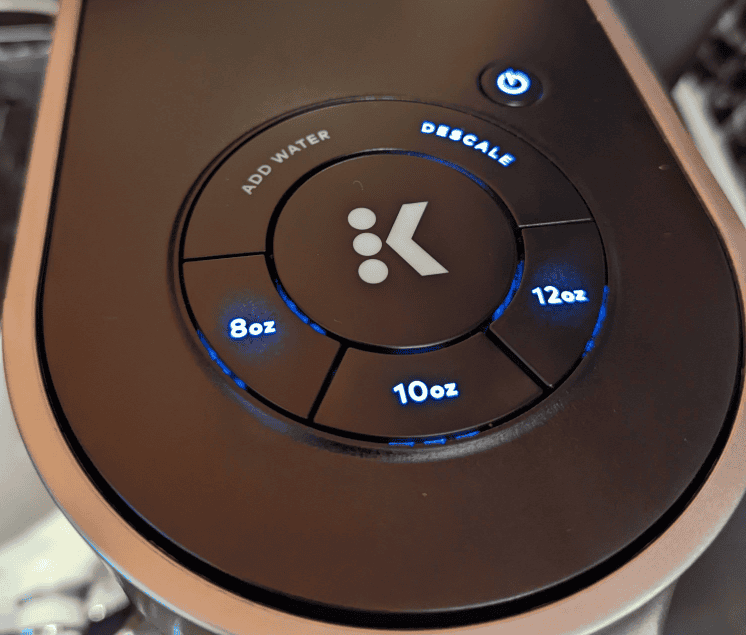
| K-Supreme Plus, K-Express, K-Iced | 8 oz and 12 oz buttons |
| K-Express Essentials, K-Iced Essentials | 6 oz and 10 oz buttons |
| Other Models | Consult your Keurig user manual |
Important Notes
- Complete Descaling First: Ensure you’ve fully descaled your Keurig before attempting to reset the light.
- Check for Remaining Solution: If the descale light persists, run additional rinse cycles with fresh water until it turns off.
- Refer to Manual: If the general steps don’t work, consult your specific Keurig model’s user manual for precise instructions.
Additional Tips for Resetting the Descale Light On Keurig
Complete Rinse Cycles
- Refill and Repeat: After the initial descaling solution runs out, refill the reservoir with fresh water. Continue running brew cycles until the “Add Water” light comes on. Repeat this process at least once more.
- Don’t Interrupt: Avoid lifting the K-Cup holder or interrupting the brew cycles during the rinsing process. This can reset the machine and prevent the descale light from turning off.
Button Combinations and Brew Cycles
- Press and Hold: For models requiring a button combination, make sure to press and hold the specified buttons before plugging the brewer back in.
- Brew Without K-Cup: Always run brew cycles without a K-Cup inserted during the reset process.
- Multiple Cycles: If the light doesn’t turn off after the first few cycles, keep repeating until it does.
Troubleshooting Tips
- Check Filter: Ensure the water filter is properly installed and tightened in the reservoir. A loose filter can sometimes trigger the descale light.
- Use Cold Water: Some users have reported success using cold water for the rinse cycles after descaling.
- Avoid Selecting Cup Size: When using button combinations, press the “Brew” button without selecting a cup size.
- Check for Leaks: If you notice any leaks, address them before attempting to reset the light.
Remember, patience is key. If the descale light doesn’t turn off immediately, keep running rinse cycles until it does. If you’ve tried all these tips and the light still persists, consider contacting Keurig customer support for further assistance.
Key Takeaways
- Unplugging the Keurig for 10 minutes often resets the descale light
- Descaling with vinegar or a special solution cleans the machine
- Regular maintenance prevents buildup and keeps coffee tasting great
Understanding the Descale Light Indicator
The descale light on Keurig machines alerts users to mineral buildup. It affects different models and impacts machine performance.
Identifying Descale Light on Different Models
Keurig machines display the descale light in various ways. On the Keurig Supreme, it’s a small LED near the control panel. The Keurig Mini has a similar light on its front. Keurig Slim models often show a descale icon on their digital screens.
For Keurig 2.0 machines, the descale alert appears as a message on the touch display. Some older models use a combination of blinking lights to signal descaling needs.
To find the descale indicator, users should check their machine’s manual. This helps locate the light or message for each specific model.
The Impact of Scale on Your Keurig Machine
Scale buildup affects Keurig machines in several ways. It slows down brewing time and reduces water flow. This can lead to weak or incomplete cups of coffee.
Hard water deposits can clog internal parts. This makes the machine work harder and may shorten its lifespan. Scale can also change the taste of coffee, giving it a bitter or metallic flavor.
Regular descaling keeps the machine running smoothly. It helps maintain proper water temperature and pressure. Clean machines brew better-tasting coffee and last longer.
Ignoring the descale light can lead to more serious issues. The pump may fail or heating elements could burn out. These problems often require costly repairs or replacement.
Descaling Your Keurig
Descaling is a vital process to keep your Keurig running smoothly. It removes mineral buildup and ensures your coffee tastes great.
Preparing for Descale
Start by emptying the water reservoir. Rinse it thoroughly with clean water. Remove all K-cups from the machine. Get your descaling solution ready. You can use Keurig’s official descaler or white vinegar.
Pour the solution into the reservoir. If using vinegar, mix it with equal parts water. Fill to the max line. Place a large mug on the drip tray. This will catch the descaling liquid.
Make sure you have enough time. The process takes about 30 minutes to an hour. Have extra water on hand for rinsing later.
Executing the Descaling Process
Turn on your Keurig. Some models have a special descale mode. Press the 8 oz and 12 oz buttons at the same time to activate it. For other models, just start a normal brew cycle.
Let the machine run until the reservoir is half empty. Turn it off and let it sit for 30 minutes. This allows the solution to work on tough buildup.
After 30 minutes, turn the Keurig back on. Finish running the remaining solution through the machine. Empty the mug as needed.
Finishing the Descaling Cycle
Once all the solution is gone, it’s time to rinse. Fill the reservoir with clean water. Run brew cycles until the tank is empty. This might take 10-12 cycles.
Taste the water from the last cycle. If it still tastes like vinegar or descaler, run more rinse cycles. Keep going until the water tastes clean.
After rinsing, your Keurig is ready to use. The descale light should turn off automatically. If it doesn’t, try unplugging the machine for a few minutes. This often resets the light.
Resetting the Descale Light
Resetting the descale light on a Keurig coffee maker is a simple process that varies slightly by model. Proper reset ensures the machine functions correctly and maintains optimal water flow.
Reset Instructions by Model
For most Keurig models, unplugging the machine for 10 minutes often resets the descale light. After plugging it back in, the light should turn off.
On the Keurig Supreme, users can enter descale mode by pressing the 8oz and 12oz buttons together for 3 seconds while the machine is off but plugged in. Then, press the ‘K’ button to start descaling.
For Keurig 2.0 models, hold the 8oz and 12oz buttons simultaneously to start descale mode. Place a large mug on the drip tray and press the flashing button to begin the process.
Keurig Mini and Slim models may require running a water-only brew cycle after descaling to reset the light.
Troubleshooting Post-Reset Issues
If the descale light remains on after resetting, try running another descaling cycle. Use a mixture of equal parts water and white vinegar or a Keurig descaling solution.
Persistent clogs can cause the light to stay on. Remove and clean the K-cup holder and needle. Soak these parts in warm, soapy water for 10 minutes.
Check the water reservoir for proper seating. A loose fit can trigger the descale light. Remove and reattach it firmly.
If issues continue, perform a factory reset. Unplug the machine, remove the water reservoir, and leave it off for an hour before reassembling and trying again.
Maintenance and Prevention
Regular maintenance and preventive measures can significantly improve your Keurig’s performance and lifespan. These practices help avoid descaling issues and keep your machine running smoothly.
Regular Cleaning and Care
Clean your Keurig coffee machine often to prevent mineral buildup. Wipe the exterior with a damp cloth weekly. Remove and wash the drip tray, K-cup holder, and water reservoir in warm soapy water.
Clean the needles that pierce K-cups monthly. Use a paperclip to clear any coffee grounds from the holes. This step helps maintain proper water flow.
Rinse the water tank daily and refill it with fresh water. This practice reduces mineral deposits. For best results, use filtered or bottled water in your Keurig.
Extending Your Keurig’s Lifespan
Replace the water filter every two months or after 60 tank refills. This step removes impurities that can affect coffee taste and machine performance.
Descale your Keurig every 3-6 months depending on water hardness. Use a Keurig descaling solution or white vinegar to remove limescale buildup.
Allow the machine to cool between brews. This practice prevents overheating and protects internal components.
Check the user manual for model-specific care tips. Follow these guidelines to maintain your warranty coverage.
Contact Keurig customer support if you notice any unusual noises or performance issues. Early intervention can prevent more serious problems.
Frequently Asked Questions
Resetting the descale light on a Keurig can be tricky. Here are some common questions and solutions to help you get your machine back to brewing great coffee.
How do I manually reset the descale light on my Keurig machine?
To manually reset the descale light, unplug your Keurig and remove the water tank. Leave it unplugged for 10 minutes. This allows the machine to reset to factory settings. Plug it back in and refill the water tank. The light should now be off.
Why does the descale light remain illuminated after I have completed the descaling process?
If the light stays on, the machine may need another rinse cycle. Run plain water through the brewer 2-3 more times. If the light persists, repeat the entire descaling process. Make sure to use the correct amount of descaling solution.
What are the steps to properly exit the descale mode on a Keurig Slim?
To exit descale mode on a Keurig Slim, press the 8 oz and 12 oz buttons at the same time. Hold them for 3 seconds. The machine should beep and exit descale mode. Run a water-only brew cycle to finish the process.
What should I do if the descale light on my Keurig won’t turn off after resetting?
If the light won’t turn off, try unplugging the machine for 30 minutes. Then plug it back in and run 3-4 water-only brew cycles. If this doesn’t work, contact Keurig customer support. The machine may need professional servicing.
How can I descale my Keurig brewer using vinegar?
To descale with vinegar, mix equal parts water and white vinegar. Pour this into the water reservoir. Run brew cycles until the tank is empty. Rinse thoroughly with plain water. Run several more water-only cycles to remove any vinegar taste.
What is the process for turning off the descale light on my Keurig K-Duo Ess?
For the K-Duo Ess, hold down the 8 oz and 10 oz buttons together for about 5 seconds. Release the buttons. The descale light should turn off. If not, try unplugging the machine for a few minutes before repeating these steps.