Creating key art for video games can seem daunting, but it’s a crucial element that captures your game’s essence in a single image. This artwork serves as the face of your game across storefronts, promotional materials, and social media. Effective key art combines your game’s main character, logo, and a compelling background to instantly communicate your game’s style, tone, and story to potential players.
The process involves more than just technical skill—it requires thoughtful planning and a deep understanding of your game’s identity. Before jumping into creation, study your project thoroughly and gather references that match the mood you’re trying to convey. Many professional artists recommend creating three core assets (character, logo, and background) that can be combined in different ways to produce various marketing materials.
You don’t need to be a master artist to create compelling key art. By learning fundamental design principles and utilizing both 2D and 3D tools like Photoshop and Blender, you can develop imagery that stands out in a crowded marketplace. Remember that your key art should not only look good but also effectively represent what makes your game special.
Understanding the Role of Key Art in Game Marketing
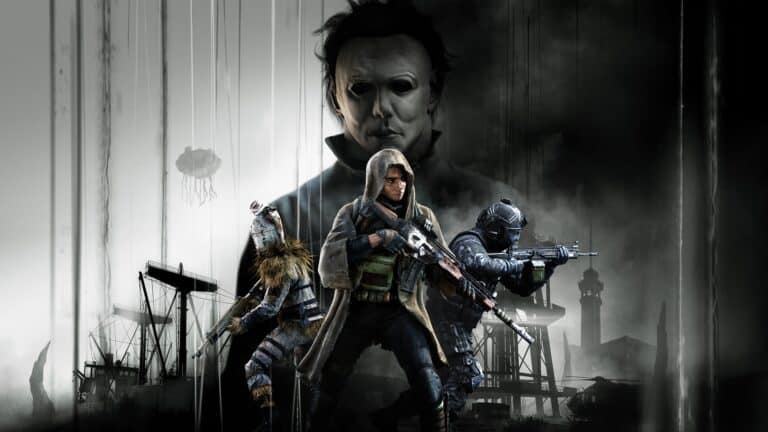
Key art isn’t just a pretty image—it’s a marketing tool, a storytelling shortcut, and often the first thing players see. Whether it’s used for digital storefronts, physical packaging, promotional posters, or event banners, key art captures the essence of a game in a single image. For indie developers and AAA studios alike, well-crafted key art can make or break first impressions.
What Makes Great Key Art?
Creating compelling key art involves more than dropping your game’s logo on a screenshot. The best examples follow specific principles:
1. Visual Hierarchy
Your composition should naturally guide the viewer’s eyes. Typically, this means centering your protagonist, putting the game logo in a dominant spot, and framing action or environments to lead focus.
2. Iconography & Tone
Key art should visually communicate what your game is about. Is it a gritty shooter, a whimsical platformer, or a slow-paced mystery? Use color palettes, posture, expression, lighting, and background elements to tell the viewer what kind of world they’re about to step into.
3. Adaptability
The best key art scales well. It should work on everything from a full-screen Steam banner to a mobile app thumbnail. This often means creating multiple crops and aspect ratios from the same base art.
4. Brand Consistency
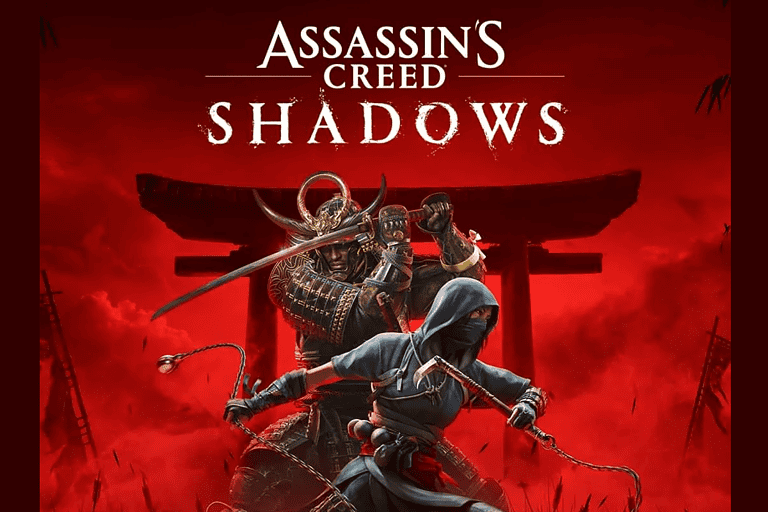
Your key art needs to reflect the identity of your game. That means matching your game’s logo style, font usage, and character design exactly—not “close enough.” This is especially important for franchise entries or titles with an established visual brand.
Pre-Production: Planning Your Key Art
Before you even open Photoshop or Blender, take time to plan. Use this checklist:
| Planning Step | Why It Matters |
|---|---|
| Define the tone and theme of the game | Helps guide the mood and palette of the art |
| Choose the focal point | Ensures your composition is anchored and readable |
| Decide on the composition and orientation | Prepares you for different uses (landscape, square, portrait) |
| Identify characters or objects to include | Keeps your art visually representative of the in-game experience |
| Sketch thumbnails | Rapidly test multiple concepts before investing time in full renders |
Thumbnailing is especially important. Try sketching 10–15 fast concepts, varying the focus, layout, and mood. These don’t need to be detailed—stick figures and shapes are fine. This process helps you visualize potential layouts and identify which ideas are strongest.
Tools and Techniques: How to Build Key Art
The specific software you use depends on your pipeline, but most key art is created using a combination of the following:
Software Tools:
| Software | Use Case |
|---|---|
| Adobe Photoshop | 2D compositing, digital painting, post-processing |
| Blender or Maya | 3D models and posing |
| ZBrush | High-detail sculpting |
| Substance Painter | Texturing assets for realism |
| Unreal Engine / Unity | Staging scenes using in-game assets |
2D Key Art Process (Using Photoshop)
- Block Out Shapes: Start with silhouettes to define strong reads.
- Color Palette Selection: Choose a limited color palette aligned with your game’s theme.
- Add Lighting & Depth: Create light direction and atmospheric perspective.
- Details & Polish: Finalize character features, textures, environment touches.
- Logo and Text Integration: Leave space for game titles and ratings.
3D Key Art Process (Using Game Assets)
- Pose Your Characters: Use rigged models or skeletons to strike emotional poses.
- Set the Scene: Place your environment pieces, props, and camera.
- Lighting Setup: Use cinematic lighting to evoke mood.
- Render at High Resolution: At least 4K, ideally 8K, so you can crop and downscale.
- Paintover: Bring the render into Photoshop for color grading, touch-ups, and effects.
Key Art Formats and Requirements
For marketing and store use, your art needs to meet platform-specific guidelines. Here’s a table of typical specs:
| Platform | Primary Image Size | Secondary Uses |
|---|---|---|
| Steam | 616×353 px (Capsule) | 460×215, 231×87, header images |
| PlayStation Store | 3840×2160 px (Promo Art) | Store tile, dynamic background, icon |
| Xbox Store | 1080×1440 px (Store Tile) | 1920×1080 for background |
| Nintendo eShop | 1280×720 px | Featured carousel, game page |
| Epic Games Store | 2560×1440 px | Landscape hero image, thumbnail |
Always design at higher resolutions than required, then export to the necessary sizes. Account for cropping, overlays, and text areas.
Common Mistakes to Avoid
- Too Much Detail: Don’t crowd your art with every character or feature—simpler often reads better.
- Weak Silhouettes: If your character’s shape isn’t instantly recognizable in silhouette, your art may not stand out.
- Poor Lighting: Flat or overexposed lighting kills the sense of depth. Learn cinematic lighting techniques.
- Ignoring Platform Constraints: Art that looks great in landscape might get cropped into an unreadable mess in portrait mode.
Real-World Examples of Effective Key Art
| Game Title | Key Art Strengths |
|---|---|
| The Last of Us Part II | Emotional character focus, muted palette, atmospheric tension |
| Cuphead | Clear tone, retro design, bold silhouettes |
| Hades | Strong pose, vibrant color scheme, tight visual hierarchy |
| Hollow Knight | Minimalist and mysterious, emphasizes tone over detail |
| Cyberpunk 2077 | Clear branding, sharp focal point, adaptable for marketing |
Studying top-performing games in your genre is a great way to reverse-engineer effective layout, contrast, and emotional storytelling.
Bonus: Quick Key Art Checklist
Before hitting export, run through this final checklist:
- Does the composition draw the eye to the focal point?
- Is the game’s tone clearly communicated?
- Is the image readable even at small sizes?
- Are lighting and color used to enhance mood?
- Does it include room for logos and rating badges?
- Can it be cropped into multiple formats?
Key art is one of your game’s most powerful ambassadors. Done right, it captures the spirit of your game in an instant and helps players feel something—even before they hit “Download.”
Key Takeaways
- Great key art combines character elements, logo design, and background imagery to instantly communicate your game’s unique appeal.
- Thorough research and reference gathering help you develop artwork that accurately represents your game’s tone and style.
- Your final artwork should be adaptable to multiple formats while maintaining visual impact across all platforms.
Understanding Key Art
Key art serves as the visual foundation of a video game’s marketing strategy, combining artistic elements that capture the game’s essence in a single powerful image.
Definition and Importance
Key art is the primary visual representation of your video game that appears on store pages, advertisements, and promotional materials. It’s the first impression players have of your game and often determines whether they’ll click to learn more. Unlike screenshots or gameplay footage, key art for video games is specially crafted to convey the game’s mood, theme, and unique selling points.
Good key art can drastically improve visibility in crowded marketplaces. When players browse through hundreds of games, compelling key art makes yours stand out. Many indie developers struggle with this aspect of game marketing, yet it’s one of the most crucial factors in attracting your target audience.
Elements of Impactful Key Art
Strong key art combines several critical elements that work together to create a memorable visual:
Composition: How you arrange elements in your image guides the viewer’s eye and establishes hierarchy. The process of creating great video game key art often begins with thoughtful composition that highlights your main character or unique game mechanic.
Color Palette: Your color choices set the emotional tone. Bold contrasts can create excitement, while muted tones might suggest mystery or melancholy. Limit your palette to 3-5 key colors for maximum impact.
Illustration Quality: Whether you use 2D or 3D techniques, technical execution matters. Many artists combine both 3D and 2D techniques to create memorable art that stands out from competitors.
Before finalizing your design, ensure it remains legible when scaled down to thumbnail size, as that’s how most players will first encounter it.
Conceptualizing Your Design
The foundation of powerful key art begins with a clear vision and methodical development process. Good concept art captures the essence of your game while attracting your target audience.
Brainstorming Ideas
Begin by studying your project thoroughly to understand what makes it unique. Ask yourself what emotions you want players to feel when they see your key art. Is it excitement, mystery, or nostalgia?
Search for references related to your game’s genre, setting, and art style. Create a mood board with images that match your vision. This visual collection will help you identify patterns and elements that resonate with your game’s identity.
Consider your target audience and what would appeal to them. If you’re making a fantasy RPG, study successful key art in that genre to understand what works.
List your game’s most distinctive elements:
- Main characters and their unique traits
- Iconic weapons or items
- Memorable environments
- Core gameplay mechanics
Drafting Initial Sketches
Start with rough thumbnails to explore different compositions. These should be simple, focusing on layout rather than details. Try at least 5-10 different arrangements to find what best communicates your game’s essence.
When creating character sketches, pay attention to poses that convey personality and action. Dynamic poses usually work better than static ones.
Traditional art tools like pencil and paper can be perfect for this phase. They allow you to work quickly and freely without technical constraints.
Test different perspectives and framing options:
- Close-up dramatic shots
- Wide environmental views
- Action-focused scenes
- Character-centered compositions
Don’t worry about perfection at this stage. The goal is to explore ideas rapidly and find promising directions.
Finalizing the Concept Art
Select your strongest sketch and refine it with more detailed drawings. Focus on readability—viewers should understand what they’re looking at within seconds.
Pay careful attention to the core elements that must be featured in your key art, including genre indicators, main characters, and iconic scenes. These elements should immediately communicate what kind of game you’ve created.
Balance the composition carefully. Use the rule of thirds to place key elements where they’ll draw the eye naturally. Create a clear visual hierarchy that guides viewers to the most important parts first.
Consider color theory when planning your palette. Colors should reflect your game’s mood and theme while ensuring important elements stand out. Limited color schemes often create more memorable and striking imagery than overly complex ones.
Digital Art Fundamentals
Creating stunning key art for video games requires a solid foundation in digital art techniques and tools. The right software, workspace setup, and illustration principles can dramatically improve your artistic workflow and final results.
Choosing the Right Digital Art Software
Selecting appropriate software is crucial for game art creation. Adobe Photoshop remains the industry standard with powerful brushes and layer capabilities specifically useful for key art creation.
For budget-conscious artists, Krita offers a free alternative with professional-grade painting tools and a user-friendly interface. It includes features specifically designed for concept artists.
Clip Studio Paint excels in illustration and is popular among game artists for its natural-feeling brushes and specialized tools for character design.
Affinity Designer provides vector capabilities that complement raster workflows, allowing for scalable elements in your key art.
Consider your specific needs when choosing software. Will you focus on character art, environments, or promotional materials? Different tools excel in different areas.
Setting Up Your Digital Workspace
A properly configured workspace saves time and improves your workflow efficiency. Start by customizing your software’s interface to place frequently used tools within easy reach.
Create a folder structure that organizes your assets, references, and work-in-progress files. This prevents clutter and helps maintain version control.
Invest in a drawing tablet with pressure sensitivity like Wacom or XP-Pen models. Pressure control gives you greater expression in your linework and shading.
Adjust your monitor settings for accurate color representation. Calibrate your display if possible, as game art often needs to match specific color palettes.
Set up custom brushes and tool presets for techniques you use frequently in your key art. This creates consistency across your work and speeds up your process.
Principles of Digital Illustration
Strong key art begins with solid composition. Use the rule of thirds to place focal points and create visual interest that guides the viewer’s eye through your image.
Master layers and layer groups to maintain flexibility. Keep characters, backgrounds, and effects on separate layers so you can make adjustments without starting over.
Learn non-destructive editing techniques. Use adjustment layers and masks rather than direct pixel manipulation to preserve your original work.
Color theory is essential in game art. Develop cohesive color palettes that convey the mood and match the game’s aesthetic. Limited color schemes often create more impact than complex ones.
Lighting dramatically affects the emotional tone of your key art. Experiment with different lighting setups to create mystery, excitement, or tranquility depending on your game’s genre.
Creating Your Key Art
The process of creating key art involves thoughtful planning and technical execution. Your key art will serve as the visual ambassador for your game, capturing its essence and attracting your target audience.
Constructing the Composition
Start by sketching your initial ideas. Study the project thoroughly to understand what elements best represent your game. Consider the rule of thirds when placing your main character or focal point.
Think about the story you want to tell through this single image. What moment or emotion will resonate most with players?
Use these questions to guide your composition planning:
- What is your game’s unique selling point?
- Which characters should be featured?
- What environment elements support your narrative?
- What perspective best showcases your game world?
Create multiple thumbnail sketches before committing to a final layout. This exploration phase helps you discover the most compelling arrangement of elements before investing time in details.
Working with Layers and Depth
Organize your artwork using layers to maintain flexibility throughout the creation process. In programs like Photoshop, separate elements into logical groups:
Recommended Layer Structure:
- Background elements
- Mid-ground elements
- Foreground elements/characters
- Effects/atmosphere
- Text/logo elements
Create depth by adjusting the scale of objects and using atmospheric perspective. Elements in the foreground should appear larger and more detailed than those in the background.
Add depth through overlapping elements and varying levels of focus. Slightly blur background elements while keeping foreground elements sharp. This technique creates a natural sense of depth that draws viewers into your game world.
Consider using Blender alongside Photoshop to generate 3D elements that can be integrated into your 2D composition for enhanced depth.
Detailing Lighting and Shadows
Lighting establishes mood and directs attention to important elements. Choose a primary light source and remain consistent with how it affects all elements in your composition.
Consider these lighting styles:
- Dramatic lighting with strong contrasts for action/horror games
- Soft, diffused lighting for casual or narrative games
- Colorful, stylized lighting for indie or artistic games
Add realistic shadows that correspond to your light sources. Cast shadows create grounding and realism, while core shadows add volume to objects.
Use rim lighting (light that outlines the edges of objects) to separate elements from the background. This technique is particularly effective for making characters stand out against busy backgrounds.
Remember that lighting isn’t just functional—it’s emotional. The right lighting can evoke feelings of danger, mystery, hope, or wonder that align with your game’s themes.
Color Selection and Application
Your color palette should reflect your game’s mood and genre. Create character sketches with colors that complement your overall palette.
Consider using these color theory approaches:
- Complementary colors for dynamic tension
- Analogous colors for harmony
- Monochromatic schemes for cohesive, stylized looks
- Triadic colors for vibrant, balanced compositions
Limit your palette to 3-5 main colors to maintain visual cohesion. Use color to direct the viewer’s eye to important elements by placing warm colors against cool backgrounds, or bright elements against subdued ones.
Test your colors both in digital and print formats if your key art will appear in multiple media. Colors often appear differently across devices and in print, so make adjustments as needed.
Adobe Illustrator offers excellent color management tools for creating and saving custom color palettes specific to your project.
Integrating Text and Typography
Choose typography that reflects your game’s personality. Bold, angular fonts work well for action games, while elegant serifs might suit historical or fantasy settings.
Keep these text integration principles in mind:
- Maintain adequate contrast between text and background
- Allow sufficient breathing room around text elements
- Ensure your game title is legible at various sizes
- Consider how text and logo will work in different formats
Position your text to complement the visual flow of your composition rather than fighting against it. Your game title should be integrated harmoniously with the artwork while remaining the most prominent text element.
Create logos that stand out even when scaled down for various marketing materials. Test your design at different sizes to ensure the text remains readable on everything from billboards to mobile thumbnails.
Use layers to experiment with different text placements and effects before finalizing your design.
Advanced Techniques
Creating stunning key art requires mastering specialized tools and methods that can elevate your game visuals. These techniques combine traditional artistic skills with digital innovation to produce eye-catching imagery that captures player attention.
3D Modeling and Rendering
3D software offers powerful options for creating dramatic key art with precise perspective and lighting. Blender stands out as a free yet professional-grade tool that many artists use to build their base compositions.
Start by creating simple 3D models that represent your main characters, environments, or vehicles. You don’t need highly detailed models – focus on getting the shapes, proportions, and positioning correct.
Set up your camera angle carefully to create impact. Dramatic low angles make characters appear heroic, while overhead shots can showcase environments effectively.
Lighting is crucial for setting mood. Experiment with rim lighting to highlight character silhouettes or dramatic shadows to create tension. Many artists use 3D geometry as a base for complex scenes, then paint over these renders in Photoshop to add detail and style.
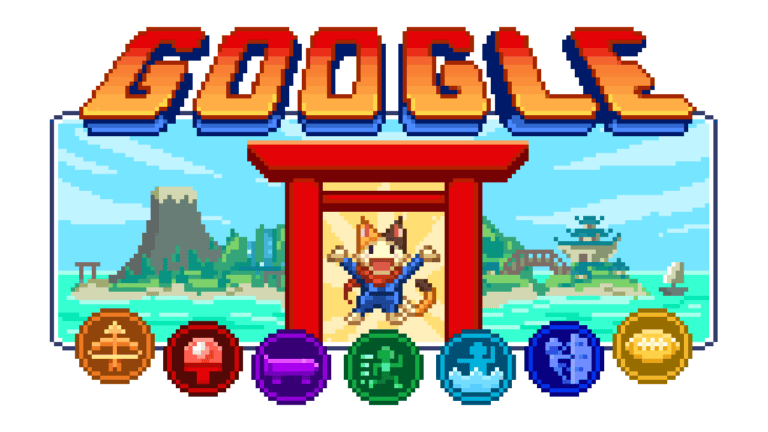
Pixel Art Creation
Pixel art remains incredibly popular for indie games and retro-styled titles. This distinctive art form requires patience and an understanding of limited color palettes.
Tools like Aseprite, GraphicsGale, and Piskel offer specialized features for pixel artists. These programs provide grid systems, animation tools, and palette management specifically designed for pixel work.
When creating pixel art key visuals, start with a limited color palette – 8 to 16 colors often work best. This constraint forces creative solutions and gives your art that authentic retro feel.
Carefully consider your sprite designs and how they’ll translate into larger key art. You’ll want consistency between in-game assets and promotional materials.
Dithering techniques can create the illusion of additional colors and gradients. Use this strategically for shadows or to suggest texture without adding more colors to your palette.
Incorporating Motion in GIFs
Animated key art can capture attention more effectively than static images. GIFs provide a perfect middle ground between still images and full videos.
Start by planning your animation sequence – what elements will move and how? Simple is often better – subtle character breathing animations or environmental effects like flowing water can add life without becoming distracting.
When creating animated key art, focus on a short loop that flows seamlessly. About 1-3 seconds usually works well for social media and storefronts.
File size matters for animated key art. Limit your frame count and color palette to keep files manageable. Consider using sprite sheet animations compiled into a single GIF to maintain quality while reducing file size.
Test your GIFs at different sizes to ensure they remain clear and effective when scaled down for various platforms like Steam, social media, or mobile storefronts.
File Preparation and Exporting
Proper file preparation and export settings ensure your key art looks its best across all platforms while maintaining the right balance between quality and file size.
Image Resolution and Formats
When preparing your key art files, start by working at a high resolution—at least 300 DPI for print materials and 72-150 DPI for digital use. For master files, save your digital art in a lossless format like PNG or TIFF to preserve quality and transparency.
For web use, JPG works well for images without transparency, while PNG is better when you need transparent backgrounds for logos or character art. Remember that PNG files maintain quality but are larger, while JPG files are smaller but use lossy compression.
Always keep your original layered files (PSD or similar) separate from your exports. This allows you to make changes later without starting over.
Consider creating a naming convention for your files such as “GameTitle_KeyArt_Platform_Date” to keep everything organized as your project grows.
Optimizing for Various Platforms
Different platforms require different specifications for your key art. Steam store pages typically need horizontal images at 616×353 pixels, while console storefronts often require higher resolutions.
For social media:
- Twitter: 1200×675 pixels
- Facebook: 1200×630 pixels
- Instagram: 1080×1080 pixels (square) or 1080×1350 (portrait)
When preparing files for printing on physical game boxes or promotional materials, work in CMYK color mode rather than RGB. This prevents unexpected color shifts when your digital art goes to print.
Use batch processing in Photoshop or similar tools to quickly generate all the sizes you need from your master file. Many platforms provide templates you can download to ensure your key art fits perfectly within their specifications.
Always test your exports on the actual platforms to verify they display correctly before finalizing.
Reflection and Iteration
Creating effective key art requires continuous evaluation and refinement. The process doesn’t end with your first draft—successful game art evolves through feedback cycles and careful adjustments.
Seeking Feedback from Team Members
Start by gathering input from various departments within your development team. Art directors can evaluate visual cohesion, while marketing experts can assess commercial appeal. Developers might provide insights about gameplay elements that should be highlighted.
Create a structured feedback form with specific questions like:
- Does the key art accurately represent the game’s mood?
- Are the main characters prominently featured?
- Does it communicate the game’s genre at a glance?
When presenting your work, share both the final composition and your preliminary sketches to give context to your creative decisions. This helps team members understand your thought process.
Record all feedback systematically, noting recurring themes. Sometimes contradictory opinions arise—trust your expertise while remaining open to valid criticisms.
Implementing Changes and Revisions
Create a priority list based on collected feedback. Focus first on elements that impact the key art’s central message or marketability. Technical issues like composition problems or unclear focal points should take precedence over minor stylistic preferences.
When making revisions, work in clearly defined stages:
- Address major structural changes
- Refine character representations
- Adjust lighting and color balance
- Fine-tune details and polish
Keep a version history of your work. This allows you to track progress and potentially revert to previous elements if needed. Many artists use naming conventions like “KeyArt_v1.2_ColorRevision” for easy reference.
Don’t rush the revision process. Allow yourself time between feedback sessions and implementation to process suggestions objectively. This cooling-off period often leads to more thoughtful adjustments.
Playtesting and Final Adjustments
Display your key art alongside actual gameplay footage to evaluate consistency. The art should feel like an extension of the game experience, not a disconnected marketing piece.
Conduct A/B testing with potential players by showing different versions of your key art and recording their impressions. Ask specific questions:
- What type of game do you think this is?
- What emotions does this artwork evoke?
- Would this image make you interested in learning more?
Pay special attention to first impressions. The initial 3-5 seconds of viewing often determine whether your key art succeeds in capturing interest.
Make final technical checks before delivery. Ensure the art works across different formats (horizontal banners, vertical mobile displays, thumbnail sizes) without losing impact. Test how it appears in actual store environments where it will be displayed.
Promotional Strategies
Your key art is a powerful marketing asset that can significantly boost visibility and engagement for your game. Strategic promotion helps maximize its impact across various channels and touchpoints.
Integrating Art in Marketing Campaigns
Start by featuring your key art prominently on store pages to increase wishlists and conversions. This creates an immediate visual identity for your game.
Develop a consistent visual language across all marketing materials. Your key art should inform the design of social media assets, email campaigns, and digital ads.
Consider creating animated versions of your key art for video trailers and social media. Motion adds another dimension that can capture attention more effectively in crowded feeds.
If you’re developing for specific video game consoles, adapt your key art to fit their marketing guidelines while maintaining your game’s unique identity. Each platform may have different specifications and audience expectations.
Showcasing Key Art at Events
Gaming conventions and trade shows provide valuable opportunities to display your key art in physical formats. Invest in high-quality banners, posters, and standees that attract attention from across the show floor.
Create exclusive variations of your key art for special events. This generates excitement and gives attendees something unique to remember your game by.
Consider partnering with artists to create live demonstrations of your key art creation process. These performances can draw crowds and generate social media content simultaneously.
If your game leverages nostalgia, emphasize these elements in your event displays. Familiar visual cues from beloved gaming eras can create instant emotional connections with potential players walking by your booth.
Frequently Asked Questions
Creating key art for games involves specific techniques, tools, and approaches that can transform your game’s visual identity. Proper key art captures the essence of your gameplay while attracting your target audience.
What are the essential steps in designing key artwork for a video game?
Start by studying your project thoroughly to understand the game’s core themes and messages. This step ensures your art aligns with the game’s identity.
Next, gather extensive references related to your game’s genre, style, and atmosphere. Creating a reference board helps maintain consistency throughout your design process.
Decide which elements to feature in your key art. This could include main characters, significant locations, or iconic objects that represent your game’s uniqueness.
Develop preliminary sketches to explore composition options before committing to a final design. Strong compositions guide the viewer’s eye to important elements.
Which tools and software are best suited for creating video game key art?
Photoshop remains an industry standard for 2D key art creation, offering powerful painting, compositing, and editing capabilities. Its layer system allows for non-destructive editing and experimentation.
Blender provides excellent 3D modeling capabilities that can be used to create base assets for your key art. Many artists use 3D elements as foundations for their 2D paintings.
Procreate offers a more affordable alternative with intuitive drawing tools for iPad users. Its portability makes it excellent for creating initial concepts.
Specialized software like Substance Painter helps with texturing 3D elements that may appear in your key art, giving materials realistic properties.
How can a programmer with minimal art skills develop visually appealing game art?
Focus on a simple, distinctive art style rather than attempting photorealism. Minimalist, geometric, or stylized approaches can look professional while requiring less technical skill.
Consider using asset stores or hiring freelancers for base assets that you can modify to suit your needs. Sites like Unity Asset Store offer customizable starting points.
Learn basic color theory and composition principles to improve your existing work. Even simple art can look polished with harmonious colors and balanced layouts.
Invest time in learning one specific skill that can elevate your work, such as lighting or composition, rather than trying to master everything at once.
What techniques are involved in making 2D art assets for video games?
Start with clear silhouettes that read well at different scales. Strong silhouettes help players quickly identify characters and objects, especially in action-oriented games.
Use color to convey information and create visual hierarchy. Important interactive elements should stand out from background elements.
Create concept art before final assets to explore different approaches. This saves time by resolving design issues before detailed production work begins.
Implement consistent light sources across your assets to create a cohesive world. Lighting direction should remain constant unless specifically justified by in-game light sources.
Could you detail the process of conceptualizing and creating concept art for video games?
Begin by defining the core elements of your game world, including atmosphere, technology level, and cultural influences. These fundamentals will guide all visual decisions.
Create character sketches exploring different body types, clothing styles, and personality traits that reflect your game’s themes.
Develop environment concepts that support your gameplay while establishing a sense of place. Consider how level design and artistic vision can work together.
Iterate based on feedback, refining concepts until they align with both artistic vision and gameplay requirements. Concept art should evolve alongside game design.
What guidelines should be followed to establish a unique art style for a video game?
Identify your target audience and research visual styles that resonate with them. Different demographics respond to different aesthetic approaches.
Create a clear style guide documenting color palettes, shape language, and proportions to maintain consistency across your game.
Limit your palette to create a distinctive look. Many memorable games use restricted color schemes that become instantly recognizable.
Consider technical constraints when developing your style. Art that performs well within your game engine will create a better player experience than visually complex art that causes performance issues.