Learning to draw what you see instead of what you think you see is a fundamental skill for any artist. When you first start drawing, your brain often relies on symbols rather than reality. The key to accurate drawing is training your eye to observe shapes, angles, and proportions as they truly appear, not as your mind interprets them. This approach helps you create more realistic artwork that captures what’s actually in front of you rather than a simplified version.
Looking at the world through an artist’s eyes means breaking down complex subjects into basic shapes and relationships. You can start by focusing on negative spaces – the areas around your subject – which helps you see proportions more accurately. Many artists also recommend measuring by holding up your pencil at a fixed distance to compare sizes and angles within your subject.
A helpful technique when starting your drawing is to place marks for the top, bottom, left, and right extremes of your subject. This creates boundaries that help you maintain proper proportions throughout your work. Remember that recognizing basic shapes like cubes, cylinders, cones, and spheres within complex objects gives you a solid foundation for accurate representation.
A Guide to Observational Drawing
Observational drawing is the art of drawing from real life—capturing exactly what your eyes perceive rather than what your mind imagines. It’s a foundational skill for artists that improves accuracy, attention to detail, and your ability to represent the world realistically. Whether you’re a beginner or looking to refine your skills, this guide will help you learn how to draw what you see effectively.
What Is Observational Drawing?
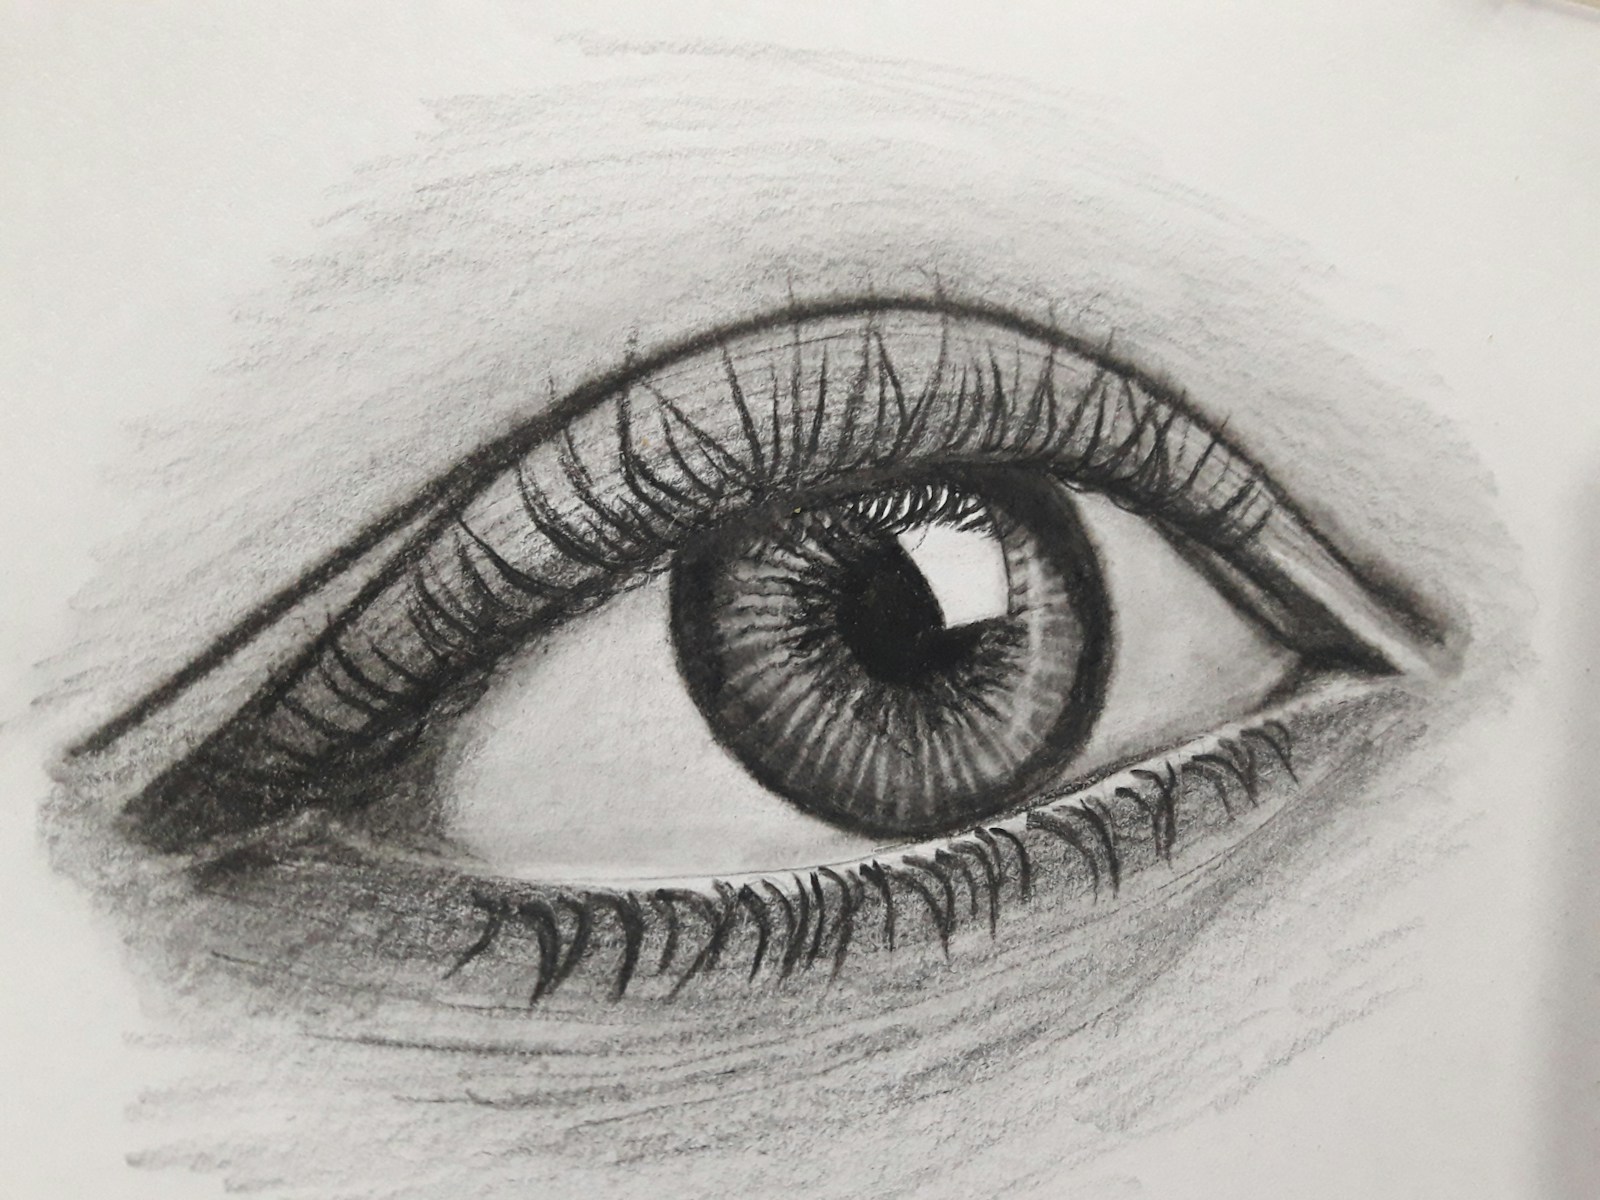
Observational drawing involves closely studying a subject and translating its shapes, proportions, light, and shadow onto paper. Unlike drawing from memory or imagination, it challenges you to slow down, observe carefully, and interpret the visual information accurately.
Why Practice Observational Drawing?
- Improves hand-eye coordination.
- Enhances your ability to see shapes, proportions, and details.
- Develops patience and focus.
- Builds a strong foundation for all art styles.
- Helps you understand light, shadow, and texture.
Getting Started: Essential Materials
- Sketchbook or drawing paper
- Pencils (HB, 2B, 4B recommended)
- Eraser (kneaded eraser preferred)
- Sharpener
- Ruler (optional)
Step-by-Step Guide to Drawing What You See
1. Choose Your Subject
Start with simple objects like a fruit, a cup, or a plant. As you gain confidence, move on to more complex subjects like people, landscapes, or interiors.
2. Observe Carefully
- Take time to look at your subject from different angles.
- Notice the basic shapes (circles, squares, triangles) that make up the object.
- Pay attention to proportions and relationships between parts.
3. Start with Basic Shapes
- Lightly sketch the general shapes and outlines.
- Use simple geometric forms to block in the structure.
- Keep lines loose and light to adjust easily.
4. Measure and Compare Proportions
- Use your pencil or a ruler to measure angles, lengths, and relative sizes.
- Compare parts of the subject to each other to maintain accuracy.
5. Add Details Gradually
- Once the basic shapes and proportions feel right, start adding smaller details.
- Look for edges, textures, and unique features.
6. Focus on Light and Shadow
- Observe where the light hits and where shadows fall.
- Use shading techniques (hatching, cross-hatching, blending) to create depth.
- Capture highlights and reflected light for realism.
7. Refine and Adjust
- Step back periodically to view your drawing from a distance.
- Make corrections to shapes, lines, and shading as needed.
- Erase unnecessary lines and darken important ones.
Tips to Improve Your Observational Drawing
- Practice regularly: Consistency builds skill.
- Draw from life often: Even quick sketches help train your eye.
- Use different viewpoints: Change your angle to challenge your perception.
- Don’t rush: Take your time to observe and draw.
- Experiment with different pencils and papers: Find what works best for you.
- Keep a sketchbook: Document your progress and ideas.
Exercises to Train Your Artist’s Eye
- Contour Drawing: Draw the outline of objects without looking at your paper.
- Negative Space Drawing: Focus on the space around the object rather than the object itself.
- Blind Contour Drawing: Draw without lifting your pencil or looking at the paper.
- Value Studies: Practice shading simple shapes to understand light and shadow.
- Gesture Drawing: Capture the essence and movement of a subject quickly.
Key Takeaways
- Training your eye to observe actual shapes and proportions rather than relying on mental symbols leads to more accurate drawings.
- Using techniques like measuring with your pencil and focusing on negative spaces helps capture true relationships between elements.
- Breaking complex subjects into basic shapes creates a framework for detailed, realistic representation in your artwork.
Understanding the Drawing Process
Drawing what you see is a skill that can be broken down into clear steps. The process involves both observing carefully and developing specific techniques that train your eye and hand to work together.
Fundamentals of Observational Drawing
Observational drawing starts with truly seeing your subject. Instead of drawing what you think something looks like, you need to draw exactly what’s in front of you. One effective approach is to start with negative spaces – the areas around and between objects.
When beginning a drawing, place marks for the outermost points of your subject. These marks help establish boundaries for your drawing. Keep these initial lines light so you can adjust them easily.
Break complex objects into basic shapes. This simplification makes the process less overwhelming. Look for relationships between different parts of your subject – how one element aligns with another.
Try flipping your reference photo upside down. This trick forces your brain to see shapes rather than objects, helping you draw more accurately.
Gesture Drawing Technique
Gesture drawing captures the energy and movement of your subject in quick, fluid strokes. This technique isn’t about details but about grasping the essential character of what you’re seeing.
Start with a loose, sweeping line that follows the main action or flow of your subject. This line, often called the “line of action,” forms the backbone of your drawing. Spend only 30-60 seconds per drawing when practicing.
Keep your hand moving continuously and don’t worry about mistakes. The goal is to train your eye to quickly see and record the most important aspects of what you’re observing.
Drawing realistically requires regular practice of gesture drawing. It builds muscle memory and improves your ability to see proportions accurately.
Use light pressure on your drawing tool to maintain freedom of movement. Your wrist and arm should be relaxed, not tense.
Mastering Perspective in Art
Perspective creates depth and realism in your artwork by showing how objects relate to each other in space. Proper perspective techniques transform flat drawings into three-dimensional scenes that pull viewers into your visual world.
Principles of Linear Perspective
Linear perspective uses converging lines to create the illusion of depth on a flat surface. When you draw, all parallel lines appear to meet at vanishing points on the horizon line. There are three main types:
- One-point perspective: All lines converge to a single point, ideal for frontal views
- Two-point perspective: Uses two vanishing points, perfect for corner views of buildings
- Three-point perspective: Adds a third point for tall structures seen from below or above
Practice by drawing simple boxes first. Place your horizon line at eye level and mark your vanishing points. Every vertical edge should remain perfectly straight while horizontal lines point toward vanishing points.
You can master perspective faster by using the XYZ axis method to establish your basic framework before adding details.
Exploring Foreshortening
Foreshortening makes objects appear shorter than they actually are when extending toward or away from the viewer. This technique creates dramatic depth in your drawings.
When drawing limbs or objects in foreshortening:
- Observe how forms compress visually as they come toward you
- Pay attention to proportions – objects closer appear larger
- Use overlapping shapes to reinforce depth
Try this exercise: Hold your arm straight out, then bend it toward yourself. Notice how your arm appears shorter but wider as it points toward you. This is foreshortening in action.
You can practice with two practical techniques that bypass complex perspective rules. First, use a viewfinder to frame your subject. Second, measure relative angles with your pencil to accurately capture foreshortened shapes.
Building Blocks of Composition
Understanding the fundamental elements that make up any drawing will help you create more balanced and visually appealing artwork. These building blocks serve as the framework upon which all successful compositions are built.
The Role of Basic Shapes
When you look at any object, try to break it down into its basic shapes – circles, squares, rectangles, and triangles. This simplification helps you capture proportions accurately before adding details.
Start by identifying the largest shapes in your subject. For example, a human head can be simplified as an oval, while buildings often begin as rectangular forms.
Practice seeing these shapes by doing quick sketches focused only on basic forms. This trains your eye to recognize the underlying structure of complex objects.
Use a light touch when drawing these initial shapes. They serve as guidelines that you can refine as you progress with your drawing.
Try this exercise: Look at everyday objects around you and sketch only their basic shapes for 5-10 minutes daily. This builds your visual library and improves observation skills.
Designing with Composition in Mind
Composition refers to how you arrange elements within your drawing space. Strong compositions guide the viewer’s eye and create visual interest.
Consider these key principles:
- Balance: Distribute visual weight evenly
- Focal point: Create a clear center of interest
- Rule of thirds: Place key elements at intersections of imaginary grid lines
- Leading lines: Use lines to direct attention to important areas
Before drawing, plan your composition with thumbnail sketches. These small, quick drawings help you test different arrangements without investing too much time.
Pay attention to negative space – the empty areas between objects. These spaces are just as important as the objects themselves in creating a harmonious composition.
Using a viewfinder (a small cardboard frame) can help you isolate and compose your subject before drawing. This simple tool makes it easier to see potential compositions in the world around you.
Practical Tools and Resources
Having the right supplies and learning materials can make a big difference in your drawing progress. The tools you choose and resources you study can either enhance or hinder your ability to accurately draw what you see.
Selecting the Right Drawing Tools
Start with basic supplies that won’t complicate your learning process. A simple HB pencil, a small set of graphite pencils (ranging from 2H to 6B), and a sketchbook with medium-textured paper work well for beginners.
An eraser is essential—get both a kneaded eraser for lightening areas and a vinyl eraser for complete removal. Don’t forget a basic pencil sharpener.
Consider these additional tools as you progress:
- Blending stumps or tortillons for smooth shading
- Drawing pens with different tip sizes for line work
- Colored pencils once you’re comfortable with graphite
Your drawing space matters too. Find a surface with good lighting—natural light is best for seeing colors and values accurately. Line of Action offers free digital practice tools that can supplement your physical drawing setup.
Recommended Books and Guides
Several excellent books can improve your observational drawing skills:
For beginners:
- “Drawing on the Right Side of the Brain” by Betty Edwards—teaches you to see objects as artists do
- “Keys to Drawing” by Bert Dodson—focuses on practical exercises
For intermediate artists:
- “The Natural Way to Draw” by Kimon Nicolaides—emphasizes gesture drawing
- “Figure Drawing for All It’s Worth” by Andrew Loomis—covers human anatomy
Online resources can be equally valuable. Learn sketching for beginners guides provide structured approaches to drawing what you see. Many artists also recommend drawing what you see exercises on YouTube.
Find art communities like Reddit’s Illustration forum where artists share resources and critique each other’s work.
Sharing Your Artwork
Once you’ve created drawings you’re proud of, sharing them can help you grow as an artist and connect with others who share your passion. Effective presentation and thoughtful engagement can make a significant difference in how your work is received.
Best Practices for Displaying Your Work
When displaying your drawings, lighting is crucial. Natural, indirect light works best to show true colors without glare. For physical displays, consider using neutral mats that complement but don’t compete with your work.
When sharing your art online, use high-quality photos or scans. Make sure your images are:
- Well-lit with no harsh shadows
- In focus and properly cropped
- Accurately representing colors and details
- Sized appropriately for the platform
Include brief descriptions about your process or inspiration with each drawing. This gives viewers context and shows your thought process behind what you’ve drawn.
Consider watermarking digital images to protect your work while sharing. Keep the mark subtle so it doesn’t distract from your drawing.
Connecting with Other Artists
Finding a community of fellow artists can dramatically improve your drawing skills and motivation. Online platforms like Instagram, DeviantArt, and art-focused Reddit communities offer places to share and receive feedback.
When posting your drawings, use relevant hashtags to increase visibility. Specific tags like #pencildrawing or #portraitsketch will reach more targeted audiences than general ones.
Don’t just post your work—actively engage with other artists. Comment thoughtfully on their drawings and participate in discussions. This builds genuine connections rather than just collecting followers.
Art critique groups can provide valuable feedback on how accurately you’re drawing what you see. Look for local workshops or online forums where you can share works-in-progress.
Consider joining drawing challenges to stay motivated and connect with artists at similar skill levels.
Frequently Asked Questions
Drawing what you see takes practice and specific techniques to train your eyes and hands to work together. These common questions address key skills that will help you capture reality on paper accurately.
What techniques can beginners use to learn to draw objects as they appear in real life?
Focus on basic shapes when you first look at an object. Break down complex subjects into simple geometric forms like circles, squares, and triangles.
Try the upside-down drawing method where you turn your reference photo upside down and draw it that way. This forces your brain to stop labeling objects and instead see only lines and shapes.
Use a viewfinder (a small cardboard frame) to isolate your subject and reduce visual distractions. This helps you concentrate on just what’s inside the frame.
Are there step-by-step guides available to assist in drawing objects with high realism?
Yes, many artists have created methodical approaches to realistic drawing. Carrie Lewis offers a four-step process that begins with negative spaces, then rough outlines, followed by details, and finishing with refinements.
Video tutorials like those on YouTube demonstrate realistic drawing techniques in action. These visual guides help you understand the process from start to finish.
Books like “Drawing on the Right Side of the Brain” by Betty Edwards provide comprehensive step-by-step methods specifically designed to help you see and draw accurately.
What exercises can help improve the ability to capture the details of a subject in a drawing?
Practice negative space drawing by focusing on the empty spaces around and between objects rather than the objects themselves. This trains your eye to see shapes more accurately.
Try contour drawing where you look only at your subject while drawing its outline without looking at your paper. This strengthens the eye-hand connection.
Time yourself with quick gesture drawings (30 seconds to 2 minutes) to capture the essence of subjects without overthinking. Gradually increase your time to add more detail.
Can you recommend any books that focus on teaching the skill of drawing from observation?
“Drawing on the Right Side of the Brain” by Betty Edwards is considered essential reading for learning observational drawing. It includes exercises specifically designed to switch your perception.
“Keys to Drawing” by Bert Dodson provides practical techniques and exercises for drawing what you see with accuracy and expression.
“The Natural Way to Draw” by Kimon Nicolaides offers a thorough course in observational drawing with progressive exercises to build your skills methodically.
How important is understanding perspective when attempting to draw realistically from sight?
Understanding perspective is crucial for realistic drawing. Without it, objects appear flat or distorted rather than three-dimensional.
Even simple knowledge of one-point and two-point perspective dramatically improves your ability to draw buildings, interiors, and objects on flat surfaces with correct proportions.
Perspective helps you accurately represent how objects recede into space and how their size appears to change with distance—fundamental concepts for creating drawings that look real to viewers.
What are some tips for translating the three-dimensional world onto a two-dimensional surface?
Use sighting techniques to measure proportions by holding your pencil at arm’s length and comparing sizes of different parts of your subject. This helps maintain accurate scale relationships.
Pay attention to light and shadow patterns rather than just outlines. These value relationships create the illusion of three dimensions on a flat surface.
Start with a light sketch of the overall silhouette before adding details. This establishes the correct proportions early and prevents mistakes that are difficult to fix later.