A clean stovetop not only improves your kitchen’s appearance but also ensures your cooking area remains safe and efficient. Whether you have a gas, electric, or glass cooktop, regular cleaning prevents buildup of food particles and grease that can affect cooking performance. The most effective way to clean any stovetop is to start with warm, soapy water for basic cleaning, then use specific methods based on your stovetop type for tougher stains.
For stubborn messes on glass cooktops, a mixture of baking soda and vinegar works wonders, while gas stove grates benefit from soaking in hot soapy water for at least 20 minutes. Many people find that using a razor blade can help scrape off burned spots without damaging the surface. For daily maintenance, wiping spills immediately after they occur prevents hardened residue and makes deep cleaning sessions much easier.
🧽 What You’ll Need
- Dish soap or degreasing cleaner
- Baking soda
- White vinegar
- Microfiber cloths or soft sponges
- Toothbrush or small cleaning brush
- Paper towels
- Warm water
- (Optional) Razor scraper — for glass tops only
🔥 1. Cleaning a Gas Stove Top
Step 1: Remove grates and burner caps
Take off the grates and burner caps and soak them in hot, soapy water for 15–20 minutes.
Step 2: Wipe the surface
Use a damp cloth with dish soap to remove loose debris and grease from the stovetop.
Step 3: Scrub burners and grates
Use a brush or sponge to scrub away residue. For stubborn grease, sprinkle baking soda and spray vinegar over it — let it fizz for a few minutes before scrubbing.
Step 4: Clean burner heads
Use a toothbrush or pin to unclog burner holes carefully.
Step 5: Rinse and reassemble
Wipe everything clean with a damp cloth, dry thoroughly, and replace all parts.
(Sources: Martha Stewart, Home Depot)
⚡ 2. Cleaning an Electric Coil Stove Top
Step 1: Remove coils (if detachable)
Unplug the stove or ensure it’s cool. Gently lift and unplug the coils.
Step 2: Clean drip pans
Remove and soak drip pans in warm, soapy water. Scrub and rinse well.
Step 3: Wipe the surface
Use a damp cloth and mild cleaner to remove residue from the stovetop surface.
Step 4: Reassemble
Once dry, plug the coils back in and replace the drip pans.
(Sources: Better Homes & Gardens, Whirlpool)
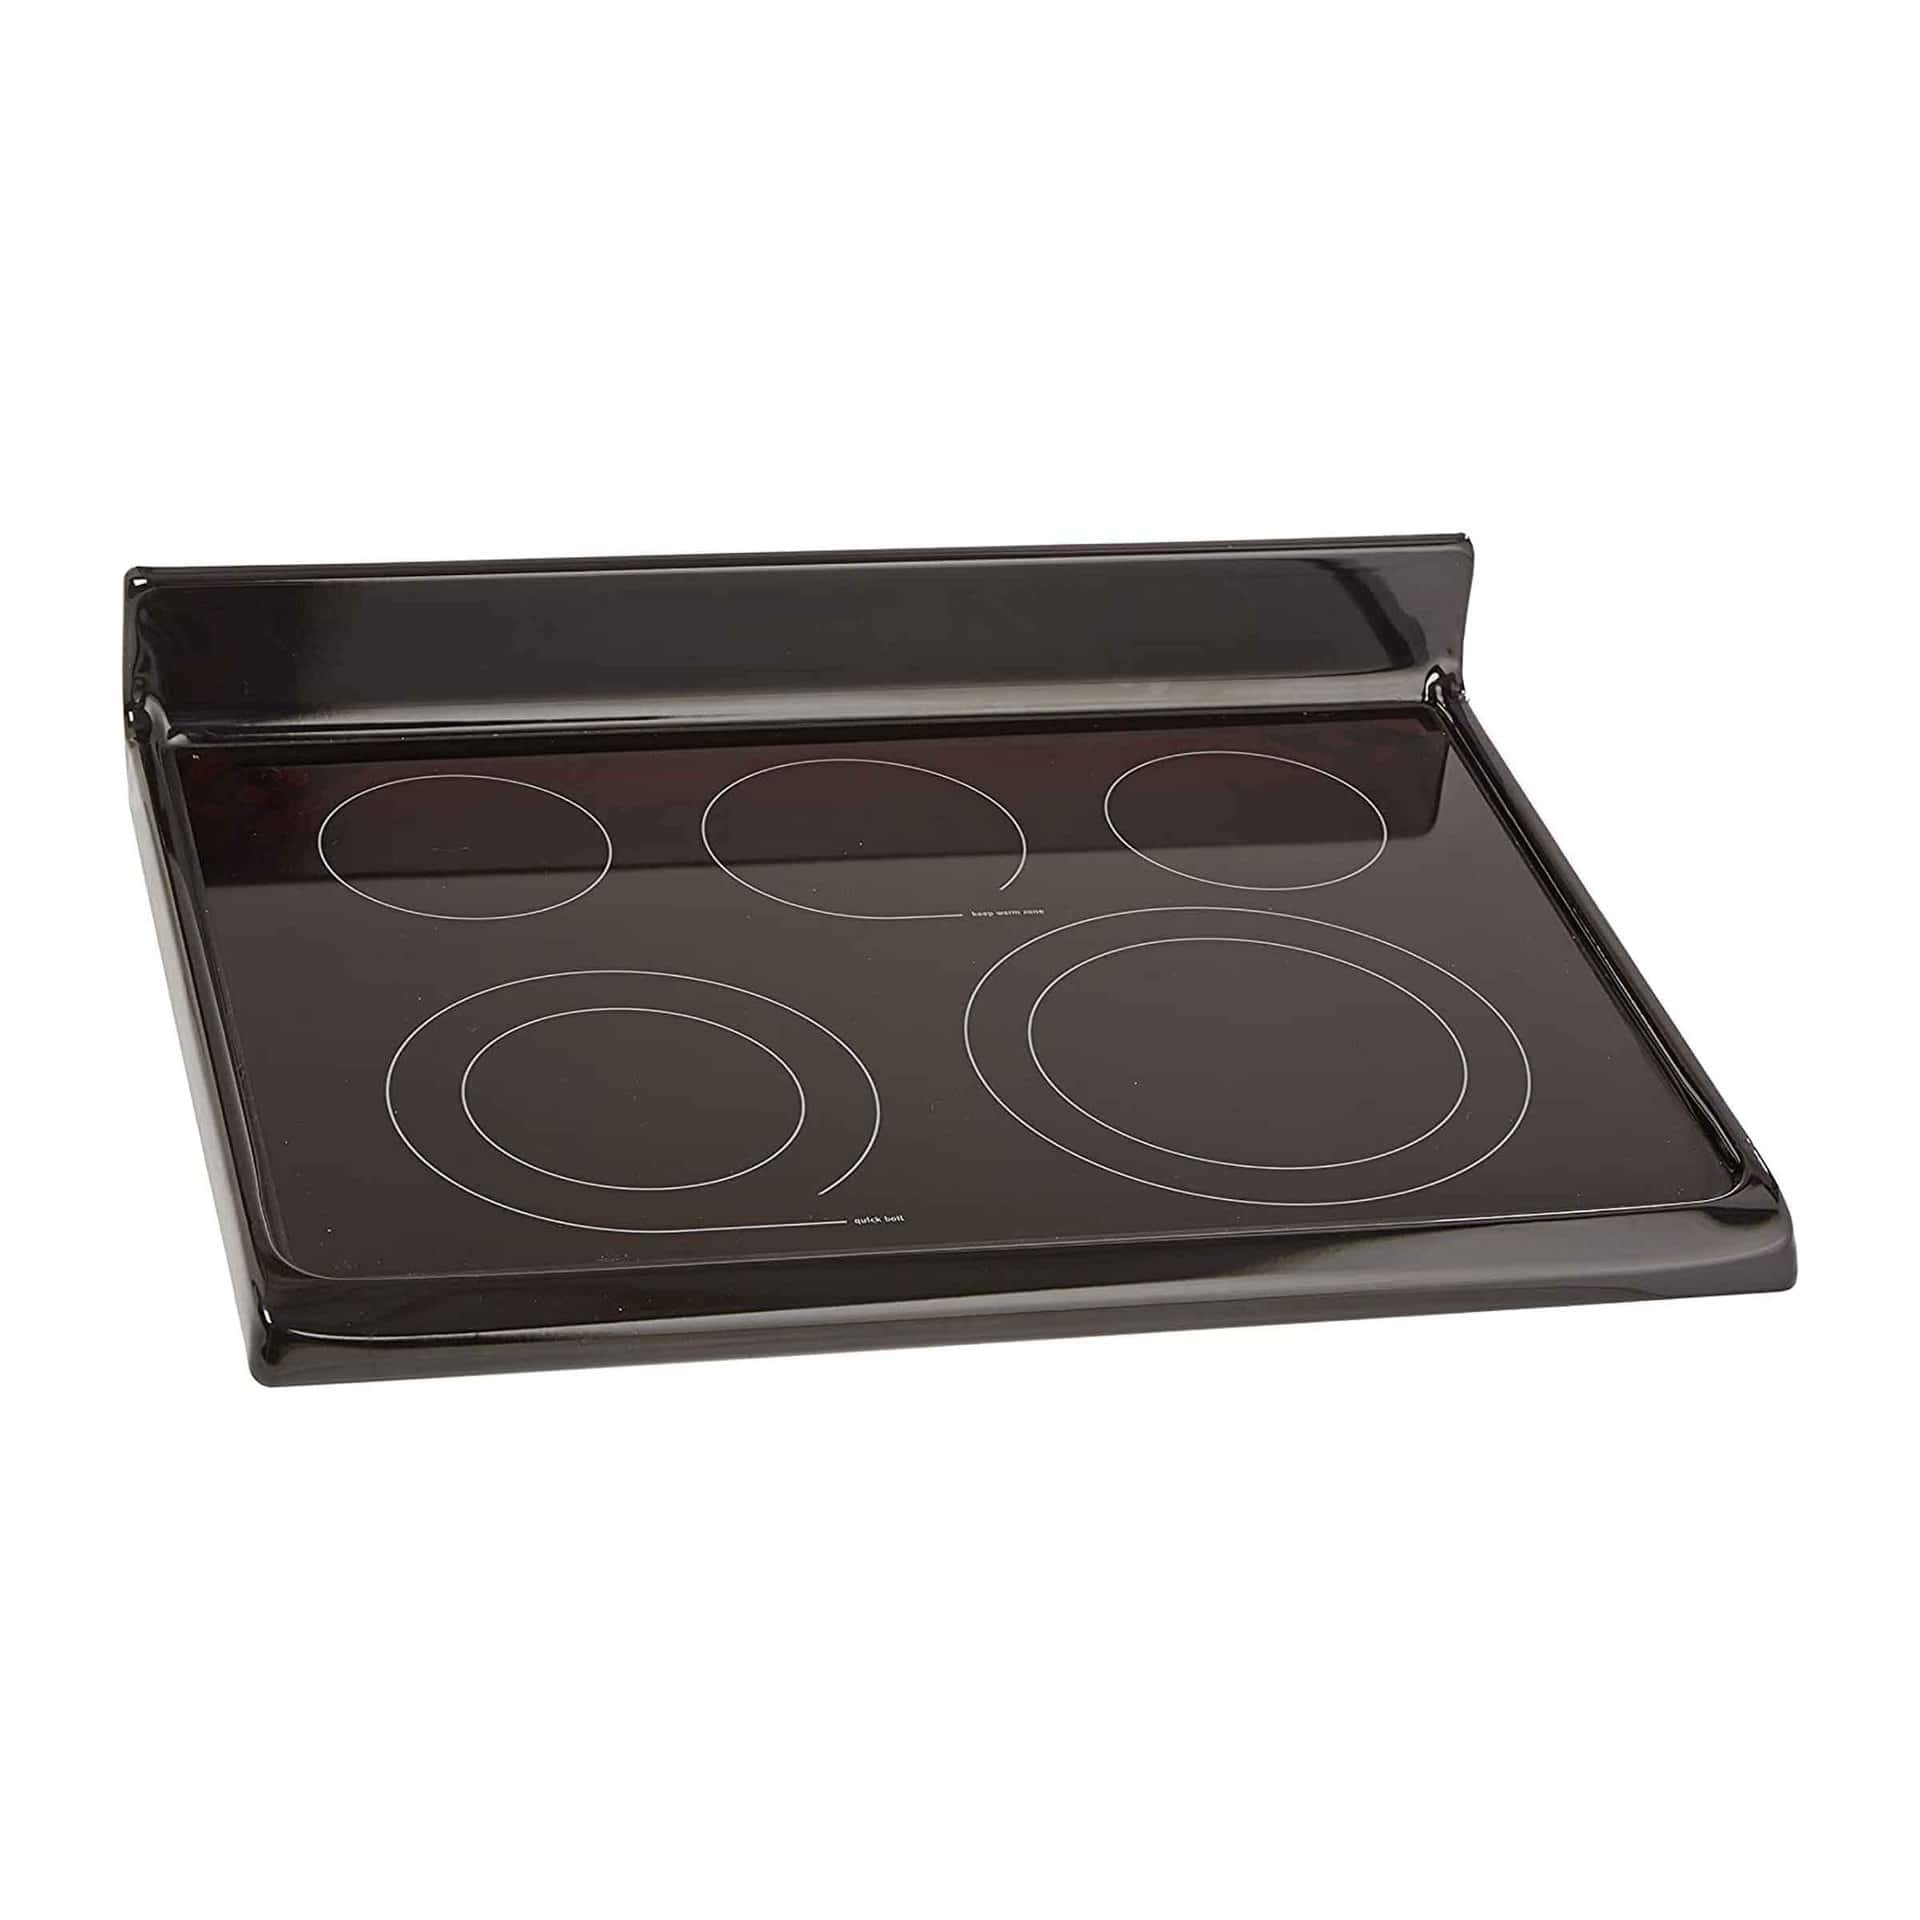
🍳 3. Cleaning a Glass or Ceramic Stove Top
Step 1: Remove loose debris
Wipe away crumbs or burnt bits with a damp cloth.
Step 2: Apply baking soda and vinegar
Sprinkle baking soda over the surface, then spray with white vinegar. Let it bubble for 10–15 minutes.
Step 3: Wipe and polish
Use a soft, damp cloth to wipe clean. For stubborn spots, gently use a razor scraper held at a 45° angle.
Step 4: Buff dry
Finish with a microfiber cloth for a streak-free shine.
(Sources: Lowe’s, SmartHeatHub)
💡 Maintenance Tips
- Wipe spills immediately after cooking to prevent buildup.
- Avoid using abrasive pads that can scratch surfaces.
- Deep clean weekly for best results.
- For glass tops, use a specialty cleaner occasionally to maintain shine.
Key Takeaways
- Start with warm soapy water for all stovetop types, then use specialized cleaners like Weiman glass top cleaner for specific surfaces.
- Soak removable components like gas stove grates and burner caps for at least 20 minutes to loosen stubborn grease and food particles.
- For tough stains on any stovetop, apply a paste of baking soda and vinegar, let it sit, then wipe clean for a sparkling finish.
Understanding Your Stove Top Type
Different stove tops require specific cleaning approaches based on their materials and designs. Knowing your stove type helps you choose the right cleaning methods and products to maintain it properly without causing damage.
Gas Stovetop
Gas stovetops have burners with removable grates and caps that sit above the flame. These components can accumulate food residue and grease quickly during cooking. For daily cleaning, wipe down surfaces with warm soapy water after the stove has cooled completely.
For deeper cleaning, remove the grates and burner caps. Soak them in hot, soapy water for 15-20 minutes. Stubborn buildup may require a paste of baking soda and water.
The burner heads have small holes where gas escapes. These can become clogged with food particles. Use a toothpick or small brush to gently clear these openings for proper flame distribution.
Never submerge the igniter (the small ceramic piece that creates the spark) in water as this can damage it permanently.
Electric Stovetop
Electric stovetops come in several varieties, with the most common being smooth-top and coil designs. Smooth-top electric stoves have heating elements beneath a flat surface, while coil types have exposed heating elements.
For smooth-top electric stoves, wait until the surface is completely cool before cleaning. Use a soft cloth with warm, soapy water for light cleaning. For tougher stains, apply a small amount of cooktop cleaner designed specifically for electric stovetops.
Cleaning tips:
- Never use abrasive scrubbers on smooth electric surfaces
- Avoid sliding pots and pans across the surface to prevent scratches
- Clean spills promptly to prevent baking onto the surface
- Use a plastic scraper at a 45-degree angle for stuck-on foods
Glass and Induction Cooktops
Glass and induction cooktops feature smooth surfaces that require gentle but thorough cleaning methods. Induction cooktops use electromagnetic energy to heat pans directly while the surface stays relatively cool.
Start by wiping the cooktop with a damp microfiber cloth after each use. For stuck-on food, let a hot, damp towel sit on the spot for 10-15 minutes to soften the residue.
Special glass cooktop cleaners can help remove tough stains without scratching. Apply a small amount and rub gently in circular motions.
Avoid these items on glass surfaces:
- Metal scouring pads
- Abrasive powders
- Chlorine bleach
- Ammonia
For persistent stains, a mixture of baking soda and vinegar can be effective. Spread the paste over the stain, let it sit for 15 minutes, then wipe clean.
Coil Stove
Coil stoves have exposed heating elements that spiral above drip pans. These stoves are generally more forgiving when it comes to cleaning but require attention to multiple components.
The coil elements can be gently wiped with a damp cloth when cool. For tougher spots, use a non-abrasive cleaner. Never submerge the coils in water or cleaning solution.
Drip pans catch spills beneath the coils and should be removed regularly for cleaning. Soak them in hot, soapy water or a mixture of vinegar and water to break down grease.
For stubborn buildup on drip pans, make a paste with baking soda and water. Apply it to the stained areas and let it sit for 20 minutes before scrubbing gently.
The stovetop surface around the coils can be cleaned with standard kitchen degreasers or soap and water.
Safety Precautions and Initial Steps
Before tackling a dirty stovetop, it’s essential to follow proper safety procedures and prepare the area correctly. Taking these preliminary steps ensures both your safety and the effectiveness of your cleaning efforts.
Turning Off and Cooling Down
Always begin by turning off your stove completely. For gas stoves, ensure all knobs are in the off position. For electric stoves, switch off at the controls and, if possible, unplug the appliance from the power outlet for extra safety.
Wait until the stovetop has completely cooled down before starting any cleaning. This typically takes 30-60 minutes after use. Attempting to clean a hot surface can lead to:
- Burns or injuries
- Release of toxic fumes when cleaning products contact hot surfaces
- Damage to the stovetop material due to sudden temperature changes
You can check if the surface has cooled sufficiently by carefully holding your hand several inches above the stovetop to detect any residual heat. Never touch the surface directly to test temperature.
Removing Removable Parts
Once the stovetop is cool, remove all detachable components. For gas stoves, this includes:
- Burner grates
- Burner caps
- Control knobs
For electric coil stoves, carefully remove the heating coils if they’re designed to detach. Some electric stovetops have drip pans underneath that should also be removed.
Place all removed parts on newspaper or paper towels to prevent mess. Inspect each part for damage or unusual wear that might indicate it’s not working properly. Replace any damaged components before reassembling the stove.
Wiping Down the Surface
Start with a gentle approach by wiping the entire stovetop with a damp cloth to remove loose debris. Warm, soapy water works well for initial cleaning of all stovetop types.
For stubborn spots, try this technique: place a hot, damp towel over the affected area for 10-15 minutes. The heat and moisture help loosen baked-on residue.
When wiping down gas stoves, be careful around:
- Ignition elements
- Gas ports or holes
- Temperature sensors
Avoid harsh chemicals or abrasive materials that could scratch surfaces or damage components. For glass or ceramic cooktops, use only recommended cleaning products to prevent permanent damage.
Basic Stovetop Cleaning
Keeping your stovetop clean prevents buildup of food residue and maintains your appliance’s appearance and efficiency. Regular cleaning with simple household items can handle most messes without requiring harsh chemicals.
Using Dish Soap and Water
For everyday stovetop cleaning, dish soap and water provide an effective solution. Start by removing any loose debris or food particles from the surface. Mix a few drops of mild dish soap with warm water in a small bowl.
Dip a soft microfiber cloth or damp sponge into the soapy solution and wring out excess water. Gently wipe down the stovetop surface in circular motions, paying special attention to areas with visible spills or grease.
For gas stovetops, remove the grates and burner caps if possible and wash them separately in the soapy water. Be careful around the ignition areas to avoid damage.
Glass cooktops should be cleaned when completely cool. Apply the soapy solution and wipe gently to avoid scratching the surface.
Applying Baking Soda
For stubborn stains and burned-on residue, baking soda offers excellent cleaning power. Sprinkle a generous amount of baking soda directly onto problem areas of the stovetop.
Lightly spray or sprinkle water onto the baking soda to create a paste. Let this mixture sit for 15-20 minutes to loosen the grime.
For particularly tough stains, place a damp towel over the baking soda mixture and let it sit for 10-15 minutes. The moisture and baking soda will help soften even hardened spills.
Use a non-abrasive sponge to gently scrub the paste in circular motions. The mild abrasive quality of baking soda helps lift stains without scratching most surfaces.
Rinsing and Drying
After cleaning with either dish soap or baking soda, it’s important to thoroughly rinse away all cleaning agents. Dampen a clean microfiber cloth with plain water and wipe the entire stovetop surface.
Make multiple passes if necessary to remove all soap or baking soda residue. Any leftover cleaning agents might burn when the stovetop is next used.
Dry the stovetop surface completely using a clean, dry microfiber cloth. This prevents water spots and streaks from forming, especially on glass cooktops.
For gas stovetops, ensure all components are completely dry before reassembling. Check that burner holes are clear and unobstructed. Proper drying prevents rust formation on metal parts and ensures efficient operation.
Tackling Tough Stains and Grease
Stubborn grease and burnt-on residue require special techniques and products to restore your stovetop to its original shine. The right combination of degreasing agents, soaking methods, and targeted stain removal can tackle even the most challenging kitchen messes.
Degreasing Agents
Commercial degreasers offer powerful solutions for grimy stovetops. These products are specifically formulated to break down cooking oils and food residue that accumulate over time. Apply the degreaser directly to the affected areas and allow it to sit for the manufacturer’s recommended time.
For a natural alternative, white vinegar works effectively on grease. Mix equal parts vinegar and water in a spray bottle, apply to the surface, and let sit for 10-15 minutes before wiping. The acidic properties help dissolve stubborn grease.
Baking soda creates an excellent paste when mixed with water. This mild abrasive cuts through grease without scratching surfaces. Dish soap with hot water also provides a simple yet effective degreasing solution for regular maintenance.
Always test any degreasing agent on a small, inconspicuous area first to ensure it won’t damage your specific stovetop material.
Scrubs and Soaks
For particularly stubborn spots, a good soak can loosen hardened residue. Place a hot, damp cloth over the stovetop for 10-15 minutes to steam and soften baked-on messes.
Another effective method involves heating vinegar in the microwave for 3 minutes, then using fabric softener sheets dipped in the warm solution. Let them sit on the problem areas for about 30 minutes before scrubbing.
For scrubbing, use these tools based on your stovetop type:
- Glass/ceramic: Non-abrasive scrubbing pads
- Gas stovetops: Soft brushes for burner areas
- Electric coils: Damp cloth with mild abrasive
Never use steel wool or harsh scouring pads on glass or delicate surfaces as they can cause permanent scratches.
Specialized Stain Removal
For burn marks and carbonized residue, a specialized approach is needed. A plastic scraper or old credit card can safely lift hardened deposits without scratching surfaces.
For glass cooktops, a razor blade held at a 45-degree angle works wonders on stubborn spots. Move in one direction to avoid scratching, and only use on completely cool, flat glass surfaces.
Commercial glass cooktop cleaners contain fine abrasives specifically designed to remove tough stains without damaging the surface. Apply a small amount to the stained area and gently buff with a microfiber cloth.
For discoloration around burners, create a paste using cream of tartar and hydrogen peroxide. Apply to the stained area, let sit for 10 minutes, then wipe clean with a damp cloth. This mixture effectively lifts even the most stubborn discoloration.
Always finish by buffing dry with a clean microfiber cloth to prevent streaking and water spots.
Care for Specific Components
Different parts of your stove need special attention to keep them working well and looking clean. Regular maintenance of each component will extend the life of your stove and prevent cooking mishaps.
Cleaning Grates and Burner Caps
Stove grates and burner caps collect the most food splatter and grease during cooking. Remove these parts when the stove is completely cool. Soak them in warm soapy water to loosen stubborn grime.
For cast iron grates with baked-on food, create a paste using:
- ½ cup baking soda
- 3-4 tablespoons water
Apply this baking soda paste to tough spots and let it sit for 20 minutes. Scrub gently with a non-abrasive sponge to avoid scratching surfaces.
For extremely stubborn residue, place grates in a sealed plastic bag with ¼ cup of ammonia overnight. The fumes will help break down grease without scrubbing. Always rinse thoroughly and dry completely before replacing.
Maintaining Drip Pans and Coils
Electric stove drip pans catch food spills and protect coils from damage. Remove drip pans when cool and wipe away loose debris. For deep cleaning, soak in a solution of equal parts vinegar and water.
For stubborn stains on drip pans:
- Sprinkle with baking soda
- Spray with vinegar solution
- Let bubble for 15 minutes
- Scrub gently with a soft brush
Electric coils should be wiped with a damp cloth when cool. Never submerge coils in water as this can damage electrical components. For non-removable parts, use a hot damp towel. Place it over the area for 10-15 minutes to loosen debris.
Managing Control Knobs and Labels
Control knobs attract grease and food particles that can make them sticky or difficult to turn. Remove knobs by pulling straight out from the stove face. Check your manual first, as some models have special removal instructions.
Wash knobs in warm soapy water using a soft cloth. Avoid soaking for extended periods as this may damage any printed markings or labels.
For stove labels and panels:
- Use a microfiber cloth with mild soap solution
- Never use abrasive cleaners which can remove printed text
- For stubborn spots, try a 50/50 vinegar-water solution
- Dry completely to prevent water spots
For hard-to-reach areas around fixed knobs, dip a cotton swab in rubbing alcohol and carefully clean around the base. This helps dissolve grease without damaging the control panel surface.
Advanced Techniques for Stubborn Residues
When regular cleaning methods fail, specialized approaches can tackle those hardened, burnt-on messes that seem impossible to remove. These techniques require extra caution but deliver remarkable results for the toughest stove top challenges.
Using Ammonia for Burnt Food
Ammonia works wonders on stubborn burnt food residue due to its powerful degreasing properties. For removable elements like burner grates or drip pans, place them in a sealed plastic bag with 1/4 cup of ammonia overnight. The fumes—not the liquid itself—break down the grime.
Safety precautions:
- Always work in a well-ventilated area
- Never mix ammonia with bleach or other cleaners
- Wear gloves to protect skin
- Keep away from children and pets
For glass stovetops, dampen a cloth with a small amount of diluted ammonia (1:2 ratio with water). Apply to burnt areas for 5-10 minutes before wiping clean. Follow up with a vinegar and baking soda treatment to neutralize any ammonia residue.
Implementing Razor Techniques
A razor scraper can effectively remove baked-on residue from glass and ceramic stovetops without scratching. This method works best on completely cool surfaces.
Hold the scraper at a 45-degree angle and apply gentle, consistent pressure. Work in small sections, moving the blade in one direction rather than back and forth. Keep the surface slightly damp to prevent scratching.
For particularly stubborn spots, apply a specialized glass-ceramic cleaner first and let it sit for 5-10 minutes. This softens the residue, making scraping easier and more effective. Replace razor blades regularly for the best results and safety.
Caution: Never use razor scrapers on non-glass surfaces as they can cause permanent damage.
Metal Utensil Alternatives
When razor scrapers seem too aggressive, several alternatives can safely remove stubborn residue. A plastic scraper provides good leverage without risking surface scratches. Many are specifically designed with curves and angles that fit stove contours.
For textured surfaces, steel wool pads (grade 0000 only) can be effective when combined with appropriate cleaners. The ultra-fine steel wool conforms to surface irregularities while minimizing scratch risk.
Silicone scrapers offer another gentle option. Their flexible edges can reach tight spots while their heat resistance handles warm residue. For cast iron grates, a copper mesh cleaner provides abrasion without damage.
Best practices:
- Test any tool on an inconspicuous area first
- Apply minimal pressure initially
- Use proper cleaning agents alongside tools
- Follow up with recommended stove top cleaner to restore shine
Finishing Touches for a Polished Look
After the deep cleaning process, these final steps will elevate your stove top from merely clean to professionally maintained. A truly polished stove top enhances the entire kitchen’s appearance and prevents future buildup.
Buffing for a Streak-Free Finish
The secret to a streak-free shine lies in the buffing technique and materials used. Microfiber towels are superior to paper towels for this final step, as they don’t leave lint or streaks behind.
Apply a small amount of cook-top cleaner or polish to the smooth surface of your stove. Use circular motions when buffing, working from the outside edges toward the center.
For glass cook tops, a mixture of white vinegar and water (1:1 ratio) in a spray bottle works excellently for that final shine. Spray lightly and buff immediately with a dry microfiber towel.
Always buff when the surface is cool but not cold. Room temperature is ideal as it prevents the cleaning agents from drying too quickly and leaving streaks.
Replacing Worn Elements
Burner grates and drip pans that remain discolored or damaged even after cleaning should be replaced rather than becoming an eyesore in your kitchen.
Most replacement parts are inexpensive and dramatically improve the stove’s appearance. Standard drip pans typically cost between $10-20 for a complete set.
When selecting replacements, bring the old parts to ensure proper sizing or note the make and model of your stove. Manufacturer-specific parts maintain the best fit and appearance.
For electric coil stoves, consider replacing the reflector bowls every 1-2 years depending on use. This prevents the unsightly blackened look that persistent food burns can cause.
Chrome drip pans maintain their shine longer when treated with a thin layer of car wax after cleaning (ensure they’re completely dry first).
Final Inspection for Appearance
Examine your stove top under different lighting conditions to identify any missed spots or streaks. Overhead kitchen lights can hide imperfections that become visible from other angles.
Check control knobs and the front panel for fingerprints or grease splatter that might have been overlooked. These areas significantly impact overall appearance but are often neglected.
Inspect around the burners or heating elements for any remaining debris. Use a soft cloth to remove any particles that might have fallen during the cleaning process.
For gas stoves, ensure the burner heads and caps are properly aligned after cleaning. Misalignment not only looks unprofessional but can cause uneven heating and cooking problems.
Stand back and view your stove from across the room—this broader perspective helps identify any areas needing additional attention before considering the job complete.
Preventative Measures for Future Cleanliness
Keeping your stove top clean is easier when you prevent messes from building up in the first place. Wiping down your stovetop daily with warm water and a small amount of dish soap helps control messes before they become stubborn stains.
For best results, homeowners should clean spills as soon as they happen. This prevents food from hardening and becoming difficult to remove later. When cooking, using splatter guards can minimize the mess from sauces and oils.
Quick Clean-Up Kit
- Microfiber cloths
- All-purpose cleaner
- Baking soda
- Spray bottle with vinegar solution
- Paper towels for immediate spills
Regular maintenance is recommended by appliance experts. After each cooking session, wait until the stove top has cooled and wipe it with a damp cloth to remove crumbs and loose debris.
Effective spill management involves promptly addressing accidents. For fresh spills on a cool surface, a paper towel works well. On warm surfaces, using a heat-resistant tool to carefully remove food prevents further cooking onto the surface.
Creating a cleaning schedule helps maintain cleanliness. Weekly deep cleaning prevents buildup and keeps the stove looking new. The Home Depot recommends incorporating stove cleaning into regular kitchen routines.
Consider applying a protective product designed for your stove type. This creates a barrier that makes future cleaning easier and helps prevent staining on glass and ceramic surfaces.
Frequently Asked Questions
Cleaning your stove top properly requires different approaches depending on the type of surface and kind of mess. Below are answers to common questions about tackling various stove cleaning challenges.
What is the most effective method for cleaning gas stove tops?
Gas stove tops need regular attention to prevent food and grease buildup. First, remove the grates and burner caps when the stove is completely cool. Soak these parts in warm, soapy water while cleaning the surface.
Wipe the stove surface with a damp microfiber cloth to remove loose debris. For stubborn spots, make a paste with baking soda and water and let it sit for 15-20 minutes before scrubbing gently with a non-abrasive sponge.
After cleaning, thoroughly dry all components before reassembling to prevent rust and ensure proper ignition.
How can you clean burnt-on grease from a stove top?
Burnt-on grease requires extra effort but can be removed without damaging your stove. Apply a mixture of dish soap and warm water to the affected area and let it sit for about 15 minutes to soften the grease.
For persistent grease, create a paste with baking soda and water, apply it to the problem areas, and cover with a damp cloth for 30 minutes. The baking soda helps break down the burnt residue.
Use a plastic scraper at a 45-degree angle to gently lift away softened grease without scratching the surface. Finish by wiping clean with a damp cloth.
What are the steps to clean stove top burners?
Begin by removing the burners once they have completely cooled. For electric coil burners, disconnect them from the stove. Shake off loose debris over the trash.
Soak removable parts in warm water with dish soap for 20-30 minutes. Use an old toothbrush to scrub around crevices and ports where food might be stuck.
For gas burners, ensure all ports are clear of debris to allow proper gas flow. A small pin or paperclip can help dislodge any clogs. Rinse thoroughly and allow all parts to dry completely before reinstalling.
How should you use baking soda to clean a stove top?
Baking soda is a versatile, non-toxic cleaner perfect for stove tops. Create a cleaning paste by mixing baking soda with just enough water to form a spreadable consistency.
Apply this paste to problem areas and let it sit for 15-30 minutes. The alkaline nature of baking soda helps break down grease and food residue without scratching surfaces.
For enhanced cleaning power, spray white vinegar over the baking soda paste to create a fizzing reaction. This combination helps lift stubborn stains with minimal scrubbing needed afterward.
What techniques are recommended for cleaning glass stove tops?
Glass stove tops require special care to avoid scratches. Wait until the surface is completely cool before cleaning. Remove loose debris with a soft microfiber cloth dampened with water.
For regular cleaning, use a cleaner specifically designed for glass cooktops or a solution of mild dish soap and warm water. Apply with a non-abrasive sponge using circular motions.
For burnt-on spills, use a glass cooktop scraper at a 45-degree angle to carefully remove hardened residue. Follow with a specialized glass cooktop cleaner for shine and protection.
What cleaning solutions work best on black stove tops?
Black stove tops show water spots and fingerprints easily but can look stunning when properly maintained. Avoid abrasive cleaners that may scratch the surface and dull the finish over time.
A solution of equal parts white vinegar and water works well for daily cleaning and helps prevent streaking. Apply with a microfiber cloth, which traps dust and debris without scratching.
For deeper cleaning, commercial products specifically formulated for dark surfaces provide good results. Wipe in the direction of the grain (if applicable) and buff dry with a clean microfiber cloth to prevent water spots.