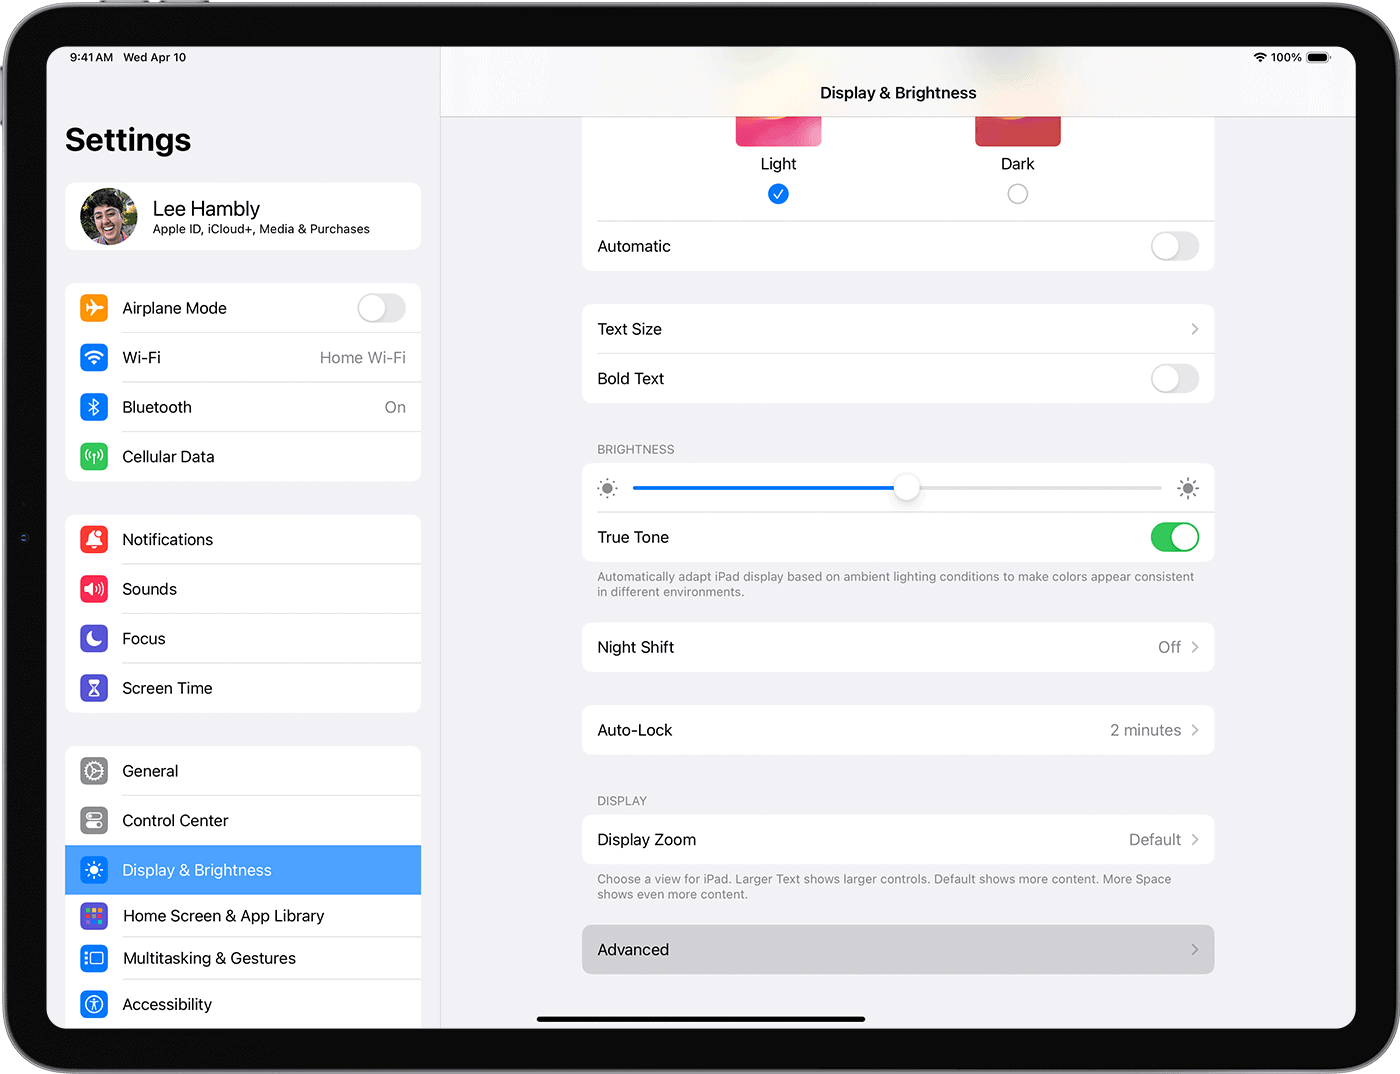
iPad screen calibration ensures optimal touch response and display accuracy. To calibrate your iPad screen, go to Settings > Display & Brightness, turn off True Tone, tap Color, then select Calibrate Display and follow the on-screen instructions. This process adjusts color balance and touch sensitivity for a better viewing experience.
Regular calibration keeps your iPad screen performing at its best. It helps with color accuracy, touch responsiveness, and overall display quality. Users may notice improved app performance and a more enjoyable interaction with their device after calibration.
For users experiencing persistent touch issues, enabling AssistiveTouch can provide a workaround. This accessibility feature offers additional options to fine-tune screen responsiveness. Remember to check for available iOS updates, as they often include fixes for screen-related problems.
Fine-Tuning Your iPad Display: A Guide to Calibration
While iPads generally have excellent displays, you might occasionally find that the colors seem a bit off or the touch sensitivity isn’t quite right. Calibrating your iPad’s screen can help improve these issues and ensure you’re getting the best possible visual and touch experience.
1. Check for Software Updates
Before you start calibrating, make sure your iPad is running the latest version of iPadOS. Software updates often include display improvements and bug fixes.
- Go to Settings > General > Software Update.
- If an update is available, download and install it.
2. Adjust Display Settings
iPadOS offers several settings that can affect your display’s appearance.
- Brightness: Adjust the brightness to a comfortable level for your environment. You can do this in Settings > Display & Brightness or using Control Center.
- True Tone: This feature automatically adjusts the display’s color temperature based on ambient lighting. You can enable or disable it in Settings > Display & Brightness.
- Night Shift: This feature shifts the display’s colors to the warmer end of the spectrum at night, which can help reduce eye strain. You can schedule it or turn it on manually in Settings > Display & Brightness.
3. Calibrate Touch Sensitivity
If you’re experiencing issues with touch sensitivity, you can recalibrate the touchscreen.
- Go to Settings > Accessibility > Touch > Touch Accommodations.
- Turn on “Touch Accommodations” and adjust the settings as needed. You can experiment with different options like “Hold Duration” and “Ignore Repeat” to fine-tune the touch response.
4. Color Calibration for Professionals
For professionals who require precise color accuracy, there are advanced calibration tools available.
- Colorimeter: A colorimeter is a device that measures the colors on your display. You can use it with calibration software to create a custom color profile for your iPad.
- Calibration software: Several apps and software programs are available for iPad color calibration. These tools allow you to fine-tune the display’s color accuracy and create custom profiles.
5. Resetting Display Settings
If you’ve made changes to your display settings and are unhappy with the results, you can reset them to the default values.
- Go to Settings > General > Transfer or Reset iPad > Reset > Reset All Settings.
- This will reset all your settings, including display settings, to their default values.
Display Calibration Tips
| Tip | Description |
|---|---|
| Update iPadOS | Ensure your iPad is running the latest software version for optimal display performance. |
| Adjust brightness and color temperature | Use the built-in display settings to adjust brightness, True Tone, and Night Shift to your preferences. |
| Calibrate touch sensitivity | Use Touch Accommodations to fine-tune the touch response if you’re experiencing touch accuracy issues. |
| Use professional tools (if needed) | For professional color calibration, consider using a colorimeter and calibration software. |
| Reset display settings | If you’re not happy with your display adjustments, you can reset all settings to their defaults. |
By following these steps, you can calibrate your iPad’s screen to ensure it’s displaying colors accurately and responding to your touch as expected. This can enhance your viewing experience and make your iPad even more enjoyable to use.
Key Takeaways
- Screen calibration improves color accuracy and touch sensitivity
- Regular calibration enhances overall iPad performance and user experience
- AssistiveTouch offers extra options for touch responsiveness issues
Understanding iPad Screen Calibration
iPad screen calibration improves color accuracy and touch responsiveness. It helps ensure the display shows images and colors as intended by app developers and content creators.
Benefits of Screen Calibration
Screen calibration enhances the iPad user experience in several ways. It improves color accuracy, making photos and videos look more true-to-life. This is especially important for photo editing and graphic design work.
Calibration also optimizes brightness levels for different lighting conditions. This reduces eye strain during extended use and helps conserve battery life.
For tasks requiring precise touch input, calibration fine-tunes the screen’s responsiveness. This leads to more accurate taps and gestures when using apps or playing games.
Properly calibrated screens can also improve text readability. This is particularly helpful for users who read a lot on their iPads.
Prerequisites for Calibration
Before calibrating an iPad screen, a few preparations are necessary. First, ensure the iPad is running the latest version of iPadOS. Newer software often includes display improvements and bug fixes.
Clean the screen thoroughly to remove any smudges or debris that could affect calibration. Use a soft, lint-free cloth for best results.
Find a well-lit room with consistent lighting. Avoid areas with direct sunlight or strong shadows, as these can skew color perception.
Allow the iPad to warm up for about 30 minutes before starting. This helps stabilize the display’s color output.
Close all background apps to prevent interruptions during the calibration process. This ensures the most accurate results.
Frequently Asked Questions
iPad screen calibration issues can be frustrating, but many common problems have simple solutions. Here are answers to some of the most frequently asked questions about iPad screen calibration.
How can I recalibrate the touchscreen on my iPad?
To recalibrate your iPad’s touchscreen, start by cleaning the screen with a soft, lint-free cloth. Then, go to Settings > Display & Brightness > True Tone and turn it off. Next, tap Color > Calibrate Display and follow the on-screen instructions.
What steps are involved in resetting screen calibration on an iPad?
Resetting screen calibration on an iPad involves force restarting the device. For iPads with a Home button, press and hold the top button and Home button until the Apple logo appears. For iPads without a Home button, quickly press and release the volume up button, then the volume down button, and finally hold the top button until the Apple logo shows.
Why does the screen calibration prompt keep appearing on my iPad?
The screen calibration prompt may keep appearing due to a software glitch or an outdated app. Try updating your iPad’s operating system and all installed apps. If the issue persists, delete and reinstall the problematic app or perform a factory reset as a last resort.
How do I adjust the sensitivity of the touchscreen on my iPad?
iPads don’t have a built-in setting to adjust touchscreen sensitivity. However, users can try these workarounds:
- Clean the screen thoroughly
- Remove any screen protectors
- Use a stylus for more precise input
- Adjust accessibility settings like AssistiveTouch for easier navigation
What is the proper method to calibrate the compass on an iPad?
To calibrate the compass on an iPad:
- Open the Compass app
- Move away from magnetic interference
- Tilt and rotate the iPad in a figure-eight motion until calibration is complete
This process helps the iPad’s sensors accurately determine its orientation and location.
Why is the auto-rotate feature on my iPad not functioning correctly?
If auto-rotate isn’t working on an iPad, check these potential causes:
- Ensure the rotation lock is off in Control Center
- Restart the iPad
- Update to the latest iOS version
- Check if the app supports rotation
- Test the accelerometer by using other rotation-dependent features
If problems persist, contact Apple Support for further assistance.


