Creating characters in Clip Studio Paint doesn’t have to be complicated. Whether you’re a beginner or experienced artist, this powerful digital art software offers all the tools you need to bring your imagination to life. You can create stunning character illustrations in Clip Studio Paint by following a simple six-step process that includes sketching, linework, base colors, shading, details, and final touches.
Many artists find character design challenging, but breaking it down into manageable sections makes the process enjoyable. Clip Studio Paint shines with its intuitive brush customization and specialized character tools that help you design everything from cartoon characters to realistic portraits. The software’s material library also gives you access to pre-made elements that can speed up your workflow.
How to Create a Character Illustration in Clip Studio Paint
Creating a character illustration in Clip Studio Paint is a rewarding process that combines creativity, technical skills, and an understanding of digital tools. Whether you’re aiming for a polished concept design or a dynamic full-color illustration, Clip Studio Paint offers everything you need. Here’s a step-by-step guide to help you bring your character to life.
Step 1: Set Up Your Canvas
Start by creating a new file. Your canvas size will depend on your end goal, but here are some tips to keep in mind:
- Resolution: 300 dpi (dots per inch) is standard for high-quality prints. If you’re working for the web, 72 dpi is enough, but it’s better to work at a higher resolution and scale down later.
- Canvas Size: 2000×3000 pixels is a good starting point for character illustrations, giving you enough room for details without slowing your system down.
Create a New Canvas:
- Go to File > New.
- Set the Width and Height.
- Choose Resolution (300 dpi recommended).
- Select Color as RGB for digital or CMYK if you’re planning to print.
Step 2: Sketch the Concept
Begin with a loose sketch to establish the character’s pose, proportions, and basic design. Don’t worry about details yet—this stage is about brainstorming.
Tools to Use:
- Pencil Tool: Try the “Rough Pencil” or “Darker Pencil” brushes for a traditional feel.
- Stabilization: Increase stabilization in the tool settings if you want smoother lines.
Tips:
- Use simple shapes to block out the body: circles for joints, cylinders for limbs.
- Focus on gesture and flow rather than perfection. Capture movement and personality.
- Keep everything on a separate layer, labeling as you go. You’ll thank yourself later.
Step 3: Refine the Line Art
Once your rough sketch is solid, lower its opacity and create a new layer on top for your clean lines.
Inking Techniques:
- Pen Tool: The “G-Pen” or “Turnip Pen” are popular for clean, consistent lines.
- Vector Layers: Consider inking on a vector layer. This allows you to adjust lines without losing quality and use tools like “Correct Line” or “Simplify Line.”
Line Art Tips:
- Vary your line weight. Thicker lines for outer contours, thinner lines for inner details, to give depth and emphasis.
- Clean up messy edges with the Eraser Tool or Vector Eraser.
Step 4: Base Colors (Flatting)
With your line art done, it’s time to add flat colors beneath it.
How To:
- Create a new raster layer underneath your line art.
- Use the Fill Tool (Refer to Other Layers) to quickly fill closed areas.
- For open line art, use the Lasso Tool to manually select areas and fill them.
- Organize different parts (skin, clothes, hair) into separate layers or folders.
Helpful Features:
- Auto Select (Magic Wand): Quickly selects areas based on line art.
- Close Gap Option: Lets the fill tool ignore small gaps in your lines.
Step 5: Add Shadows and Highlights
Once the base colors are set, add dimension through shading and highlights.
Process:
- Create a new layer above your flats and set it to Multiply for shadows.
- Pick a neutral color for shading (like a dark purple or brown) and use a soft brush for subtlety or a hard-edged brush for cel shading.
- Create another layer for highlights, and set it to Add (Glow) or Overlay for light effects.
Lighting Tips:
- Decide on a light source early and stay consistent.
- Use cooler shadows and warmer highlights to add contrast and visual interest.
Step 6: Add Details and Textures
Now’s the time to push the illustration further by adding small details that make your character pop.
Ideas:
- Hair Strands: Add individual strands or highlight streaks for texture.
- Fabric Texture: Use Clip Studio’s built-in materials or custom brushes to add patterns.
- Eye Details: Eyes can make or break a character. Add extra reflections, gradients, and slight texture to give them life.
Step 7: Final Touches and Effects
Polish your work by adding effects that tie the illustration together.
Common Effects:
- Gradient Maps: Adjust the overall color tone and mood. Go to Layer > New Correction Layer > Gradient Map.
- Glow Effects: Add a new layer set to Add (Glow) for magical or sci-fi touches—great for eye shines or energy effects.
- Screen Tones: For manga-style illustrations, Clip Studio Paint offers screentones you can overlay for stylistic flair.
Background:
- Even a simple gradient or abstract shape can help focus attention on your character.
- Use blur effects on the background to create a sense of depth (Gaussian Blur works well).
Step 8: Export Your Illustration
When you’re satisfied with your work, it’s time to save and export it.
How To Export:
- Go to File > Export (Single Layer) > PNG or JPEG.
- Choose PNG for the highest quality with transparency or JPEG for compressed files.
- Make sure to save a .clip file as your working file with all layers intact.
Pro Tips for Character Illustration in Clip Studio Paint
- Use Reference: Keep anatomy, clothing, and lighting references nearby.
- Brush Settings: Customize brushes to suit your style. Small tweaks can make a big difference.
- Color Palette: Limit your palette early on. Start with 3-5 key colors and build from there to maintain harmony.
- Backup Often: Save multiple versions of your work. Nothing kills creativity faster than losing hours of progress.
With practice and patience, Clip Studio Paint becomes a powerful ally for creating stunning character illustrations. Don’t rush the process—every step from sketching to final effects adds something important to the final piece. Experiment, push your style, and most importantly, have fun with it.
Key Takeaways
- You can create professional character illustrations by following a structured approach that builds from sketch to finished artwork.
- Clip Studio Paint offers specialized brushes and tools designed specifically for character creation that simplify the illustration process.
- Breaking down characters into basic shapes and working in organized layers makes complex designs more manageable for artists of any skill level.
Getting Started with Clip Studio Paint
Clip Studio Paint offers a powerful yet beginner-friendly environment for creating character illustrations. The software provides specialized tools that make the digital art process smooth and enjoyable.
Understanding the Interface
When you first open Clip Studio Paint, you’ll notice several key areas. The toolbar on the left contains your drawing tools like pencils, brushes, and erasers. At the top, you’ll find menu options and property settings for your selected tools.
The right side houses important panels including Layer, Color, Tool Property, and Sub Tool panels. You can customize this workspace by dragging panels to new positions or using Window > Workspace to select preset arrangements.
The Command Bar at the top provides quick access to common functions like save, undo, and zoom. For beginners, the “Beginner” workspace is recommended as it organizes essential tools in an accessible layout.
Don’t feel overwhelmed by all the options. Focus on mastering basic navigation first – panning with the hand tool and zooming with Ctrl+mouse wheel.
Setting Up Your Canvas
Starting a new illustration begins with creating the right canvas. Go to File > New or press Ctrl+N to open the New Canvas dialog.
For character illustrations, consider these settings:
- Canvas size: At least 2000-3000 pixels on the longest side
- Resolution: 300 DPI for print, 72-150 DPI for web only
- Color mode: RGB for digital display, CMYK for print
- Paper color: White or transparent depending on your needs
Create a proper layer structure from the beginning. Start with a Raster Layer for your sketch, then add separate layers for linework, base colors, shading, and highlights.
Enable the Stabilization feature (found in the Tool Property panel) to help smooth your lines when drawing. For digital painting, experiment with different brushes in the Sub Tool panel to find ones that suit your style.
Character Design Fundamentals
Creating compelling characters in Clip Studio Paint starts with understanding key design principles. These fundamentals will help your characters stand out while maintaining visual appeal and storytelling effectiveness.
Developing Character Concepts
Begin your character design by creating rough sketches that explore different ideas. Think about who your character is and what story they tell.
Consider these elements when developing your concept:
- Personality traits: How do they influence physical appearance?
- Background story: What experiences shaped them?
- Function: What role does this character serve in your world?
Try using Clip Studio Paint’s brush customization to create variety in your concept sketches. The software offers specialized brushes for character design that can help you explore different styles quickly.
A useful approach is breaking characters into three main sections: head, torso, and legs. This helps maintain proper proportions while you develop your concept.
Importance of Silhouettes
Strong silhouettes make characters instantly recognizable. In Clip Studio Paint, create a new layer and fill it with black beneath your character to check your silhouette’s readability.
Your character should be identifiable from their outline alone. Test this by:
- Reducing your design to a black shape
- Viewing it at different sizes
- Comparing it against other characters
Orthographic drawings can help you maintain consistent silhouettes from multiple angles. Create front, side, and three-quarter views to ensure your character remains visually interesting from all perspectives.
Use Clip Studio Paint’s vector layers for silhouette work—they allow easy editing without losing quality when you make adjustments.
Choosing Appropriate Colors
Color selection dramatically impacts how viewers perceive your character. Clip Studio Paint’s color tools make it easy to experiment with different palettes.
When choosing colors:
- Use color psychology: Reds for passionate characters, blues for calm ones
- Limit your palette: 3-5 main colors create cohesion
- Consider contrast: Ensure colors read well against various backgrounds
Try using the color wheel feature to find complementary or analogous color schemes. For unique characters, experiment with hybrid design techniques that combine unexpected color combinations.
Create color variations on separate layers to easily compare options. The software’s layer blending modes can help you visualize how colors interact before finalizing your design.
Sketching Your Character
The foundation of any great character illustration begins with a solid sketch. This crucial first step allows you to explore ideas and establish proportions before committing to final details.
Rough Sketching Techniques
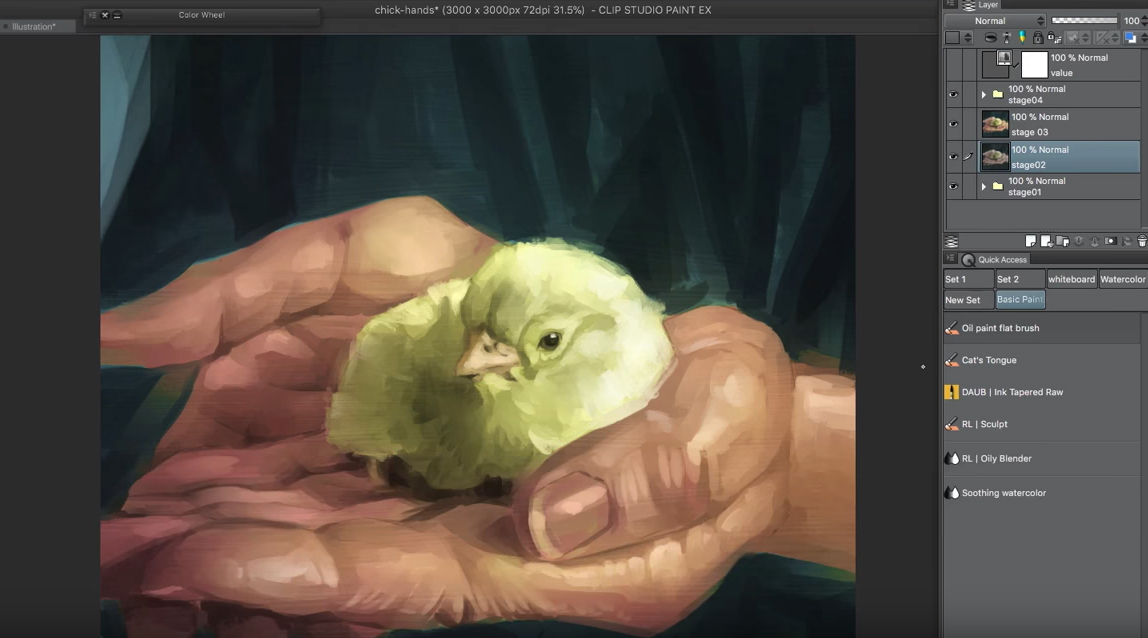
Start by creating a new raster layer in Clip Studio Paint and label it “rough sketch.” Select a light blue or red pencil tool to make erasing easier later. Keep your strokes loose and gestural, focusing on capturing the overall pose and silhouette rather than details.
Try using the Symmetrical Ruler tool if your character needs perfect symmetry. You can activate this by going to Rule → Symmetrical Ruler and placing it vertically through your canvas. This helps ensure balanced facial features and body proportions.
Draw basic shapes to form the character’s structure – circles for the head, rectangles for the torso, and cylinders for limbs. Don’t worry about perfect lines at this stage.
Experiment with multiple rough sketches on separate layers to explore different poses and expressions before settling on your favorite.
Refining the Sketch
Once you’re satisfied with your rough sketch, create a new raster layer above it and reduce the opacity of your rough layer to about 30%. This creates a light blueprint to work from.
Select a darker pencil tool with slightly more precision for your refined sketch. Trace over your rough guide with more confident, cleaner lines that define your character’s features and clothing details.
Pay special attention to the face, as it communicates your character’s personality. Define the eyes, nose, and mouth with greater precision.
Use the Clip Studio Paint vector tools for particularly clean linework if needed. The vector eraser makes adjustments easier without damaging surrounding lines.
Check your proportions by flipping the canvas horizontally (Edit → Flip Horizontally). This fresh perspective helps you spot asymmetry issues you might have missed.
Adding Details and Textures
Adding fine details and textures is what brings your character illustration to life in Clip Studio Paint. The right details can transform a flat drawing into an artwork with depth and personality.
Using the Symmetrical Ruler
The Symmetrical Ruler in Clip Studio Paint is a powerful tool for creating balanced character designs. To activate it, select the Ruler tool from the toolbar and choose “Symmetrical Ruler” from the Tool Property palette.
Once activated, you can adjust the center line by dragging its endpoints. This creates a mirror effect where anything you draw on one side automatically appears on the other side.
For character faces, position the line vertically down the center. For clothing or armor designs, you can use multiple symmetry lines at different angles.
You can temporarily disable the ruler by holding the Shift key while drawing. This is useful when you want to add asymmetrical details like hair strands or scars that make your character more unique and realistic.
Remember to create initial concept sketches before applying symmetry to ensure your character’s overall pose works well.
Detailing with Brushes and Textures
Clip Studio Paint offers numerous ways to add texture and depth to your illustrations. Start by organizing your layers properly—keep details on separate layers from base colors for easier editing.
For skin textures, try using a soft airbrush with low opacity to build up subtle variations. Hair details benefit from specialized brushes that mimic strands.
To add fabric textures to clothing, you can:
- Use pattern brushes for regular designs
- Apply the Texture overlay feature (found in Layer Properties)
- Import custom textures as new layers
For a traditional media look, consider adding paper textures before coloring. This gives your digital art warmth and character that purely digital work sometimes lacks.
You can also use the texture tools to add dimension to backgrounds, clothing wrinkles, and environmental elements that surround your character.
Line Art and Coloring
Moving from sketches to finished illustrations requires mastering both line art and coloring techniques. These steps transform your basic character design into a polished digital artwork with depth and personality.
Creating Clean Line Art
Line art forms the foundation of your character illustration in Clip Studio Paint. To create clean lines, start by reducing the opacity of your sketch layer and create a new layer above it for your final lines.
Select a pen tool with stabilization settings that match your drawing style. Clip Studio Paint offers various pen options that can help steady your hand as you work. Adjust the stabilization between 5-15 depending on how much smoothing you need.
Work systematically when inking your character:
- Start with outlines of the main shapes
- Move to facial features and important details
- Finish with smaller elements like hair strands and clothing details
Use different line weights to create depth—thicker lines for the character’s outer edges and thinner lines for internal details. This technique helps direct the viewer’s eye and adds dimension to your illustration.
Applying Base Colors
After completing your line art, it’s time to add base colors to your character design. Create a new layer beneath your line art layer and set it to “Normal” blending mode.
The bucket fill tool works perfectly for applying flat colors to enclosed areas. Make sure your line art has no gaps to prevent color leakage. For complex areas, try using the lasso fill method—select an area with the lasso tool and fill it with your chosen color.
Organize your colors logically:
- Start with skin tones
- Add hair color
- Color clothing and accessories
- Finally, add any background elements
Create a harmonious color palette by limiting your selection to 3-5 main colors plus variations. You can use Clip Studio Paint’s color wheel to select complementary or analogous color schemes that enhance your character’s personality and theme.
Shading and Highlight Techniques
Adding shadows and highlights brings your character to life by creating volume and dimension. Start by deciding on a light source direction—this determines where all your shadows and highlights will appear.
Create a new layer above your base colors and set it to “Multiply” for shadows or “Overlay” for highlights. Use a soft brush with low opacity (15-30%) to gradually build up your shading effects.
For a stylized look, try these shading approaches:
- Cell shading: Clean, defined shadow edges popular in anime styles
- Soft shading: Gradual transitions between light and shadow
- Textured shading: Using custom brushes to add interesting shadow textures
When adding highlights, focus on areas that would naturally catch the light: cheekbones, nose tip, metal objects, glossy hair sections, and reflective surfaces. Many artists recommend working from dark to light, adding your brightest highlights last for maximum impact.
Remember to consider the material properties of different elements—skin, fabric, metal, and hair all reflect light differently and require unique shading approaches.
Integrating 3D Elements
3D elements can transform your character illustrations in Clip Studio Paint. These tools save time and help achieve accurate proportions while maintaining artistic freedom.
Utilizing 3D Models and Accessories
Clip Studio Paint offers a robust library of 3D character models that serve as excellent references for your illustrations. To access them, navigate to the Material palette and select the “3D” category. You can choose from human figures, animals, and various props.
Once you’ve selected a model, drag it onto your canvas. Position your model using the Object tool by clicking and dragging different parts. For more precise control, use the manipulator handles to rotate, scale, or move the entire figure.
Models can be posed in countless ways. Adjust individual joints by selecting them and rotating as needed. You can also apply preset poses from the Sub Tool palette or create and save your own poses for future use.
Adding accessories like clothing, weapons, or props enhances your character design. These items will automatically follow your model’s movements, saving you time on complex perspective calculations.
Working with Clip Studio Coordinate
Clip Studio Coordinate allows for more advanced 3D model manipulation. This feature helps you create complex poses and scenes beyond what’s possible with basic tools.
To access Coordinate mode, select your 3D model and click the “Coordinate” button in the Tool Property palette. This opens a specialized interface with more precise controls for each body part.
You can adjust multiple joints simultaneously by using the chain selection tool. This helps create natural-looking poses where movement in one area affects connected parts.
The weight painting feature lets you control how parts of the model respond to movement. This is particularly useful for clothing and hair that should follow the character’s actions naturally.
Use the camera controls to view your model from different angles. Finding the most dynamic view can dramatically improve your character illustration’s impact and storytelling potential.
Customizing 3D Elements
Personalizing your 3D models makes them match your unique art style. Clip Studio Paint allows extensive customization of model features to create distinctive characters.
Adjust body proportions by using the Transform tools. You can elongate limbs, modify head size, or change overall body shape to match anime, realistic, or stylized aesthetics.
Customize facial features through the Face panel. Here you can modify eyes, mouth, nose, and other details to match your character’s design. You can also change hair style and color.
For advanced users, importing custom 3D models is possible. Programs like Cheetah3D can create models that you can export and use in Clip Studio Paint. This gives you unlimited design possibilities.
Remember that 3D elements are tools, not replacements for your artistic vision. The final illustration should still carry your unique style, with the 3D elements serving as foundations for your creative expression.
Backgrounds and Perspectives
Adding backgrounds and perspective to your character illustrations enhances storytelling and creates depth. Mastering these elements in Clip Studio Paint can transform a simple character drawing into a complete scene.
Incorporating Perspective
In Clip Studio Paint, the perspective ruler tools are essential for accurate scene construction. To activate these tools, go to the ruler menu and select either the 1-point, 2-point, or 3-point perspective options.
For beginners, start with a simple 1-point perspective to establish depth. This works well for hallways or rooms viewed head-on. For more complex scenes, 2-point perspective creates a stronger sense of dimension.
When placing characters in your perspective scene, ensure they follow the same vanishing points. You can position characters in perspective drawings by using the same ruler guides for both the background and figure.
Try these quick tips for better perspective work:
- Use blue lines for your perspective guides
- Lock your perspective rulers to prevent accidental movement
- Scale your character appropriately as they move deeper into the scene
Designing Engaging Backgrounds
A compelling background complements your character while adding context to your illustration. Start by deciding the mood and setting that best supports your character’s story.
For urban environments, explore vanishing points to create convincing city streets or building interiors. Use the rectangle tool with perspective rulers to quickly establish structured elements.
Natural settings require a more organic approach. Create depth by varying line weight and detail—more defined in the foreground, lighter in the background. Add atmospheric perspective by reducing contrast and saturation in distant elements.
You can learn background drawing techniques specifically for Clip Studio Paint through video tutorials that show the process step-by-step.
Consider these background elements to enhance your scene:
- Lighting sources that cast appropriate shadows
- Texture brushes for different materials
- Environment-specific details (furniture, plants, signage)
Animation Basics
Adding movement to your character illustrations brings them to life. Clip Studio Paint offers powerful animation tools that are surprisingly easy to use once you understand the core concepts.
Understanding Frames and Timing
When creating animations in Clip Studio Paint, you’ll work with frames that represent different points in time. To start a new animation project, go to the File menu > New and select the animation option (look for the video icon) in the project section. Each animation needs frames to work with – think of them as individual drawings that play in sequence.
The standard animation rate is 24 frames per second for smooth movement. However, you can work with fewer frames for simpler animations. Clip Studio Paint lets you adjust timing between frames, which controls how long each image appears.
You can view your timeline at the bottom of the workspace. Here you can:
- Add new frames
- Duplicate existing frames
- Adjust frame duration
- Preview your animation speed
Animating Characters in Clip Studio Paint
To animate your character, you’ll create slightly different poses across multiple frames. Clip Studio Paint makes this easier with its onion skin feature, which lets you see faint images of adjacent frames while you draw. Turn this on by clicking the onion skin icon in the timeline.
For character animations, try starting with simple movements like a head turn or a waving hand. You can create new animation canvases specifically sized for your project needs.
The Animation Folder function helps organize complex movements. You can place related frames inside folders and edit them as a group. This is especially useful for character animation sequences with multiple moving parts.
When drawing frames, maintain consistent line quality between positions. Use layers to separate elements that move at different rates, like a character’s body versus their flowing hair.
Advanced Techniques
Creating dynamic and flexible character illustrations in Clip Studio Paint requires mastering advanced features. These techniques allow your characters to move naturally and maintain proper proportions even when posed in complex positions.
Rigging with Standard Bone Specification
To begin rigging your character, first create a new animation folder by right-clicking in the Layer panel and selecting “New Animation Folder.” This serves as the foundation for your character’s movement system.
Import your character art into this folder, with each body part on a separate layer. Make sure to name these layers clearly (head, torso, arms, etc.) for easier organization.
Select the “Create Bone” tool from the Tool palette and place the main bone at your character’s core, typically the torso. Add child bones by clicking and dragging from the parent bone to create a hierarchical structure.
In the Object panel, you can fine-tune bone parameters like rotation limits and movement constraints. This prevents unrealistic movements that might break your character’s anatomy.
Test your rig by selecting the “Object Manipulation” tool and moving different bones. Watch for issues like distortion or overlapping parts that need adjustment.
Mesh Transformation and Rigging
Mesh transformation takes your character rigging to the next level by allowing more natural deformation. Start by selecting your character layer and choosing “Create Mesh” from the Layer menu.
The default mesh grid may be too sparse for detailed movement. Adjust the mesh density in the Tool Property palette to match your character’s complexity. More points mean smoother deformation but slower performance.
Connect your mesh to your bone structure by selecting both, then using the “Set Up Mesh to Bone” option. This links the mesh’s deformation to the bone movement.
Use control points to refine how the mesh deforms. Areas like elbows and knees need more control points to bend naturally. You can add these manually by selecting the mesh and using the “Add Control Point” tool.
For clothing or hair, create separate meshes with looser parameters. This allows these elements to follow the main body movement while maintaining a natural flow and secondary motion.
Exporting and Publishing
Once you’ve completed your character illustration in Clip Studio Paint, you’ll need to prepare it for sharing with others or using in various projects. The right export settings can make a big difference in how your work looks to your audience.
Exporting Final Artwork
To export your finished artwork in Clip Studio Paint, go to “File” > “Export” or press Ctrl+Shift+S (Command+Shift+S on Mac). You’ll see several format options to choose from. For web use, choose JPG or PNG formats. PNG works best for illustrations with transparency or clean lines. JPG is better for paintings with many colors.
Make sure to check your resolution before exporting. For online sharing, 72 DPI is sufficient, but for printing, use at least 300 DPI. You can adjust this in the export dialog box.
Consider the color mode too. RGB is for digital display, while CMYK is for print projects. Unlike Photoshop, Clip Studio Paint primarily works in RGB, but you can convert to CMYK during export for print-ready files.
If you’re exporting for a comic or publication, you might want to save different versions at various resolutions.
Sharing Your Work Online
After exporting your character illustration, you have many options for sharing it online. Clip Studio Paint connects directly to several platforms through its built-in sharing feature. Find this under “File” > “Share.”
Social media platforms like Instagram, Twitter, and ArtStation have specific image requirements:
- Instagram: 1080 × 1080 pixels (square)
- Twitter: 1200 × 675 pixels (16:9 ratio)
- ArtStation: 1920 × 1080 pixels (HD quality)
If you’re creating a children’s book or longer publication, you might need to export multiple files in sequence. Clip Studio Paint allows batch exporting through “File” > “Export Multiple Pages.”
Remember to add your signature or watermark before publishing your work online to protect it from unauthorized use. You can create a custom brush in Clip Studio Paint specifically for your signature to make this process quick and consistent.
Frequently Asked Questions
Creating character illustrations in Clip Studio Paint involves specific techniques and tools that artists commonly ask about. Here are answers to some of the most frequent questions to help you improve your character creation process.
What are the steps to start a character illustration in Clip Studio Paint?
To begin a character illustration in Clip Studio Paint, start by creating rough sketches to explore different ideas. This helps you determine the character’s basic shape and concept.
Next, create a new layer and refine your sketch with cleaner lines. Many artists reduce the opacity of the rough sketch layer to trace over it more precisely.
Then move on to the inking stage using the pen or G-pen tools for crisp outlines. Once you’re satisfied with the linework, add flat colors on separate layers below your line art.
Can you create a character animation in Clip Studio Paint, and if so, how?
Yes, you can create character animations in Clip Studio Paint using the Animation timeline. First, set up your document as an animation file when creating a new canvas.
Use the timeline palette to add frames and manage your animation sequence. You can create keyframes for major poses and then add in-between frames.
The onion skin feature helps visualize previous and upcoming frames, making smooth transitions easier. For more complex animations, you can use the timeline to control layer visibility across different frames.
What are the techniques for drawing vector images in Clip Studio Paint?
To create vector illustrations in Clip Studio Paint, start by selecting the “Vector” layer type when creating a new layer. This allows your lines to remain editable and scalable.
Use the Object sub tool to create and manipulate vector shapes. The selection tools like the Object Selector let you adjust individual points and curves after drawing.
The Correct line tool helps smooth out your vector lines and adjust thickness. For clean, professional-looking illustrations, combine vector layers for outlines with raster layers for textures and colors.
How do you set up a new canvas for character illustration on the Clip Studio Paint iPad version?
On the iPad version, tap the “+” icon to create a new canvas. Select “Illustration” as your use, which provides preset dimensions optimized for character artwork.
Adjust the resolution based on your needs—higher resolution (300 DPI or more) for print, lower (72-150 DPI) for digital display only. Select RGB color mode for digital art or CMYK if you plan to print your work.
You can also customize the number of layers and paper texture. The iPad version maintains most desktop features but with touch-optimized controls and gesture support.
What are the similarities and differences between Clip Studio Paint and Procreate?
Clip Studio Paint and Procreate both offer powerful drawing tools, but Clip Studio has more detailed character illustration capabilities and comic creation features. Procreate has a simpler interface that’s easier to learn initially.
Clip Studio Paint provides more specialized brushes for comic and manga creation. It also offers better tools for perspective drawing and 3D model integration.
Procreate excels in its video recording feature and more intuitive gesture controls. Clip Studio Paint is available on more platforms, while Procreate remains iPad-exclusive.
How can you utilize Clip Studio Assets to enhance character illustrations?
Clip Studio Assets offers thousands of brushes, textures, and 3D models to enhance your character illustrations. You can access the marketplace directly within the software through the Material palette.
Downloaded assets automatically integrate into your workspace. Use 3D models as reference for complex poses or perspective challenges when designing characters.
Many artists use pre-made brushes for specific textures like skin, fabric, or hair to save time. You can also find character templates and pose references to help establish proportions in your illustrations.