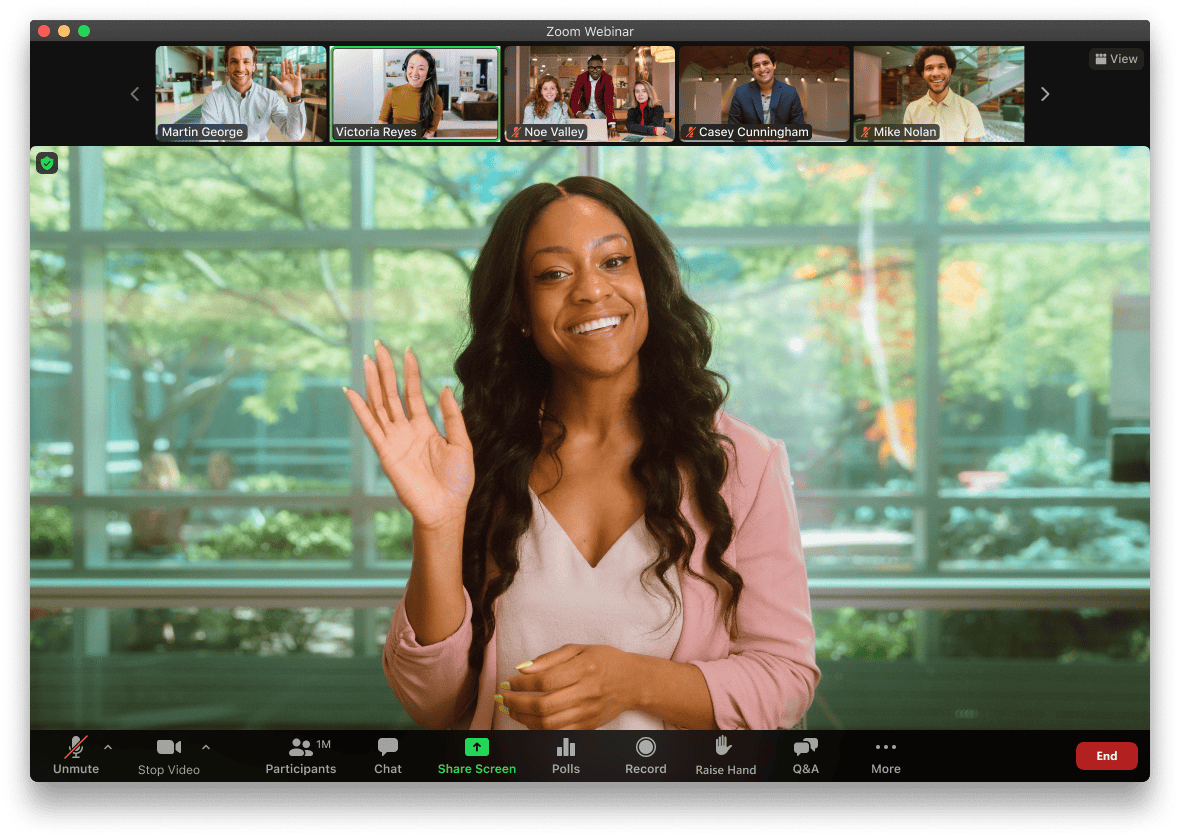
Recording presentations on Zoom has become essential for many professionals and educators. Zoom offers a straightforward way to capture your screen, webcam, and audio while delivering a presentation. To record a presentation on Zoom, start a meeting, share your screen with your slides, enable your webcam if desired, and click the “Record” button in the Zoom toolbar.
Zoom’s recording feature saves both video and audio, allowing you to create high-quality presentations for later viewing or sharing. Users can choose to save recordings locally on their computer or in the Zoom cloud, depending on their account type and preferences. This flexibility makes it easy to distribute your presentation to colleagues, students, or clients who couldn’t attend the live session.

Recording Presentations on Zoom: A Step-by-Step Guide
Zoom is a versatile tool for online meetings and presentations. It also allows you to record your presentations for later viewing or sharing. Here’s a guide to recording presentations on Zoom:
Before You Start
- Check your Zoom plan: Ensure your Zoom plan allows recording.
- Choose your recording location: Decide whether to record to the cloud (Zoom’s servers) or locally to your computer. Cloud recording is convenient for sharing, while local recording offers more control over the files.
- Inform participants: Let your attendees know that you’ll be recording the presentation.
- Test your audio and video: Make sure your microphone and camera are working correctly.
Recording Your Presentation
- Start your Zoom meeting: Launch your Zoom meeting as usual.
- Find the “Record” button: Look for the “Record” button in the meeting controls. It might be labeled “Record” or have a small red dot icon.
- Choose your recording location: If you have the option, select “Record to the Cloud” or “Record on this Computer.”
- Start recording: Click the “Record” button to begin recording. A recording indicator will appear in the meeting window.
- Share your screen: Click “Share Screen” to share your presentation slides or other content.
- Pause or stop recording: Use the “Pause/Stop Recording” button as needed during your presentation.
After the Meeting
- Cloud recordings: Zoom will process your cloud recording and send you an email with a link when it’s ready. You can then download or share the recording.
- Local recordings: Your local recording will be saved to a folder on your computer. You can find the location in your Zoom settings.
Tips for High-Quality Recordings
- Use a good microphone: A quality microphone will ensure your audio is clear and easy to understand.
- Minimize background noise: Find a quiet location to record your presentation.
- Use a stable internet connection: A strong internet connection will prevent interruptions and ensure a smooth recording.
- Practice your presentation: Rehearse your presentation beforehand to avoid unnecessary pauses or mistakes.
- Edit your recording: Consider editing your recording afterward to remove any unwanted sections or improve the flow.
Zoom Recording Settings
You can customize your Zoom recording settings to suit your preferences. In the Zoom app, go to Settings > Recording to adjust options like:
- Recording location: Cloud or local
- File format: MP4 or M4A
- Cloud recording options: Optimize for 3rd party video editor, record active speaker view, or record gallery view.
Sharing Your Zoom Recording
Once you have your recording, you can easily share it with others. For cloud recordings, Zoom provides a shareable link. You can also download the recording file and share it through email or other platforms. For local recordings, you have the file readily available on your computer to share as you like.
Key Takeaways
- Start a Zoom meeting and share your screen to record your presentation
- Click the “Record” button in Zoom to capture your slides, webcam, and audio
- Save your recording locally or in the cloud for easy sharing and viewing
Preparing Your Presentation for Recording
Recording a presentation on Zoom requires careful preparation. This involves setting up Zoom correctly, organizing your content, and adjusting audio and video settings for optimal quality.
Setting Up Zoom
To begin, install the latest version of Zoom on your computer. Open the application and sign in to your account. Navigate to the settings menu and ensure local recording is enabled. This option allows you to save the recording directly to your device.
Create a new meeting or schedule one for later. If you plan to invite others, send them the meeting link in advance. Test your internet connection to avoid disruptions during the presentation.
For a smoother experience, close unnecessary applications and browser tabs. This frees up system resources and reduces the risk of background noise or interruptions.
Prepare Your Presentation Content
Organize your presentation materials before starting the recording. If using Microsoft PowerPoint, save your slides in a easily accessible location on your computer. Review your content to ensure it flows logically and covers all key points.
Consider creating an outline or script to guide your presentation. This helps maintain focus and reduces the likelihood of forgetting important information.
Practice your delivery to improve confidence and timing. Pay attention to your speaking pace and enunciation. Time yourself to ensure your presentation fits within any allocated time limits.
Adjusting Audio and Video Settings
Check your microphone and camera settings in Zoom before recording. Click the arrow next to the microphone icon to select your preferred audio input device. Test the microphone to ensure clear sound quality.
For video, choose a well-lit area and position yourself facing a light source. Avoid backlighting, which can create shadows. Select an appropriate background – either a tidy room or a virtual background in Zoom.
Adjust your camera angle to frame yourself properly. Position the camera at eye level for a natural appearance. If using a laptop, consider elevating it to achieve the right height.
Recording Your Presentation on Zoom
Zoom offers powerful tools for recording presentations. Users can capture their screen, audio, and video to create professional-quality recordings.
Starting a Zoom Meeting
Open the Zoom application on your computer. Click the “New Meeting” button to start a session. Choose “Join with Computer Audio” when prompted. This ensures your voice will be captured during the recording.
For optimal audio quality, use a headset or external microphone. Test your audio settings before starting the presentation. Adjust your camera position and lighting for clear video.
Using Screen Sharing Features
Click the “Share Screen” button in the Zoom toolbar. Select the window or application you want to share. For PowerPoint presentations, open your slides first, then share that specific window.
Zoom offers annotation tools for drawing on shared screens. Access these by clicking “Annotate” in the screen sharing controls. Use pointers, text boxes, or drawings to highlight key points.
Starting the Recording
Locate the “Record” button in the Zoom toolbar. Click it to begin capturing your presentation. Choose between “Record on this Computer” or “Record to the Cloud” based on your storage preferences.
A recording indicator will appear in the top-left corner of the screen. Pause or stop the recording at any time using the Zoom controls. When finished, click “Stop Recording” and end the meeting.
Zoom will process the recording automatically. Local recordings save to your computer, while cloud recordings can be accessed through your Zoom account online.
Enhancing Your Recorded Presentation
Recording a Zoom presentation is just the first step. To create a polished final product, you’ll need to utilize tools and techniques for improvement. These methods can elevate your presentation’s quality and impact.
Using Zoom’s Annotation Tools
Zoom offers built-in annotation features to enhance your recorded presentations. The toolbar provides options like draw, spotlight, and stamp. Use the draw tool to highlight key points or create simple diagrams. The spotlight feature lets you emphasize specific areas of your slides. Stamps add visual markers for important information.
Experiment with different colors and line thicknesses to make your annotations stand out. Practice using these tools before recording to ensure smooth integration. Remember to clear annotations between slides to maintain a clean presentation.
Consider using the whiteboard feature for brainstorming sessions or explaining complex concepts. This interactive element can make your presentation more engaging and memorable.
Managing Recorded Content
Proper management of your Zoom recordings is crucial for easy access and organization. After recording, Zoom saves files to a default location on your computer. Change this setting to store recordings in a dedicated folder for better organization.
Name your files consistently, including the date and topic. This naming convention helps you quickly find specific presentations later. Consider creating subfolders for different projects or clients to further streamline your filing system.
Regularly back up your recordings to prevent data loss. Use cloud storage services or external hard drives for added security. Set a schedule to review and delete old recordings to free up space on your device.
Editing the Video Recording
Video editing can transform your raw Zoom recording into a polished presentation. Start by trimming unnecessary parts like pre-presentation chat or technical difficulties. Many video editors offer basic trimming features that are easy to use.
Add transitions between sections to create a smoother flow. Insert text overlays to highlight key points or provide additional information. Consider adding background music to set the tone, but ensure it doesn’t overpower your voice.
Adjust audio levels to maintain consistent volume throughout the presentation. Remove background noise or echoes using noise reduction tools. If needed, record a voiceover to replace unclear audio sections.
For a professional touch, create an intro and outro sequence. Include your logo, contact information, or a call-to-action at the end of the video. These elements help brand your presentation and guide viewers on next steps.
Ending Your Recording Session
Properly concluding your Zoom presentation recording involves two key steps: stopping the recording and ending the meeting.
Stopping the Recording
To stop recording your Zoom presentation, locate the “Stop Recording” button in the Zoom toolbar. On Windows, press Alt+C, or on Mac, use ⌘+Shift+C as keyboard shortcuts. If the button isn’t visible, click “More” in the toolbar and select “Stop Recording” from the menu.
For cloud recordings, Zoom will automatically upload the file to your account. Local recordings are saved in the “Zoom” folder within your Documents directory.
Always confirm the recording has stopped before proceeding. Look for the disappearance of the red recording indicator in the top-left corner of the Zoom window.
End the Meeting
After stopping the recording, click the “End Meeting” button in the bottom-right corner of the Zoom window. Choose “End Meeting for All” to close the session for all participants.
This action terminates the meeting and initiates the recording processing. For cloud recordings, Zoom will notify you when the file is ready for viewing and sharing.
Local recordings are immediately available in your designated Zoom folder. Check this location to access your presentation video file.
Remember to save any chat logs or other meeting data you need before ending the session, as these may not be accessible afterward.
Frequently Asked Questions
Recording presentations on Zoom offers various options to suit different needs. Users can customize their recordings based on preferences for video inclusion, device compatibility, and integration with other presentation tools.
What are the steps to record a presentation on Zoom with your face on the screen?
- Start a Zoom meeting and enable your camera.
- Click the “Share Screen” button and select your presentation.
- Choose “Share” to display your presentation and webcam feed.
- Click “Record” in the Zoom toolbar.
- Present your content as usual.
- Stop the recording when finished.
How can one record a Zoom presentation without including the presenter’s face?
To record without showing the presenter:
- Begin a Zoom meeting.
- Share your screen with the presentation.
- Disable your camera.
- Click “Record” in the Zoom controls.
- Deliver your presentation.
- End the recording upon completion.
What is the process for recording oneself during a presentation on Zoom?
Recording yourself during a Zoom presentation involves:
- Start a Zoom meeting.
- Enable your camera and adjust positioning.
- Share your screen with the presentation.
- Click “Record” in the Zoom toolbar.
- Present your content.
- Stop the recording when done.
Can you record a Zoom presentation on an iPad, and if so, how?
Yes, recording on an iPad is possible:
- Open the Zoom app on your iPad.
- Start or join a meeting.
- Tap “More” in the meeting controls.
- Select “Record to the Cloud” or “Record.”
- Share your screen with the presentation.
- Present your content.
- Tap “Stop Recording” when finished.
Is it possible to record a presentation on Zoom without any participants?
Recording a solo presentation is straightforward:
- Start a new Zoom meeting as the host.
- Don’t invite any participants.
- Share your screen with the presentation.
- Click “Record” in the Zoom toolbar.
- Deliver your presentation.
- Stop the recording when complete.
How to integrate Google Slides into a Zoom meeting for recording purposes?
Integrating Google Slides for recording:
- Open your Google Slides presentation.
- Start a Zoom meeting.
- Click “Share Screen” in Zoom.
- Select the browser window with your Google Slides.
- Choose “Share” to display the slides.
- Click “Record” in the Zoom controls.
- Present your Google Slides content.
- End the recording when finished.

