Managing your online presence on Facebook is important for privacy. One essential feature is the “Only Me” post option, which lets you share posts that are visible only to yourself. This is useful for private thoughts or personal reminders. With so much personal information shared on social media, it’s crucial to control who can access your data. Facebook provides privacy settings, including the “Only me” option, so you can manage who sees your posts and personal information. This guide aims to help you understand and use these features to manage your Facebook privacy effectively.
Creating an “Only Me” post on Facebook is simple. When you make a post, you can choose the audience before sharing it. By selecting “Only Me,” only you can see it after it’s posted. You can also change the audience of past posts. Managing audience settings for both new and existing posts ensures you have full control over your Facebook content, tailored to your personal preferences.
Take Charge of Your Facebook Privacy: A Guide to “Only Me” Settings and More
The Power of “Only Me”: Keeping Things Private
The “Only Me” privacy setting is your secret weapon for ultimate control over who sees your Facebook posts and personal information. It ensures that only you can view the content, shielding it from friends, family, and the wider Facebook community. This is ideal for personal reflections, drafts, or sensitive information you want to keep confidential.
Mastering Facebook’s Privacy Settings: A Step-by-Step Guide
- Profile Information: Review each section of your profile (About, Contact and Basic Info, etc.) and set the audience for each piece of information. You can choose “Public,” “Friends,” “Friends except…,” “Specific friends,” or “Only me.”
- Posts: For each new post, click the audience selector (next to the “Post” button) and choose “Only me.” You can also edit the audience of past posts by clicking the three dots in the top right corner of the post and selecting “Edit audience.”
- Photos and Albums: Control who sees your photos and albums by setting the audience for each one. You can also create “Only me” albums to keep specific photos private.
- Stories: Customize who can see your Stories by adjusting the privacy settings within the Stories feature.
- Activity Log: The Activity Log records all your actions on Facebook. You can review and manage the audience for specific activities or posts.
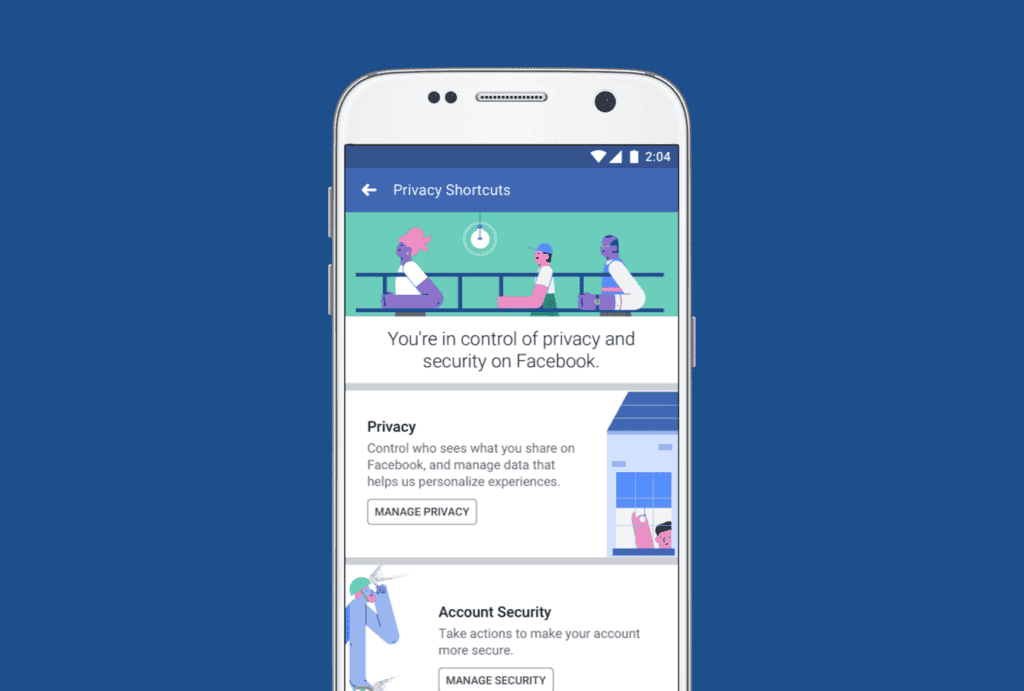
Privacy Checkup Tool: Your Personalized Privacy Guide
Facebook offers a “Privacy Checkup” tool to guide you through your privacy settings. It provides step-by-step instructions and recommendations to ensure your information is shared with the intended audience. To access it, click on the downward arrow in the top right corner, select “Settings & Privacy,” and then click “Privacy Checkup.”
Your Facebook Privacy Questions Answered
- Can I make my entire Facebook profile private?
- While you can’t make your entire profile “Only me,” you can individually control who sees each piece of information and post.
- Can people I’m not friends with see my “Only me” posts?
- No, “Only me” posts are visible only to you.
- Can I change the privacy setting of a post after I’ve shared it?
- Yes, you can edit the audience of any post you’ve shared.
- How do I know who can see my profile information?
- Review your profile settings or use the “View As” feature to see your profile as it appears to the public or specific friends.
Key Takeaways
- Facebook’s “Only Me” setting lets you post content visible only to yourself.
- You can select “Only Me” for new posts and change past posts to this privacy level.
- This feature gives you control over your privacy and how you manage your Facebook audience.
Creating a Facebook Only Me Post
When you desire complete privacy on Facebook, the ‘Only Me’ option is essential. It’s a handy feature allowing you to share posts that only you can see. This helps keep your personal space in check on the social media platform.
Understanding Only Me Privacy Setting
The ‘Only Me’ setting is a privacy feature on Facebook that gives you total control over the visibility of your posts. When you select this setting for a post, it becomes invisible to everyone else but you. It still shows up on your timeline and can be a useful way for you to save memories or ideas without sharing them with others.
Steps to Make a Post Only Me
To adjust the audience of your Facebook posts to ‘Only Me’, follow these straightforward steps:
- Open the Facebook app on your mobile device or navigate to the Facebook website on your computer.
- Create a new post by clicking what’s on your mind at the top of your News Feed or timeline.
- Look for the audience selector, which is typically a dropdown menu located below your name. It might display an icon representing the current selection, such as ‘Friends’ or ‘Public’.
- Click on the audience selector and choose the ‘Only Me’ option from the list.
- Finish your post. Write your text, add photos, or check in as you normally would.
- Click ‘Post’ to publish it. Despite clicking post, remember this content will not be visible to your friends or the public – it’s for your eyes only.
Reviewing and Editing Post Visibility
Should you change your mind or want to review your ‘Only Me’ posts, here’s how to do it:
- To review past posts: Go to your profile and view your Activity Log. Here, you’ll find all your posts and their respective audiences.
- To change the visibility: Click on the post you want to edit. Select the ‘Edit’ option or the audience selector next to the post, and change the audience as desired.
- To undo ‘Only Me’: Simply re-select the audience selector and choose a different audience (e.g., Friends, Public, or a custom list) if you decide to share the post with others.
Changing a post’s privacy does not alert anyone, so you have full freedom to make these adjustments anytime.
Managing Audience for Past and New Posts
When posting on Facebook, you have the power to decide who gets to see your content, for both new and existing posts. This flexibility allows you to shape your online presence and keep certain areas of your life private, or share them with a select group of friends or the public.
Limiting Visibility of Past Posts
To change who can see your past Facebook posts, find the audience selector tool next to the date or time on the post you wish to update. This tool enables you to modify the visibility of a single post or limit the audience for multiple past posts at once using the “Limit Past Posts” option in your privacy settings. Here are the steps to alter the audience for a past post:
- Click on your profile picture in the top right of Facebook.
- Scroll to the post you want to change.
- Click the audience selector, which might show a symbol like a globe or a silhouette of two people, next to the post’s date or time.
- Choose a new audience from the options presented, such as Public, Friends, or Only Me.
If you’re looking to quickly adjust many posts, the “Limit Past Posts” option can shift the audience of old content to Friends, helping maintain some privacy for posts you’ve shared over the years.
Understanding Audience Options for New Posts
Before you share a new post, photo, or event, Facebook allows you to select who will see it. You can cater your audience each time you post something new, or you can set a default audience in your privacy settings so you won’t have to choose every time. The following audiences are typically available:
- Public: Anyone on or off Facebook can see your post.
- Friends: Only your friends on Facebook can see your post.
- Friends except: All friends except the people you exclude will see your post.
- Specific friends: Only friends you select will see your post.
- Groups: Members of a group you post in will see your post.
- Custom: You can customize an audience based on specific criteria.
- Only me: You’re the only one who can see your post.
To select an audience for a new post:
- Click in the post box where it says “What’s on your mind?”
- Click the audience selector next to the ‘Post’ button.
- Choose who can see your post from the given options.
Remember, once a post is shared with a chosen audience, only those in that group can interact with it. It is a way to maintain control over your online presence and ensure your personal posts are viewed by the people you’re comfortable sharing with.
How to Make Your Facebook Account Private
To enhance your Facebook privacy, follow these steps:
- Profile Information: Go to your profile and click “Edit Details.” Review each section (About, Contact and Basic Info, etc.) and set the audience to “Friends” or “Only Me” for sensitive information.
- Posts: For new posts, use the audience selector (next to the “Post” button) and choose “Friends” to restrict visibility. For past posts, click the three dots and select “Edit Audience” to change who can see them.
- Photos and Albums: Control who views your photos and albums by setting the audience for each individually.
- Stories: Within the Stories feature, adjust the privacy settings to determine who can view your stories.
- Privacy Checkup Tool: Use Facebook’s “Privacy Checkup” tool, accessible through “Settings & Privacy,” to review and optimize your privacy settings.
- Friend List: To make your friend list private, go to your profile, click “Friends,” and select “Edit Privacy.” Then, choose “Friends” or “Only Me” for “Who can see your friends list?”
- Profile Picture: Click your profile picture, select “Edit Profile Picture,” and choose “Edit” again. Then, change the audience to “Friends” or “Only Me.”
How to Make Your Facebook Profile Private to Non-Friends
To ensure only your friends can see your Facebook profile:
- Adjust Profile Information: Set the audience for each section of your profile (About, Contact and Basic Info, etc.) to “Friends” or “Only Me.”
- Control Post Visibility: Make new posts visible only to “Friends.” For past posts, edit the audience to restrict visibility.
- Manage Photos and Albums: Set the audience for your photos and albums to “Friends” or “Only Me.”
- Limit Story Viewers: Adjust privacy settings within the Stories feature to only allow friends to see your stories.
How to Make Your Facebook Page Private
To make a Facebook Page private:
- Go to your Page and click “Settings.”
- Click “Page Visibility.”
- Select “Page Unpublished” and save changes.
Remember, this will make your Page invisible to the public and only accessible to Page admins and editors.
Making Your Facebook Account Unsearchable
To make yourself less searchable on Facebook:
- Limit Past Posts: Go to “Settings & Privacy” > “Privacy” > “Limit Past Posts” and limit the audience to “Friends.”
- Contact Information: In your profile settings, adjust who can see your phone number and email address.
- Search Engine Visibility: Go to “Settings & Privacy” > “How People Find and Contact You” and uncheck “Allow search engines outside of Facebook to link to your profile.”
Additional Tips for a Private Facebook Experience
- Review your tagged photos and posts regularly and remove tags if needed.
- Be cautious about what you share, even with friends, as they may not have the same privacy settings as you.
- Use strong passwords and enable two-factor authentication for added security.
By implementing these tips and regularly reviewing your privacy settings, you can significantly enhance your control over who sees your information on Facebook and ensure a more private online experience.
How to Make Your Facebook Profile Picture Private
To make your Facebook profile picture private:
- Click on your profile picture.
- Select “Edit Profile Picture.”
- Choose “Edit” again.
- Change the audience to “Friends” or “Only Me.”
How to Make Facebook Private on iPhone/Android
To make your Facebook account private on your phone:
- Open the Facebook app.
- Tap the three horizontal lines (menu icon) at the bottom right.
- Scroll down and tap “Settings & Privacy.”
- Tap “Settings.”
- Scroll down to “Audience and Visibility” and tap “Profile Information” or “Posts.”
- Adjust the audience for your profile information, posts, photos, and stories to “Friends” or “Only Me.”
How to Make Yourself Unsearchable on Facebook Mobile
To limit your searchability on Facebook mobile:
- Open the Facebook app.
- Tap the three horizontal lines (menu icon) at the bottom right.
- Scroll down and tap “Settings & Privacy.”
- Tap “Settings.”
- Under “How People Find and Contact You,” adjust who can send you friend requests and look you up by phone number or email address.
- Uncheck “Allow search engines outside of Facebook to link to your profile.”
How to Make Everything Private on Facebook
While you can’t make your entire Facebook account completely private, you can individually control the visibility of different aspects of your profile:
- Profile Information: Set each section to “Friends” or “Only Me.”
- Posts: Choose “Friends” or “Only Me” for the audience of your posts.
- Photos and Albums: Set the audience for each photo or album to “Friends” or “Only Me.”
- Stories: Adjust the privacy settings within Stories to limit who can view them.
Is My Facebook Private?
To check your current privacy settings:
- Go to your Facebook profile.
- Click the three dots next to “Add to Story.”
- Select “View As.”
- You can now see your profile as it appears to the public or specific friends.
- Review the visibility of each section and post to ensure it aligns with your preferences.
Frequently Asked Questions
When adjusting privacy settings on Facebook, a common concern is managing who can see your posts. These subsections help guide you through various privacy options pertaining to the ‘Only Me’ setting.
How can I adjust a post’s privacy settings to ‘Only Me’ on Facebook?
To adjust a single post’s privacy to ‘Only Me,’ start by creating a post. Before posting, click on the privacy button next to the post button. In the menu that appears, select ‘Only Me.’ Your post will then be visible only to you.
Is it possible for others to view my ‘Only Me’ posts on Facebook?
Posts set to ‘Only Me’ are not visible to others. The only way someone else could see these posts is if you change the privacy setting to include them or if you directly share the content with them.
What steps are involved in making all my Facebook posts private?
To make all your Facebook posts private, go to your privacy settings. Here, you can find the option to limit the audience for posts you’ve shared with friends of friends or the public. This setting allows you to change past posts to ‘Only Me.’
How do I ensure that future Facebook posts are set to ‘Only Me’ by default?
In your Facebook privacy settings, you can set the default privacy for new posts. Choose ‘Only Me’ from the options to ensure that all future posts are private unless you decide to change the setting for an individual post.
Can ‘Only Me’ visibility be applied to past Facebook posts en masse?
Yes, Facebook allows you to modify the privacy settings of past posts in bulk. Use the ‘Limit Past Posts’ option in the privacy settings to change the audience of all previous posts to ‘Only Me.’
Why aren’t my public Facebook posts appearing to others?
There can be various reasons why public Facebook posts are not appearing. It might be due to a privacy setting error, a technical glitch, or the audience filter may be accidentally set to a more restrictive setting. Check your post’s privacy settings to make sure they’re set as intended.