Ever wondered if you could build a laptop like you build a desktop PC? While building a traditional laptop from scratch isn’t typically possible for most consumers, there are now exciting options that let you assemble your own portable computer. Companies like Framework have created modular laptops that come as kits, allowing you to put together the components yourself.
You can build your own customizable, upgradeable laptop by selecting components and assembling them using special kits designed for this purpose. This approach gives you control over specifications like RAM, storage, and even ports while creating a device that can grow with your needs over time. The Framework Laptop and other customizable options from companies like Eluktronics represent a new generation of repairable, upgradeable computers that fight against electronic waste.
Building your own laptop isn’t just about getting the perfect specifications—it’s about creating a personal relationship with your technology. When you understand how each component works together, troubleshooting becomes easier, and you’ll feel more confident about making future upgrades. Many users who have built their own Framework laptops report that the experience is surprisingly straightforward and deeply satisfying.
Step-by-Step Guide to Building Your Own Laptop
Framework Laptop: Link
Building a laptop isn’t quite as straightforward as assembling a desktop PC, but it is possible with the right components, some patience, and a bit of research. Whether you’re looking to customize your machine for gaming, programming, or creative work—or you just want the satisfaction of building your own portable powerhouse—this guide covers everything you need to know.
1. Understand the Limitations
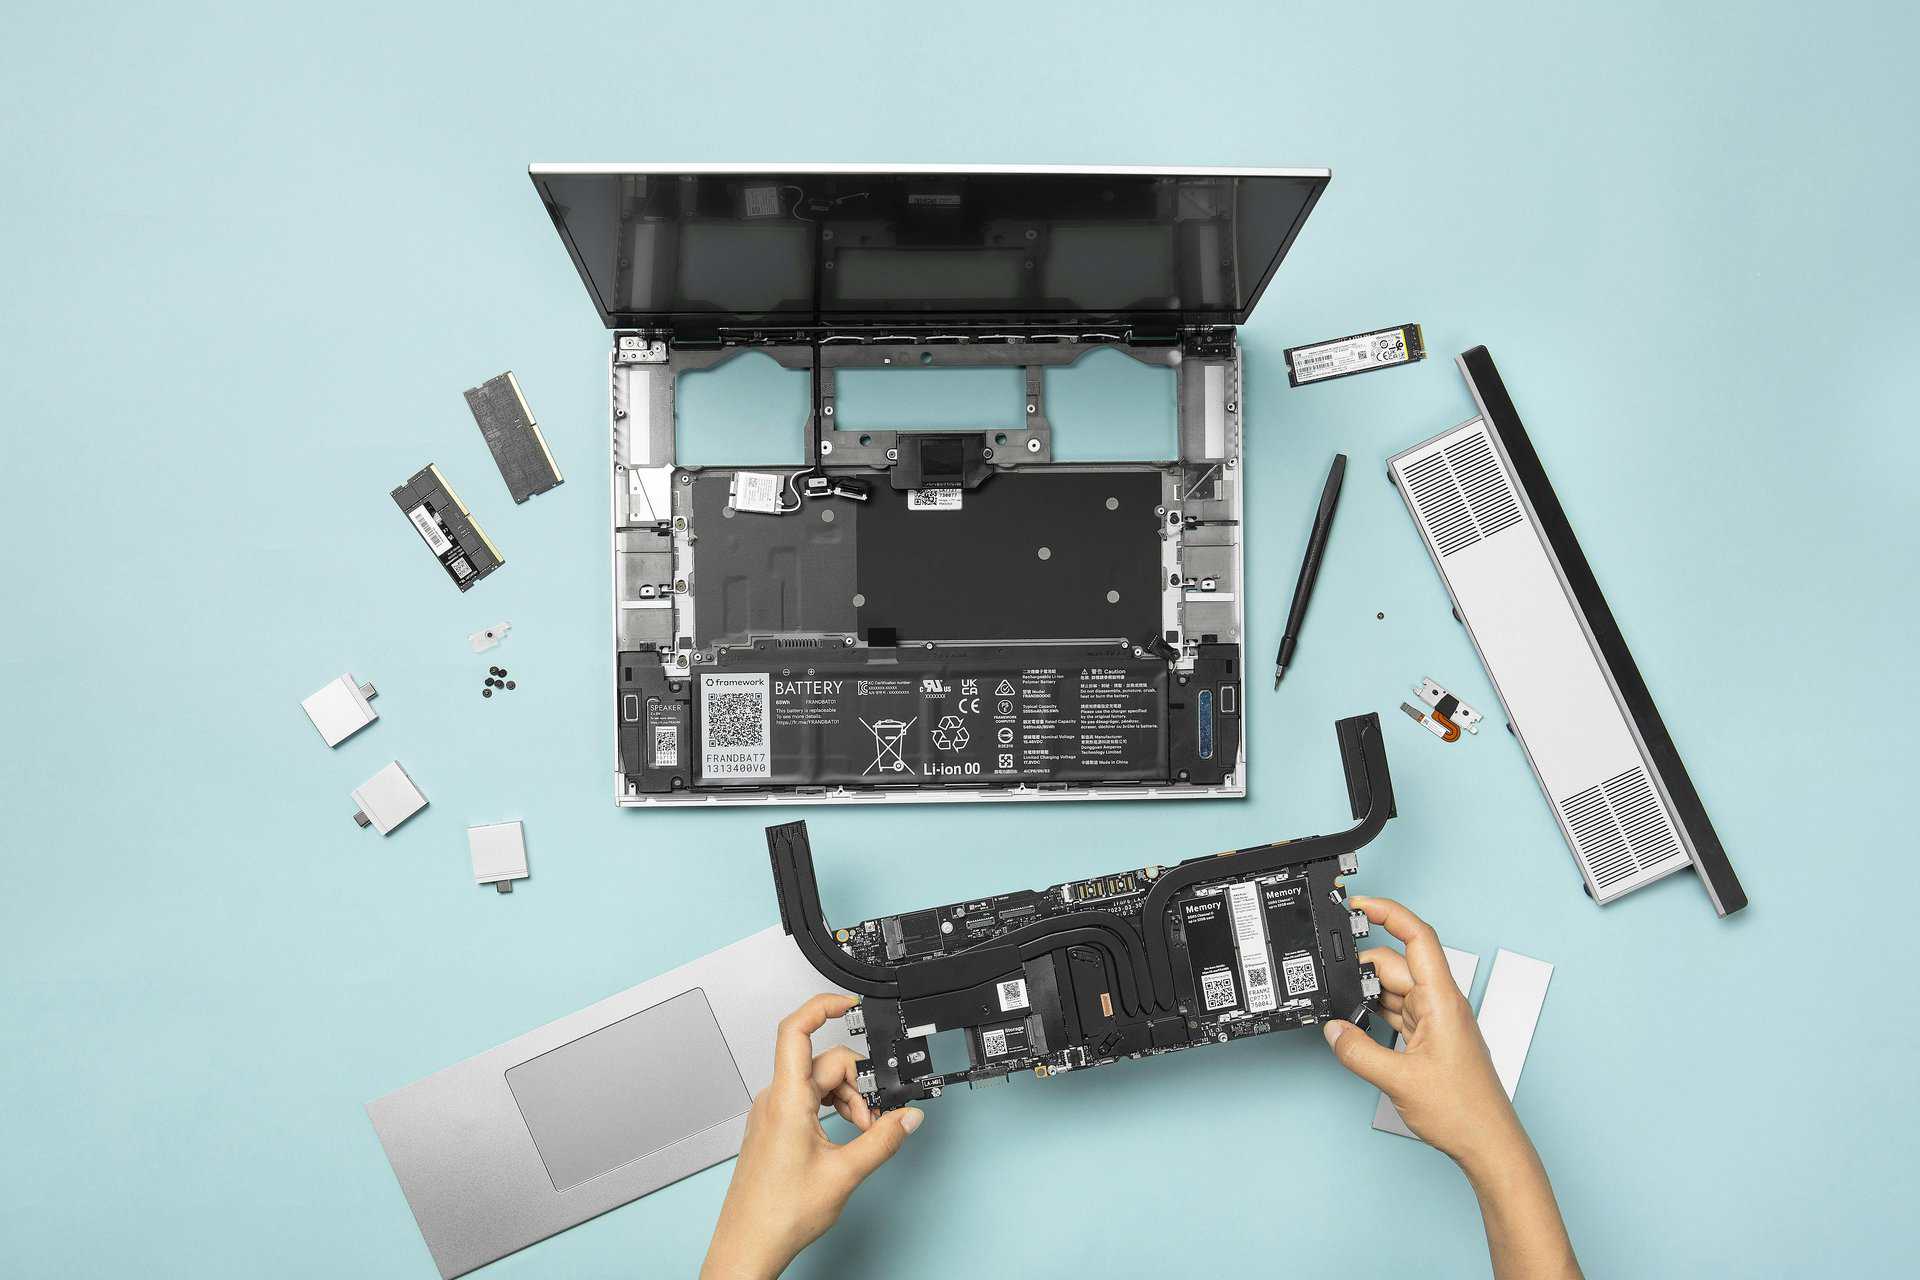
Before diving in, it’s important to recognize that laptops are far less modular than desktops. You won’t be able to mix and match components as freely. Most DIY laptop builds revolve around what’s called a barebone laptop kit—a partially assembled unit that includes the chassis, motherboard, display, keyboard, and cooling system. Your job is to add the CPU, RAM, storage, Wi-Fi card, and sometimes the GPU, depending on the model.
2. Choose a Barebone System
The barebone kit is the foundation of your laptop. Brands like Clevo (sold under names like Sager, XMG, Eluktronics, etc.) offer a variety of customizable laptop shells. When picking a model, consider:
- Screen size and resolution
- Thermal design and cooling
- Keyboard layout
- Port selection
- Battery life
Make sure it’s compatible with the components you plan to install, especially the CPU socket and GPU form factor.
3. Select a CPU (If Not Pre-Installed)
Some barebone kits come with the CPU soldered in, while others allow you to choose your own processor. If you’re given the option:
- Intel processors are more widely supported in laptop kits.
- AMD Ryzen Mobile chips offer strong multi-core performance but are less commonly supported in modular builds.
Laptop CPUs often come in a BGA or embedded format, so confirm whether the kit uses a socketed CPU or a permanently attached one. If it’s socketed, installing it is similar to desktop CPUs, though thermal paste and heatsink installation require precision due to space constraints.
4. Add RAM
Most laptop kits support SO-DIMM RAM, not the full-size DIMMs used in desktops. Make sure you:
- Check the max capacity (usually 32GB or 64GB).
- Use DDR4 or DDR5, depending on the board.
- Match RAM speeds with motherboard support to avoid bottlenecks.
Install the modules carefully into the RAM slots at an angle, then press down to lock them in place.
5. Install Storage
Most barebone systems offer one or two M.2 slots for NVMe SSDs. Some may include a 2.5″ SATA bay for additional storage.
- For speed, choose PCIe Gen 4 NVMe SSDs.
- For capacity, add a SATA SSD or HDD as a secondary drive.
- Make sure your drive is properly screwed in and thermal pads (if included) are applied for heat dissipation.
6. Install a Wi-Fi/Bluetooth Card
Many kits come with an M.2 Key E slot for a Wi-Fi/Bluetooth combo card. These typically include antenna cables that you’ll need to attach carefully:
- Select a dual-band or tri-band Wi-Fi 6 or Wi-Fi 6E module.
- Make sure the antennas are routed cleanly through the case to avoid signal interference.
7. GPU (If Applicable)
Some high-performance kits allow you to install MXM-format GPUs, though this is rare and expensive. Most barebone laptops rely on integrated graphics or come with a pre-installed dedicated GPU.
If you’re building for gaming or heavy workloads, it’s often better to select a kit with a pre-installed dedicated GPU.
8. Operating System Installation
Once all the hardware is in place, it’s time to install your operating system:
- Create a bootable USB drive with Windows, Linux, or your OS of choice.
- Boot into the BIOS/UEFI and set the USB as the primary boot device.
- Install the OS, drivers (especially GPU, chipset, Wi-Fi), and updates.
Many barebone kit manufacturers provide driver packages tailored to their models.
9. Final Tweaks and Thermal Management
Laptops have far less thermal headroom than desktops. After assembly:
- Monitor thermals with tools like HWMonitor or CoreTemp.
- Adjust fan curves in BIOS if supported.
- Undervolt the CPU or GPU (if possible) for better thermals and battery life.
- Consider repasting with premium thermal compound if stock thermals are weak.
10. Know When DIY Isn’t Worth It
Building a laptop makes sense if you want full control over parts, need specific configurations, or enjoy the technical challenge. However, for most users, a pre-built model with similar specs might offer better value. DIY builds can get expensive and support may be limited if something goes wrong.
That said, if you’re building for niche needs—like Linux-first systems, minimal bloatware, or upgradeable components—a DIY laptop is a rewarding project.
By following these steps, you’ll not only gain a deeper understanding of how laptops are built but also create a machine that reflects your exact needs. It’s not easy, but with the right parts and a careful approach, you can build a high-performance, personalized laptop that’s just as capable as many off-the-shelf models.
Key Takeaways
- Modular laptop kits allow you to customize your portable computer with your choice of components, ports, and specifications.
- Building your own laptop creates a more sustainable device that can be upgraded rather than replaced when technology advances.
- The assembly process is accessible to most users and provides valuable hands-on experience with computer hardware.
Understanding Laptop Components
Before diving into building your own laptop, it’s important to understand the key parts that make it work. Knowing these components will help you choose the right parts for your needs and budget.
Central Processing Unit (CPU)
The CPU acts as the brain of your laptop. When buying a CPU, you’ll typically choose between two main brands: AMD Ryzen and Intel Core. Each has different strengths and price points.
For Intel processors, the naming system works like this:
- i3: Entry-level (good for basic tasks)
- i5: Mid-range (good for most users)
- i7: High-performance (excellent for demanding applications)
- i9: Premium (for professional work and gaming)
AMD follows a similar pattern with their Ryzen series (3, 5, 7, 9). The higher the number, the more powerful the processor.
You should also consider generation numbers. For example, an Intel i5-12500 is from the 12th generation, while an i5-11500 is from the 11th. Newer generations usually offer better performance and efficiency.
Random Access Memory (RAM)
RAM provides temporary storage for data your laptop is actively using. More RAM allows you to run more programs simultaneously without slowdowns.
For most users, 8GB is the minimum recommendation in 2025. If you plan to:
- Basic use (web browsing, documents): 8GB
- Moderate use (light gaming, photo editing): 16GB
- Heavy use (video editing, gaming): 32GB+
RAM speed matters too, measured in MHz (like 3200MHz). Higher speeds can improve performance, especially with AMD processors.
When building your own laptop, make sure the RAM you choose is compatible with your motherboard and CPU.
Storage Options
Modern laptops offer two main storage types:
Solid State Drives (SSD)
- Much faster than HDDs
- No moving parts (more durable)
- Silent operation
- More expensive per GB
- Common capacities: 256GB, 512GB, 1TB
Hard Disk Drives (HDD)
- Slower access speeds
- Larger capacities for lower prices
- Moving parts (can fail if dropped)
- Slightly noisier
- Common capacities: 1TB, 2TB
Many custom laptops use a combination: a smaller SSD for the operating system and frequently used programs, with a larger HDD for storing files. When selecting components for your laptop build, consider your storage needs carefully.
Laptop Shell and Aesthetics
The laptop shell houses all components and determines your device’s durability and portability. When selecting or creating a laptop shell, consider:
Materials:
- Aluminum: Lightweight, dissipates heat well, premium feel
- Magnesium alloy: Extremely light yet strong
- Carbon fiber: Very light and durable but expensive
- Plastic: Affordable but less durable
Form Factor:
- Ultraportable (13-14″): Lightweight, great for travel
- Standard (15-16″): Balance of screen size and portability
- Desktop replacement (17″+): Large screen, less portable
The shell assembly process requires careful attention to component fit and cooling solutions. Some enthusiasts even create custom shells using 3D printing technology, though this requires advanced skills.
Display and Graphics
Your laptop’s display greatly impacts your overall experience. Key factors to consider include:
Resolution:
- Full HD (1920×1080): Standard, good balance of clarity and battery life
- 2K (2560×1440): Sharper text and images
- 4K (3840×2160): Ultra-sharp but drains battery faster
Panel type:
- IPS: Better colors and viewing angles
- TN: Faster response times (gaming), cheaper
- OLED: Best contrast and colors but more expensive
For graphics processing, you’ll choose between integrated graphics (built into the CPU) or dedicated graphics cards. Integrated graphics work for everyday tasks, while dedicated GPUs like NVIDIA RTX or AMD Radeon are essential for gaming and creative work.
Consider refresh rate (60Hz, 120Hz, 144Hz) if you’ll use your laptop for gaming. Higher rates mean smoother motion.
Keyboards and Input Devices
The keyboard is your primary interaction point with your laptop. When building a custom laptop, you can choose:
Keyboard types:
- Membrane: Quieter, less tactile feedback, less expensive
- Mechanical: Better typing feel, customizable, more durable
- Scissor-switch: Low profile, good feedback, common in premium laptops
Key features to consider:
- Backlighting (single color or RGB)
- Key travel distance (how far keys press down)
- Layout (full-size with numpad or compact)
- Programmable keys for shortcuts
For trackpads, glass surfaces offer the smoothest experience. Consider size and whether it has physical buttons or relies on gestures. Some custom laptop builds allow for modular input devices that can be swapped out when needed or upgraded later.
Choosing the Right Hardware
Selecting components for your laptop build requires careful consideration of performance needs, budget constraints, and future upgradability options. These factors will determine whether your custom laptop meets your expectations or falls short.
Determining Performance Needs
First, assess what you’ll use your laptop for. Different activities demand different hardware specifications.
For everyday tasks like web browsing, document editing, and video streaming, you can opt for mid-range components like:
- CPU: Intel Core i5 or AMD Ryzen 5
- RAM: 8-16GB
- Storage: 256-512GB SSD
If you’re building a gaming laptop, you’ll need more powerful hardware to ensure a smooth gaming experience:
- CPU: Intel Core i7/i9 or AMD Ryzen 7/9
- RAM: 16-32GB (higher speeds preferred)
- Storage: 512GB-1TB SSD (with optional HDD for extra storage)
- Dedicated GPU: NVIDIA GTX/RTX or AMD Radeon series
Professional work like video editing or 3D modeling requires similar high-performance specs to gaming but with emphasis on CPU multi-core performance and greater RAM capacity.
Balancing Budget and Quality
Setting a realistic budget helps narrow down component choices while ensuring quality. Don’t skimp on critical parts.
The processor (CPU) and graphics card typically consume the largest portion of your budget. These components are harder to upgrade later, so invest wisely here first.
For storage, consider a dual-drive setup: a smaller, faster SSD for your operating system and frequently used programs, with a larger HDD for file storage. This balances speed and capacity at a reasonable price.
Memory (RAM) significantly impacts multitasking ability. 16GB has become the sweet spot for most users, with 32GB beneficial for heavy workloads.
Avoid the cheapest components, as they often have shorter lifespans and poorer performance. Research reviews and benchmark results before purchasing any part.
Compatibility and Upgradability
Unlike desktop PCs, laptops have stricter compatibility requirements and limited upgrade paths. This makes initial component selection crucial.
When building your own laptop, check that all components use compatible interfaces and form factors. Some laptops use proprietary designs from OEM manufacturers that limit what parts will fit.
Focus on laptops with socketed (not soldered) components whenever possible. This allows you to upgrade:
- RAM modules
- Storage drives (M.2 slots and 2.5″ bays)
- Wireless cards
Consider frameworks that allow for future CPU or GPU upgrades, though these are less common in the laptop space.
Battery life is another consideration that depends on component efficiency. Higher-performance parts typically consume more power, reducing portability.
Check the maximum supported specifications for each component slot to understand your future upgrade ceiling.
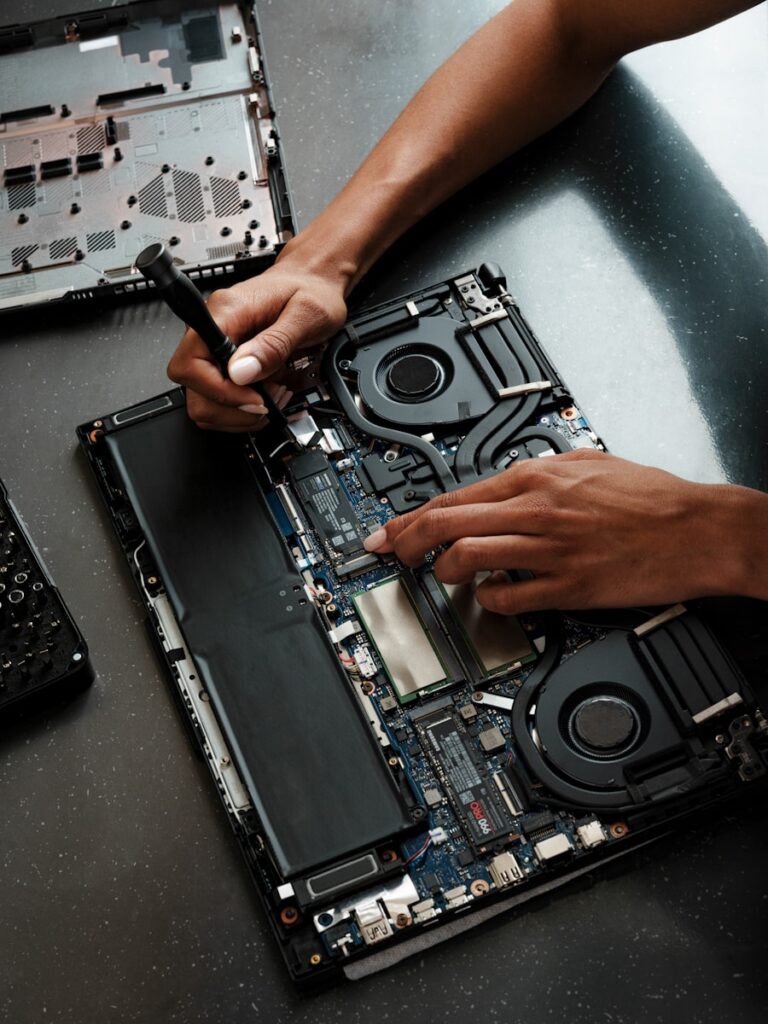
Assembling Your Laptop
Putting together your own laptop requires careful planning and precise execution. The assembly process is straightforward when you follow the right steps and have proper tools on hand.
Gathering Necessary Tools
Before starting your laptop assembly, collect all necessary tools to ensure a smooth process:
- Small Phillips-head screwdriver (size #00 or #000)
- Anti-static wrist strap to prevent damaging components with static electricity
- Plastic pry tools for safely opening laptop cases
- Thermal paste for CPU installation
- Small containers to organize screws
- Tweezers for handling small components
- Good lighting and a clean, spacious work area
Having these tools ready will save you time and frustration during the build process. Many DIY laptop kits include basic tools, but it’s worth investing in quality equipment if you plan to work on computers regularly.
Step-by-Step Assembly Guide
Prepare your workspace – Find a clean, well-lit area and put on your anti-static wrist strap.
Unbox all components – Carefully remove and identify each part before beginning.
Install the CPU – Apply a small amount of thermal paste and secure the CPU in its socket.
Add RAM modules – Insert them at a 45-degree angle until they click into place.
Connect the SSD/storage drive – Secure it with the appropriate screws.
Attach the display assembly – Connect ribbon cables carefully without forcing them.
Connect power components – Ensure the battery is properly seated and connected.
Close the chassis – Carefully align all pieces before securing screws, working from the center outward.
The Framework Laptop is an example of a modular system designed for easy assembly. Unlike desktop builds, laptop assembly requires extra care due to compact components.
Troubleshooting Common Issues
No Power Issues: If your newly assembled laptop won’t power on, check all power connections. Ensure the battery is charged and properly seated. Verify that the power button ribbon cable is correctly connected to the motherboard.
Display Problems: Black screens often result from loose display connections. Carefully recheck all ribbon cables between the motherboard and screen. Ensure the display cable isn’t pinched or damaged.
Overheating: If your laptop runs hot, you may need to reapply thermal paste or check that cooling components are properly installed. Ensure all vents are unobstructed.
Component Compatibility: Unlike desktop builds, laptops have strict compatibility requirements. If components don’t fit correctly, double-check that they’re designed for your specific model.
Remember that patience is key when troubleshooting. Take breaks if you feel frustrated and consult online forums for model-specific advice.
Installing the Operating System
Once you’ve assembled your laptop hardware, you need to breathe life into it with an operating system. This critical step transforms your collection of components into a functional computer that you can use for daily tasks.
Choosing an Operating System
Your operating system choice will impact how you use your laptop and what software you can run. Windows is popular for gaming and mainstream software compatibility, while macOS is limited to Apple hardware but offers seamless integration with Apple devices. Linux provides a free, open-source alternative with various distributions like Ubuntu or Mint that are user-friendly.
Consider these factors when choosing:
- Compatibility with your hardware components
- Software needs for work or entertainment
- Technical comfort level with different systems
- Budget constraints (Windows requires a license, Linux is free)
For most self-built laptops, Windows or Linux makes the most sense. Windows offers wide software support, while Linux provides better performance on lower-end hardware and greater customization options.
Installation Process
To install your operating system, you’ll need to create a bootable USB drive with your OS of choice. This requires downloading the OS installation files (ISO) and using software like Rufus or BalenaEtcher to create the installer.
With your bootable USB ready, follow these steps:
- Insert the USB drive into your laptop
- Power on and enter BIOS/UEFI (usually by pressing F2, F12, or Delete during startup)
- Navigate to boot options and set the USB drive as the primary boot device
- Save settings and restart
- Follow the on-screen installation prompts
During installation, you’ll need to select your language, partition your drive, and create user accounts. Most modern OS installers are straightforward with clear instructions at each step.
Initial Configuration and Updates
After installation completes, your laptop will restart into the new operating system. Now it’s time to:
- Connect to the internet to download crucial updates
- Install hardware drivers for components like Wi-Fi, graphics, and audio
- Update the system with the latest security patches and bug fixes
For Windows, use Windows Update and check manufacturer websites for specific drivers. For Linux, most drivers come built-in, but you may need to update through the package manager.
Set up your user preferences including display resolution, power settings, and security options. Install essential software like browsers, antivirus (for Windows), and productivity tools.
Consider creating a recovery drive or system backup once everything is configured properly. This provides insurance against future system problems.
Optimization and Maintenance
After building your custom laptop, proper optimization and ongoing maintenance are crucial for keeping it running at peak performance. These practices will extend your device’s lifespan and help you avoid common issues that plague laptop users.
Enhancing Performance
Start by optimizing your laptop’s settings for peak performance. Remove unnecessary startup programs that consume valuable resources when your computer boots. You can do this through Task Manager on Windows or System Preferences on macOS.
Manage your power settings wisely. For maximum performance when plugged in, choose “High Performance” mode, but switch to “Balanced” or “Power Saver” when running on battery.
Install only the software you truly need. Bloatware can significantly slow down your system. Consider using lightweight alternatives to resource-intensive programs when possible.
An SSD upgrade is one of the most effective performance boosters if you haven’t included one in your initial build. The speed difference compared to traditional hard drives is dramatic for boot times and program loading.
Regular Maintenance Schedule
Create a monthly maintenance routine to keep your custom laptop running smoothly. Clean your system physically by using compressed air to remove dust from vents, keyboard, and fans.
Run disk cleanup and defragmentation tools (for non-SSD drives) to optimize storage. For SSDs, use the TRIM command instead, which your operating system typically handles automatically.
Update your operating system and drivers regularly. These updates often include performance improvements and security patches that protect your custom build.
Scan for malware weekly using reliable security software. Malicious programs can dramatically reduce performance while putting your data at risk.
Monitor your battery health if you’re using your laptop unplugged. Most modern operating systems have built-in tools to check battery condition and recommend when replacement might be necessary.
Upgrade Paths
One major advantage of building your own laptop is the ability to upgrade components as needed. Plan future upgrades by staying informed about compatible parts for your specific model.
RAM is typically the easiest and most cost-effective upgrade. Adding memory can significantly improve multitasking performance and overall responsiveness, especially for resource-intensive tasks like gaming or video editing.
For gaming performance, external GPU solutions (eGPUs) can transform your laptop’s capabilities if your model supports Thunderbolt connectivity. This allows you to enjoy modern gameplay without building an entirely new system.
Consider the Framework Laptop approach when planning upgrades. These modular laptops are designed specifically for easy component swapping, making them truly future-proof compared to traditional models.
Document all your upgrades and keep original parts as backups when possible. This creates a safety net if newer components don’t perform as expected.
Personalizing Your Laptop
Making your laptop truly yours goes beyond hardware specifications. Personalization allows you to express your style while improving your daily computing experience through aesthetic and functional modifications.
Custom Skins and Decals
Laptop shells offer excellent opportunities for personalization without affecting performance. You can build your own laptop with a customizable exterior from the start, or modify an existing one.
Pre-cut vinyl skins provide full coverage protection while adding unique designs. These adhere directly to your laptop’s lid and palm rest areas, protecting against scratches and fingerprints. Many companies offer custom-printed options with your photos or artwork.
Decals and stickers offer a more flexible approach. You can create patterns or collages that reflect your interests and style. For a clean look, consider placement before applying:
- Center larger designs on the lid
- Arrange smaller stickers in deliberate patterns
- Leave some negative space for a professional appearance
Some customizable laptops even feature replaceable panels, allowing you to swap colors and materials as your preferences change.
Keyboard and Touchpad Options
The keyboard represents one of the most hands-on customization opportunities for your laptop. When building your own laptop, keyboard selection dramatically impacts both aesthetics and functionality.
Keyboard skins provide spill protection while adding color. Silicone overlays come in various colors and patterns, with some featuring shortcut labels for specific software.
Keycap replacements offer more permanent customization. Some laptops allow you to replace individual keycaps with colored or textured alternatives. Consider:
Keyboard Customization Options:
| Type | Benefits | Considerations |
|---|---|---|
| Silicone skins | Spill-proof, removable | May reduce typing feel |
| Custom keycaps | Permanent, tactile | Requires compatible keyboard |
| Backlight mods | Visual appeal | Power consumption |
Touchpad stickers add texture and style without affecting functionality. For advanced users, custom touchpad gestures can be programmed through your operating system settings.
Software Customization
Beyond physical modifications, software personalization transforms how you interact with your laptop. Start with your desktop environment by selecting wallpapers that inspire productivity or match your aesthetic preferences.
Custom icons and themes create a cohesive visual experience. Most operating systems support icon packs that transform the look of applications and system folders. Consider installing a custom theme that changes window colors, button styles, and animation effects.
Productivity customizations improve workflow efficiency. Try these options:
- Custom keyboard shortcuts for frequently used applications
- Start menu or dock organization by work categories
- Automatic color temperature adjustment for reduced eye strain
When creating a custom laptop, consider which pre-installed software you’ll keep. Remove unnecessary bloatware to improve performance and create a cleaner digital environment tailored specifically to your needs.
Frequently Asked Questions
Building your own laptop involves understanding specific components, assembly processes, and cost considerations. These questions cover the essential aspects of DIY laptop construction that most beginners want to know.
What components are required to assemble a custom laptop?
To build your own laptop, you’ll need several key components. These include a barebones laptop chassis, CPU, RAM, storage drive (SSD or HDD), Wi-Fi card, and an operating system.
You’ll also need to consider a compatible battery, display panel, and keyboard if these aren’t included in your barebones kit. Some kits may require you to purchase a separate cooling system as well.
Don’t forget smaller components like screws and thermal paste for proper CPU installation. Having the right tools, including precision screwdrivers, is essential for the assembly process.
Can you explain the process of putting together a laptop from a barebones kit?
The assembly process typically begins with opening the barebones chassis. You’ll first need to install the CPU carefully into its socket, applying thermal paste as needed.
Next, insert the RAM modules into their slots until they click into place. The storage drive installation follows, which usually involves connecting SATA or M.2 drives to their respective connectors.
Finally, you’ll install the Wi-Fi card, connect all internal cables, and close the chassis. After assembly, you’ll need to install your operating system and necessary drivers to make your laptop functional.
What are the advantages of building a laptop for gaming purposes versus buying a pre-built one?
Building a gaming laptop gives you precise control over performance specifications. You can select exactly the GPU and CPU combination that matches your gaming needs and budget.
Custom-built gaming laptops often offer better value for money as you’re not paying for unwanted features or manufacturer markups. You can focus your budget on components that matter most for gaming performance.
Another advantage is the learning experience and satisfaction of creating your own gaming machine. You’ll understand your system better, making future upgrades or troubleshooting easier.
Where can one find a reputable build-your-own laptop kit for purchase?
Framework Laptop offers one of the most popular and well-supported DIY laptop kits. Their systems are designed specifically for customization and future upgrades.
Several smaller companies specialize in barebones laptop kits, including Clevo and Sager. These manufacturers provide various chassis options that support different component configurations.
Some online retailers like XoticPC and Eurocom sell partially assembled laptop kits that you can complete with your choice of components.
What are the cost implications of constructing your own laptop as compared to purchasing a standard model?
Building your own laptop typically costs about the same or slightly more than buying a comparable pre-built model. However, the value proposition comes from getting exactly the components you want.
You might save money in the long run through easier upgrades. Instead of replacing the entire laptop when it becomes outdated, you can upgrade individual components as needed.
The initial investment may be higher due to purchasing tools and possibly some extra parts. Factor in these additional costs when budgeting for your DIY laptop project.
How does the Framework Laptop offer a unique opportunity for DIY laptop construction?
The Framework Laptop is designed with modularity as its core principle. It features expansion cards that can be easily swapped out to add different ports according to your needs.
Framework provides detailed guides and videos that walk you through the assembly process. This makes it accessible even for those with limited technical experience.
Unlike most laptops, Framework models allow you to upgrade nearly every component, including the CPU, GPU, and screen. This extends the useful life of your laptop and reduces electronic waste.