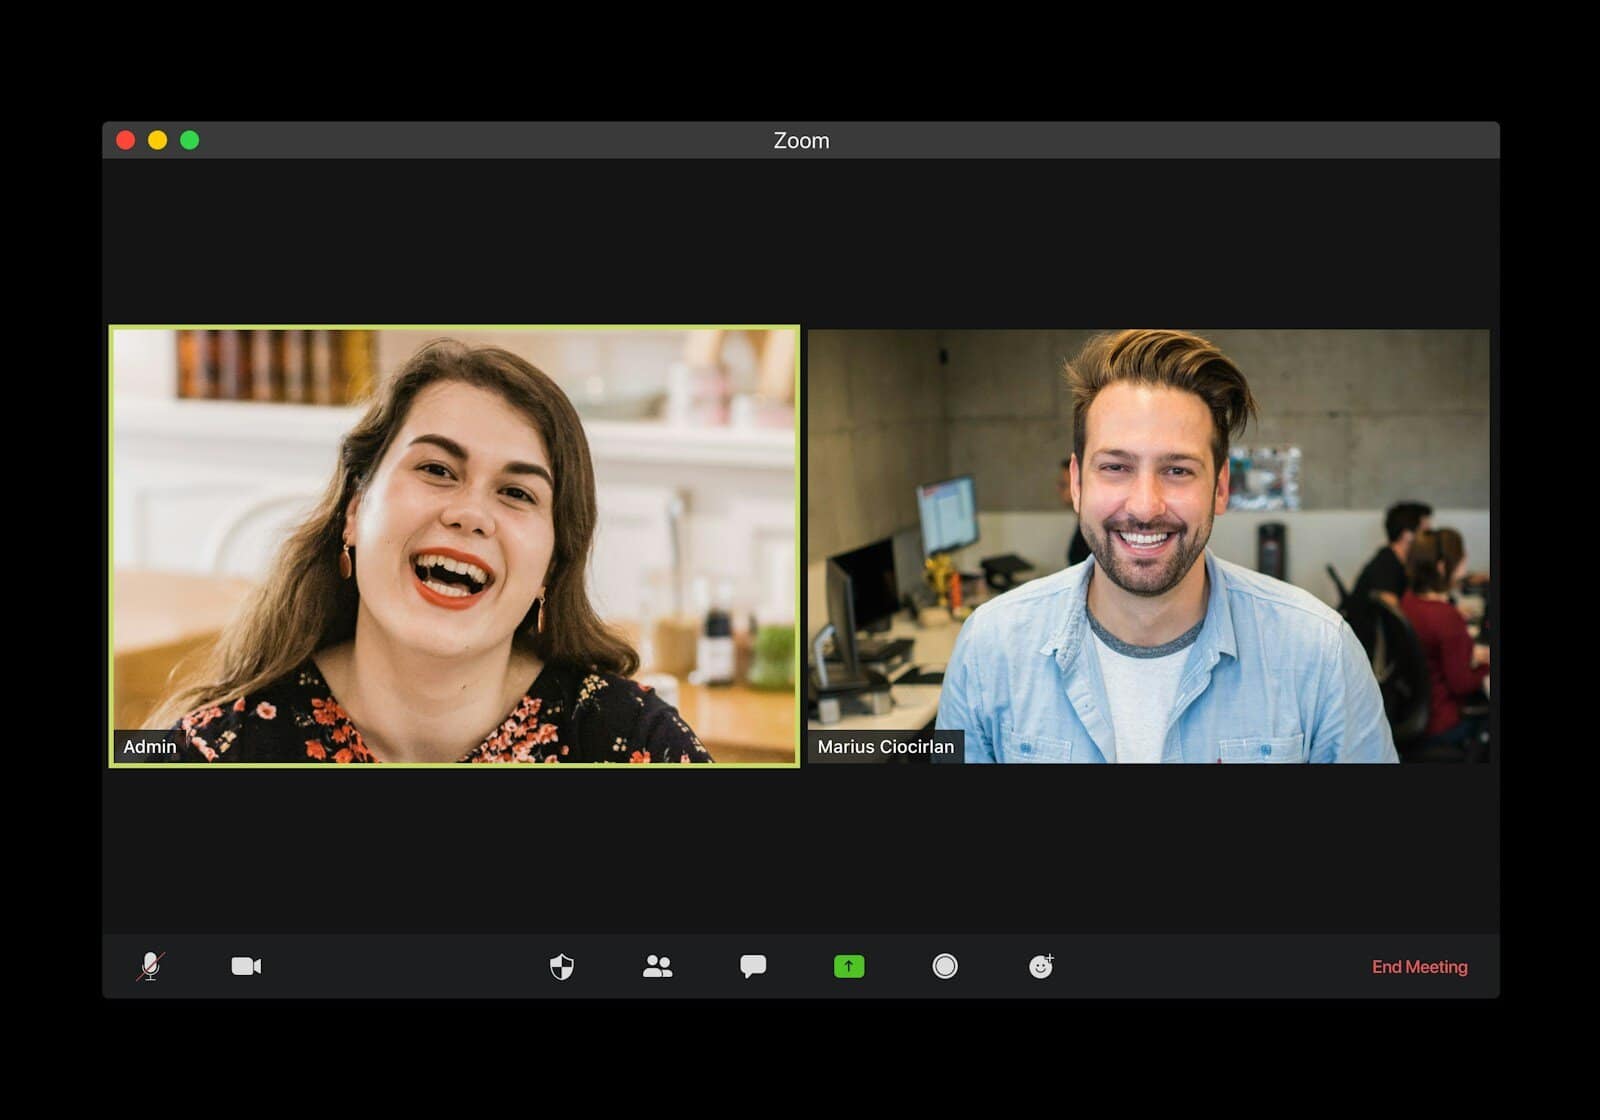
Zoom’s blur background feature offers a simple solution for maintaining privacy and professionalism during video calls. Users can easily obscure their surroundings with just a few clicks, creating a clean and distraction-free environment for meetings.
The blur background option works on desktop and mobile devices, allowing users to hide personal spaces or messy rooms without the need for a virtual background image. This feature is especially useful for those working from home or in shared spaces, ensuring confidentiality and a polished appearance.
Enabling the blur effect takes seconds and can be done before or during a meeting. It provides a balance between showing one’s presence and protecting sensitive information that might be visible in the background.
How to Use the Blur Background Feature on Zoom
Zoom’s blur background feature is designed to subtly obscure whatever’s behind you on camera, keeping the focus on you while eliminating distractions. Whether you’re in a shared space, a messy room, or just prefer more privacy, this feature is an easy and effective solution—and it works across most modern devices. Here’s everything you need to know to use it like a pro.
On Desktop (Windows & Mac)
Before Joining a Meeting:
- Open the Zoom desktop app and sign in.
- Click your profile picture in the upper right, then choose Settings.
- Go to Backgrounds & Effects (or Background & Filters, depending on your version).
- Select Blur from the list of virtual backgrounds.
During a Meeting:
- Click the upward arrow (^) next to the Start/Stop Video button on the toolbar.
- Choose Choose Virtual Background.
- Select Blur from the available options.
No need for a green screen or preloaded images—Zoom uses real-time background processing to apply the blur effect.
On Mobile Devices (iOS & Android)
During a Meeting:
- Join your Zoom meeting.
- Tap anywhere on the screen to bring up the controls.
- Tap More (the three dots at the bottom right).
- Select Backgrounds & Effects or Virtual Background.
- Tap Blur to enable the effect instantly.
Note: The feature may take a second to apply, depending on your phone’s processing power.
Minimum Requirements to Enable Blur
Not all devices are compatible with Zoom’s blur feature. Here’s what you’ll need to ensure it works smoothly:
For Desktop:
- Zoom Version: 5.5.0 or newer
- Operating System: Windows 7 or higher, macOS 10.13 (High Sierra) or later
- Processor: At least a quad-core CPU (Intel i5 equivalent or better recommended)
- Graphics: Integrated or discrete graphics that support background processing
For Mobile:
- Zoom Version: 5.6.6 or newer
- iOS: iPhone 8 or later, running iOS 11+
- Android: Android 8.0 or newer with sufficient processing power
Older or lower-end devices may not show the blur option, as the feature relies on real-time video processing.
Tips for Best Results
- Avoid similar colors between your clothes and the background to prevent blending.
- Good lighting helps Zoom detect the edges of your body and apply the blur more cleanly.
- Stable internet is essential—if your connection is poor, Zoom may drop background effects to preserve video quality.
- If your system struggles, disable HD video in Zoom settings to help performance.
What to Do if Blur Isn’t Working
If you don’t see the blur option, try the following:
- Update Zoom to the latest version via the official site or app store.
- Restart your device to refresh Zoom’s settings.
- Ensure compatibility by checking the processor and OS version.
- Reinstall Zoom, which can fix any corrupted settings preventing features from appearing.
If you’re using a work or school account, your administrator may have disabled virtual backgrounds. In this case, you’ll need to check your account’s group policies or ask IT for access.
How Zoom’s Blur Feature Compares to Virtual Backgrounds
Unlike virtual backgrounds that replace your surroundings with a static or animated image, the blur effect keeps your environment visible—just out of focus. It offers a more natural look and avoids the awkward cutouts that sometimes occur with custom backgrounds, especially if your lighting isn’t ideal or you move around a lot during calls.
Blur also uses less system resources than full virtual backgrounds, making it a better option for users with mid-range hardware.
The blur background feature on Zoom is more than just a cosmetic touch—it’s a productivity tool, privacy aid, and a way to keep meetings more focused. Whether you’re jumping into a video call from your kitchen or a coworking space, this feature can make your setup look cleaner and more professional with a single click.
Key Takeaways
- Zoom’s blur background feature enhances privacy and professionalism in video calls
- Users can enable background blur on both desktop and mobile devices
- The feature is quick to activate and can be toggled on or off during meetings
Understanding Zoom Virtual Backgrounds
Zoom virtual backgrounds offer users privacy and customization options during video calls. This feature allows participants to replace their real background with an image or video.
Technical Requirements
Zoom virtual backgrounds work best with specific hardware and software setups. Users need a computer with a quad-core processor or higher for optimal performance. The latest version of the Zoom desktop client is essential.
For best results, a solid-color background (preferably green) helps. Adequate lighting improves background detection. Some newer devices have built-in virtual background support without a green screen.
Zoom recommends at least 8GB of RAM for smooth operation. Graphics cards can enhance virtual background quality. Intel HD Graphics 4000 or newer, AMD Radeon R5 or newer, and NVIDIA GeForce GT 710 or newer are suitable options.
Privacy Implications
Virtual backgrounds in Zoom meetings provide a layer of privacy for users. They hide personal spaces, protecting sensitive information in home or office environments.
This feature helps maintain professionalism in various settings. It prevents unintended sharing of personal details visible in real backgrounds.
However, users should be aware of potential privacy risks. Virtual backgrounds may not always fully cover the real environment. Movement or technical glitches can reveal parts of the actual background.
Zoom’s privacy policy covers the use of virtual backgrounds. Users should review this policy to understand how their data is handled when using this feature.
How to Use the Blur Background Feature
The blur background feature in Zoom enhances privacy and reduces distractions during video calls. It’s easy to activate and works on various devices and platforms.
Accessing Settings on Different Platforms
On Windows and macOS, open the Zoom desktop app and click the gear icon to access settings. For iOS and Android, tap the gear icon in the Zoom app’s bottom right corner. Linux users can find settings by clicking their profile picture in the top-right of the Zoom window.
The blur option is located in the “Virtual Background” or “Background & Effects” section. If you don’t see it, ensure your Zoom client is updated to the latest version.
Step-by-Step Blur Activation
- Start or join a Zoom meeting
- Click the ^ arrow next to “Stop Video”
- Select “Choose Virtual Background”
- In the sidebar, click “Blur”
- Your background will now be blurred
For mobile devices:
- Tap “More” during a meeting
- Select “Virtual Background”
- Choose “Blur” from the options
Users can also enable blur before joining a meeting by accessing the Virtual Background settings. This saves time and ensures privacy from the start of each call.
Customizing Zoom Backgrounds
Zoom offers various options to personalize your video background during meetings. Users can select from preset images, upload custom pictures, or use the blur effect for privacy.
Selecting and Uploading Images
Zoom provides a range of pre-installed background images. To access these, click the ^ arrow next to the video icon and choose “Choose Virtual Background.” Users can also add their own images.
To upload a custom background:
- Open Zoom settings
- Click “Background & Effects”
- Select the “+” icon
- Choose “Add Image” or “Add Video”
- Pick a file from your computer
For best results, use high-resolution images (1280×720 pixels or higher). Avoid copyrighted material unless you have permission.
Using the Virtual Backgrounds Tab
The Virtual Backgrounds tab in Zoom settings lets users manage their background options. Here’s what you can do:
- Preview backgrounds in real-time
- Reorder saved backgrounds
- Delete unwanted images
- Toggle video mirroring
- Enable/disable “I have a green screen”
Zoom also offers video backgrounds and fun filters. These features may require more processing power. Check your computer meets the system requirements before using complex backgrounds.
Best Practices and Tips for a Professional Appearance
Optimizing your Zoom background enhances professionalism and privacy during video calls. Proper setup and troubleshooting ensure a polished virtual presence.
Choosing the Right Background for Meetings
Select a clean, uncluttered space for your background. A plain wall or bookshelf works well. Avoid busy patterns or distracting elements. Position your camera to frame you properly against the chosen background.
Test different lighting setups to find the best illumination. Natural light from windows can be flattering, but be cautious of glare. Consider using a ring light for even, professional lighting.
Virtual backgrounds offer flexibility, but choose wisely. Select professional, neutral options that don’t detract from the meeting. Zoom provides several built-in choices, or users can upload custom images.
Troubleshooting Common Issues
Blurry or choppy backgrounds often stem from insufficient processing power. Close unnecessary applications to free up resources. Updating graphics drivers may also improve performance.
For optimal background detection, wear solid-colored clothing that contrasts with your surroundings. Avoid clothing patterns similar to your background.
Ensure your Zoom client is up-to-date. Newer versions often include improvements to virtual background and blur features.
If background blur isn’t working, check your Zoom settings. Navigate to “Backgrounds & Filters” and confirm the blur option is enabled. Some older devices may not support this feature.
Frequently Asked Questions
Zoom offers background blur options across various devices and platforms. Users may encounter different settings and steps depending on their specific setup.
How can I blur my background in Zoom on a laptop?
Open the Zoom desktop client and sign in. Click your profile picture, then select Settings. Navigate to Backgrounds & Filters. Choose the Blur option to obscure your surroundings during meetings.
What should I do if the blur background option is missing in Zoom?
Check if your Zoom client is up to date. Sign out and sign back in to refresh settings. If the issue persists, ensure Virtual Background is enabled in your account settings on the Zoom web portal.
How can I download a virtual background for use in Zoom?
Zoom provides free virtual backgrounds on their website. Visit the Zoom Virtual Background library, select an image, and download it. In the Zoom client, go to Backgrounds & Filters and click the plus icon to add the downloaded image.
Can I blur my background when using Zoom on an iPhone?
Yes, iPhone users can blur their backgrounds. Open the Zoom app and join a meeting. Tap More in the meeting controls. Select Background and Filters, then choose Blur to apply the effect.
What are the steps to blur the background in Zoom on an Android device?
Start or join a Zoom meeting on your Android device. Tap More in the meeting controls. Select Background and Filters. Choose the Blur option to apply the effect to your background.
Is using a blurred background appropriate during a Zoom interview?
Blurred backgrounds can be suitable for interviews. They maintain a professional appearance by hiding distracting elements. However, ensure your face is well-lit and centered in the frame for the best impression.