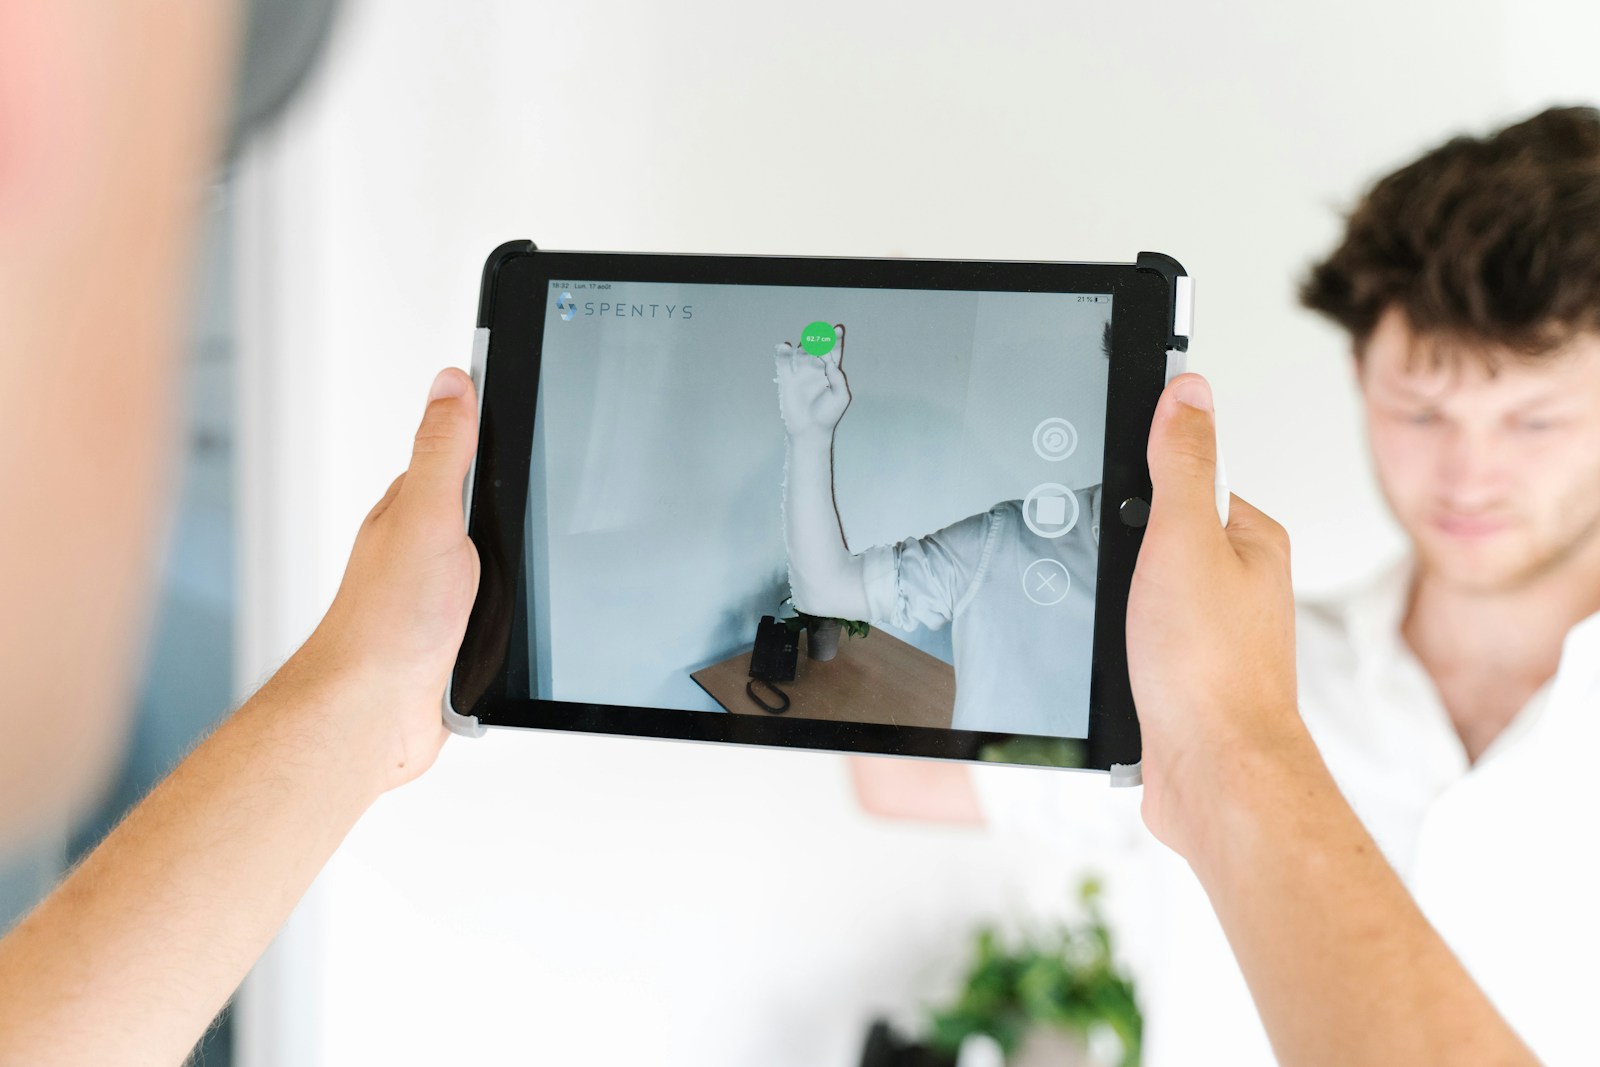
3D scanning technology has transformed how we create digital content, making it faster and easier than ever to bring real-world objects into virtual spaces. You can now capture detailed 3D models using just your smartphone and the right app, opening up endless possibilities for designers, developers, and creators. Creating high-quality 3D scans requires proper preparation, good lighting conditions, and careful capturing techniques to ensure your digital models are accurate and usable in content creation applications.
The process has become much more accessible thanks to user-friendly apps that guide you through each step. Many modern 3D scanning applications now include AR-guided capture features that help you position your device correctly while taking photos from multiple angles. Once captured, these apps can process the images directly on your device, allowing you to preview, share, or export your 3D models within minutes.
With your completed scan, you can easily drag and drop the textured OBJ file into popular 3D content creation tools like Cinema 4D. This seamless workflow enables you to quickly iterate on designs, create interactive experiences, or develop augmented reality applications without the technical barriers that previously existed.
1. Choose Your Scanning Method
There are two main ways to capture a 3D scan:
- Smartphone Apps (photogrammetry or LiDAR):
- iPhone/iPad with LiDAR (e.g., iPhone Pro models, iPad Pro).
- Apps like RealityScan, Polycam, or 3D Scanner App (source: 3DPrinterly).
- Dedicated 3D Scanners:
- Devices like Revopoint POP 3 or Structure Sensor (source: Creative Bloq).
- Provide higher accuracy and faster results, ideal for professional workflows.
2. Prepare Your Object & Environment
- Lighting: Use soft, even lighting. Avoid harsh shadows or glare.
- Background: Place the object against a neutral, uncluttered background.
- Stability: Put the object on a stable surface or use a turntable for smoother scanning.
- Surface Considerations: Matte, textured objects scan best. Glossy, transparent, or very dark surfaces may need spray or powder coating to capture details.
3. Capture the Scan
Using a Smartphone App
- Open your chosen 3D scanning app.
- Slowly move around the object in a circle, keeping it centered in the frame.
- Capture from multiple angles (top, sides, low angles) to cover all surfaces.
- Ensure overlap between photos/scans for accurate reconstruction.
Using a 3D Scanner
- Connect the scanner to your computer or phone.
- Calibrate if needed (per device instructions).
- Move the scanner around the object, or rotate the object on a turntable.
- Watch the live preview to ensure full coverage.
4. Process the Scan
- Photogrammetry apps automatically stitch photos into a 3D model.
- Dedicated scanners usually come with software (e.g., Revopoint Studio, RealityCapture).
- Steps typically include:
- Aligning and merging scans.
- Cleaning the mesh (removing noise, filling holes).
- Optimizing topology for performance.
5. Export the Model
- Choose a standard 3D format:
- OBJ, FBX, or GLTF for content creation apps (Unreal Engine, Blender, Unity).
- STL for 3D printing.
- Save locally or upload directly to your content creation platform.
6. Tips for Best Results
- Move slowly and steadily when scanning.
- Use a tripod or turntable for small objects.
- For large objects (rooms, furniture), scan in sections and stitch them together.
- Practice with simple objects before scanning complex shapes.
✅ Summary
To capture a 3D scan for a content creation app:
- Pick your scanning method (smartphone app or dedicated scanner).
- Prepare your object with good lighting and background.
- Capture from all angles with overlap.
- Process and clean the scan in software.
- Export to a format compatible with your app.
🔗 Helpful resources:
Key Takeaways
- Modern 3D scanning apps offer AR-guided capture that helps you create accurate models directly from your smartphone with minimal expertise required.
- Proper lighting, smooth object surfaces, and capturing photos from multiple angles are essential for high-quality 3D scans.
- The resulting 3D models can be easily exported and integrated into popular content creation tools for further development and application.
Understanding 3D Scanning
3D scanning transforms real-world objects into digital models through various capture technologies. The process combines precision measurements with sophisticated algorithms to create accurate virtual representations you can use in content creation apps.
History and Evolution of 3D Scanning
3D scanning technology dates back to the 1960s when researchers first experimented with lights and sensors to capture object dimensions. Early systems were expensive, bulky, and limited to industrial applications.
The 1990s saw significant advancement with the introduction of laser-based systems that improved accuracy considerably. These systems, while more precise, remained largely inaccessible to average users due to high costs.
The true revolution began in the 2010s with the miniaturization of sensors and increased computing power. Smartphones incorporated depth sensors, making 3D scanning accessible to everyone. Today’s technology allows you to capture detailed 3D models using just your phone camera through techniques like photogrammetry.
Modern scanning apps can process hundreds of images to create detailed models within minutes, democratizing what was once exclusive technology.
Key Principles of 3D Scanning
Point Cloud Generation: The foundation of 3D scanning is the creation of a point cloud – thousands of measured points that represent your object’s surface. These points contain spatial coordinates (X, Y, Z) that map the object’s geometry.
Triangulation: This mathematical principle uses multiple angles to determine precise positions. When scanning, the system measures angles between the light source, object surface, and sensor to calculate exact coordinates.
Accuracy vs. Precision: Two critical factors in 3D scanning quality:
- Accuracy: How close measurements are to the actual object dimensions
- Precision: How consistent and repeatable the measurements are
The resolution of your scan depends on both the hardware capabilities and the scanning method. Higher resolution captures more detail but requires more processing power and storage.
Data Processing: Raw scan data undergoes several processing steps, including noise reduction, alignment, and mesh creation, to transform the point cloud into a usable 3D model.
Types of 3D Scanners
LIDAR (Light Detection and Ranging): Uses laser pulses to measure distances to objects. LIDAR scanners are highly accurate and work well for large-scale projects. Many newer phones include LIDAR sensors, making this technology more accessible.
Photogrammetry: Creates 3D models from multiple 2D photographs taken from different angles. This technique is popular because it requires only a camera. Apps like Scenario let you create 3D models by taking up to 200 photos with your phone.
Structured Light Scanners: Project patterns of light onto objects and analyze distortions to create 3D models. These provide excellent detail for smaller objects and are commonly used in desktop scanners.
Contact Scanners: Use physical probes to touch objects and record measurements. While slower than other methods, they offer exceptional precision for engineering applications.
For content creation, photogrammetry and phone-based LIDAR scanning are typically most accessible, allowing you to capture models and proceed to 3D printing or digital applications.
Preparing for a 3D Scan
Success in 3D scanning depends heavily on how well you prepare before capturing the first image. Proper preparation ensures higher quality scans with fewer errors and less post-processing work.
Choosing the Right Environment
Select a space with consistent, diffused lighting for optimal scanning results. Avoid direct sunlight or harsh shadows as they can confuse the scanning software and create artifacts in your final model.
Natural light from large windows works well, but you can also use softbox lighting setups for controlled indoor environments. Ensure the light is evenly distributed around your object.
The background should be simple and uncluttered. Many professional scanners use a neutral backdrop or turntable to isolate the object. Some advanced 3D scanning apps can automatically remove backgrounds, but providing a clean setup will improve accuracy.
Consider floor surfaces too – textured floors with distinct patterns can help the app track camera movement as you circle the object.
Object Preparation Techniques
Not all objects scan equally well. Shiny, transparent, or very dark objects often cause problems for 3D scanners. Apply a temporary matte finish using scanning sprays or dry shampoo to reduce reflections on glossy surfaces.
Small details matter in reality capture. Clean your object thoroughly and remove any movable parts that might shift during scanning.
For complex objects, consider using small markers or dots if your scanning app supports them. These reference points help the software track position as you move around the object.
Size matters too. Very small objects may require macro lenses or specialized equipment, while very large objects might need to be scanned in sections.
Camera Calibration
Most 3D scanning apps include a calibration step that’s crucial for accuracy. Follow the app’s specific instructions carefully, as calibration methods vary between platforms.
During calibration, you’ll typically need to move your device in specific patterns so the app can understand your camera’s properties. This process maps how your particular camera lens distorts images.
Check that your device has sufficient storage and battery before beginning. 3D capture processes can be resource-intensive and might drain your battery quickly.
For best results, clean your camera lens before starting. Even small smudges can affect scan quality. If using a smartphone, disable features like auto-flash and beauty filters that might interfere with the scanning process.
Capturing the Object
The success of your 3D scan largely depends on how well you capture the object. Proper positioning, methodical scanning techniques, and managing challenging surfaces will ensure your 3D model has the detail and accuracy needed for your content creation app.
Positioning and Setup
Start by placing your object on a surface that contrasts with its color. This helps the scanning app distinguish the object from its background. A turntable can be extremely helpful for capturing all angles without moving the object.
Ensure even lighting from multiple directions to eliminate harsh shadows. Soft, diffused lighting works best – avoid direct sunlight or spotlights that create strong highlights.
For optimal results, remove any reflective elements or cover them with removable matte tape. The scanning environment should be clean and free of distracting elements that might be captured accidentally.
Consider using markers or reference points around complex objects to help the scanning software track movement and position accurately. These reference points create a stable point cloud during processing.
Scanning Process and Techniques
Begin by planning your capture route around the object. Most Object Capture apps recommend 20-200 photos depending on the object’s complexity. Move systematically to ensure complete coverage.
Maintain a consistent distance from the object throughout the scanning process. Overlap each shot by approximately 70% to give the software enough reference points to stitch together a cohesive point cloud.
When using a smartphone app, follow the on-screen guidance which often includes:
- Real-time feedback on capture quality
- Coverage indicators showing captured areas
- Prompts for additional angles needed
Pay special attention to capturing detailed areas from multiple angles. The textures will render more accurately when you provide comprehensive coverage of all surfaces.
Use the speed and accuracy settings available in your app to balance between capture time and detail level based on your project needs.
Handling Movement and Reflection
Reflective surfaces like glass or metal can confuse 3D scanning software because light bounces inconsistently. Apply a temporary matte spray or powder to these surfaces for better results.
For objects with moving parts, secure them in a fixed position during the entire scan. Even slight movements between photos can disrupt the point cloud generation.
Transparent objects present unique challenges. Consider using specialized settings in apps like PhotoCatch that are designed to handle transparency, or temporarily cover clear sections with a removable opaque material.
When scanning larger objects, maintain consistent lighting throughout the process. Changes in lighting can cause the software to misinterpret textures and colors.
If you’re using Apple’s Object Capture, take advantage of its automated guidance which helps you capture optimal angles for challenging surfaces.
Optimizing Scan Quality
Creating high-quality 3D scans requires attention to detail and proper technique. The right approach will significantly impact your final model’s accuracy and usability in content creation applications.
Enhancing Detail Capture
Good lighting is essential for capturing fine details in your 3D scan. Use diffused, even lighting to avoid harsh shadows that can confuse scanning software. Natural daylight works well, but avoid direct sunlight which creates strong contrasts.
Position your subject carefully to ensure all surfaces are visible to the scanner. For complex objects, you may need to capture multiple scans from different angles and merge them later.
Consider these tips for maximum detail:
- Clean the subject thoroughly before scanning
- Use a neutral background to help the scanner distinguish the subject
- Set your scanner to the appropriate point density for your subject
- Move slowly and steadily around the subject during capture
For texture-rich objects, ensure your scanning software is set to capture color data alongside geometric information.
Ensuring Accuracy and Precision
Calibration is crucial for accurate 3D scans. Follow your scanning device’s calibration process before each major scanning session. This helps maintain consistent measurements and prevents distortion.
When scanning, maintain a consistent distance from your subject. Most scanning apps provide visual feedback about optimal scanning distance – follow these guidelines carefully.
Setting the right point density is crucial for balance between detail and file size. Higher densities capture more detail but create larger files that may be difficult to work with later.
For architecture or large object scanning, consider using reference markers to help the software maintain spatial awareness. These markers create anchor points that improve alignment accuracy.
After scanning, review your model for any obvious errors or distortions before proceeding to editing.
Troubleshooting Common Scanning Issues
Incomplete scans often result from poor lighting or improper scanning technique. If your model has holes, try rescanning those areas with better lighting and a slower, more methodical approach.
Texture problems typically stem from inconsistent lighting during capture. If colors appear patchy or wrong, ensure lighting remains constant throughout your scanning process.
When your scan appears distorted or misaligned:
- Check for reflective or transparent surfaces that confuse scanners
- Ensure you’re moving smoothly without sudden movements
- Verify the scanning environment hasn’t changed during capture
- Try reducing background distractions
For models with excessive noise (random imperfections), most scanning applications offer one-tap editing to clean up these issues. Use the built-in smoothing tools, but be careful not to over-smooth and lose important details.
Complex models may require optimization in specialized software after scanning to reduce polygon count while maintaining visual fidelity.
Post-Processing the 3D Scan
After capturing your 3D scan, proper post-processing is essential to transform raw data into usable 3D models. This step ensures your models are clean, properly formatted, and ready for content creation applications.
Data Cleaning and Smoothing
When you first complete a 3D scan for a content creation app, the raw data often contains imperfections. These may include holes, noise, or irregular surfaces that need attention.
Start by examining your scan for obvious errors. Look for:
- Missing data points (holes)
- Rough edges
- Floating geometry
- Unwanted background elements
Most scanning software offers automatic hole-filling and smoothing tools. Apply these conservatively to maintain detail while fixing obvious problems.
For professional results, you might need to manually refine problem areas. Pay special attention to thin sections or complex geometry where automatic tools may struggle. Proper polygon mesh cleaning is crucial for downstream applications.
Many creators use specialty software like Meshmixer or Blender for this stage. These tools provide precise control over smoothing operations and edge refinement.
3D File Formats and Conversion
Your 3D scan likely outputs in a specific format, but content creation apps may require different file types. Understanding common 3D file formats is essential.
Common 3D Scan Formats:
| Format | Strengths | Common Uses |
|---|---|---|
| PLY | Color data, simple structure | Raw scan output |
| OBJ | Widely compatible, texture support | General purpose |
| STL | Simple mesh data, 3D printing | Manufacturing |
| GLTF | Web-friendly, animation support | Online viewing |
Convert your files using dedicated software like Meshlab or Blender. During conversion, be aware that some formats may lose certain data types. For example, converting from PLY to STL might remove color information.
Be strategic about which format to use. Choose OBJ for general modeling, GLTF for web applications, or FBX when animation data is needed.
Refining 3D Models for Content Creation
The final stage involves optimizing your 3D model specifically for your content creation application. This process transforms a clean model into a production-ready asset.
Begin by reducing polygon count (decimation) to an appropriate level. High-poly models are accurate but may slow down applications. Find the balance between detail and performance.
Next, apply proper texturing. If your scan included color data, you’ll need to generate UV maps for texture application. Many user-friendly 3D scanning applications now automate this process.
Consider your end platform’s requirements. Mobile apps need highly optimized assets, while desktop applications can handle more complex models.
Add finishing touches like proper material properties, reflectivity settings, and scale adjustments. Make sure your model interacts correctly with lighting in your target application.
Test your model in the actual content creation environment before finalizing. This reveals any performance issues or visual artifacts that might need additional refinement.
Integration with Content Creation Apps
Once you have your 3D scan, the next critical step is getting it into your design workflow. The right integration approach can save time and enhance your final output quality.
Importing Scans into Design Software
After completing your 3D scan, you’ll need to import it into your preferred design software. Most 3D scanning apps export in common formats like OBJ, STL, or GLTF, making them compatible with popular CAD and 3D modeling programs.
For professional CAD software like AutoCAD or Solidworks, you may need to convert your scan first. These programs often prefer parametric models over mesh-based scans.
When working with BIM (Building Information Modeling) software, ensure your scan includes proper scale information. Many apps now offer direct plugins for seamless integration with Revit, ArchiCAD, and other BIM platforms.
Recommended import settings:
- Use highest resolution exports for detailed work
- Keep original textures when available
- Check mesh integrity before importing
- Consider file size limitations in your target software
Editing and Enhancing Models Within Apps
Modern 3D scanning apps often include built-in editing capabilities. You can use these one-tap edit functions for quick fixes before exporting to more powerful software.
Basic editing typically includes:
- Hole filling
- Noise reduction
- Texture enhancement
- Simple mesh simplification
For Digital Twin creation, you’ll need precise measurements and accurate textures. Some apps offer measurement tools directly in the capture interface, allowing you to verify dimensions before finalizing your model.
Apps that combine photogrammetry with LiDAR provide the best balance of visual quality and dimensional accuracy. This is particularly important when your models will be used for engineering or manufacturing purposes.
Use Cases in Engineering and Manufacturing
In engineering contexts, your 3D scans can serve as reference models for reverse engineering or quality control. When importing scans for these purposes, you’ll need higher accuracy than creative applications require.
Manufacturing applications often include:
- Creating replacement parts for legacy equipment
- Developing custom fixtures and jigs
- Comparing as-built conditions to design specifications
When working with complex assemblies, you might scan individual components separately. This approach gives you better detail and makes the resulting CAD models more usable.
For quality inspection, your scanned models can be compared against original CAD designs to identify deviations. This process, called deviation analysis, helps manufacturing teams spot problems before they become costly errors.
Many mobile scanning applications now support cloud processing, allowing you to capture on-site and process the data remotely for team collaboration.
Advanced Applications
3D scanning technology has evolved beyond basic modeling to encompass sophisticated applications across multiple industries. These advanced uses leverage the detailed spatial data captured to create immersive experiences, preserve artifacts, and simulate real-world environments.
Creating High-Quality 3D Models for Virtual Reality
Virtual reality demands exceptionally detailed 3D models to create convincing immersive experiences. When scanning objects for VR applications, you’ll need to pay special attention to texture quality and polygon count.
Most content creation apps like Polycam offer advanced editing features specifically for VR-ready exports. These tools help you optimize mesh density without sacrificing visual fidelity.
For professional results, consider these essential steps:
- Capture in consistent, diffused lighting
- Take 2-3 times more images than for standard scans
- Use manual mode to adjust exposure settings
- Process with high-resolution texture settings
Post-processing is crucial for VR applications. After completing your scan, use the app’s built-in tools to refine geometry and ensure textures align perfectly at seams.
Digital Documentation and Archival
3D scanning provides unparalleled capabilities for preserving cultural artifacts, architectural elements, and historical items. Many museums now maintain digital archives of their collections using reality capture technology.
When scanning for documentation purposes, accuracy becomes your primary concern. One-tap editing features available in most scanning apps can help refine your captures, but manual adjustments often yield better results for archival quality.
Documentation scans benefit from:
- Consistent measurement references
- Multiple scan passes at different distances
- Detailed metadata recording
The resulting models serve as digital twins that researchers can study without handling fragile originals. Your scans can also be used for education, allowing students to examine artifacts closely in virtual environments.
Spatial Data and Reality Capture for Simulation
Engineering and scientific fields increasingly rely on reality capture for creating accurate simulations. These applications demand highly precise spatial data that accurately represents real-world conditions.
Using apps like AR Code Object Capture, you can generate models suitable for physics simulations, architectural visualizations, and interactive training programs. The scanning process for simulation requires methodical approaches to ensure data integrity.
Key considerations include:
- Capturing complete environments rather than isolated objects
- Recording surface properties that affect physical behavior
- Maintaining consistent scale throughout the capture
Advanced scanning techniques like photogrammetry combined with LiDAR (available in newer devices) provide the dimensional accuracy needed for engineering simulations. Your captured data can then be imported into simulation software to test designs in virtual environments before physical production.
Frequently Asked Questions
Creating high-quality 3D scans requires attention to equipment, lighting, software, and scanning techniques. Understanding these factors will help you avoid common pitfalls and produce better 3D models for your content creation needs.
What equipment is required to produce high-quality 3D scans for content creation applications?
For basic 3D scanning, you can use a modern smartphone with a good camera and 3D scanning apps like Scaniverse or Scenario. These apps leverage your phone’s camera to capture multiple images that are processed into 3D models.
For professional results, consider dedicated 3D scanners like structured light scanners or laser scanners. These provide greater accuracy but at a higher cost.
A tripod helps stabilize your device during scanning, which significantly improves quality. Some setups also benefit from a turntable for small object scanning.
Are there specific lighting conditions that improve the results of 3D scanning for digital asset generation?
Consistent, diffused lighting is crucial for successful 3D scans. Avoid harsh shadows or direct sunlight, as these create unwanted dark areas and highlights that confuse scanning algorithms.
Indoor scanning works best with soft, even lighting from multiple directions. Consider using photography softboxes or LED panels positioned to eliminate shadows.
Outdoor scanning is most effective on slightly overcast days when sunlight is naturally diffused. Early morning or late afternoon provides softer light compared to midday sun.
Which software solutions are recommended for processing and refining 3D scans intended for content creation?
After capturing your scan with apps like Scaniverse, you can use the app’s built-in editing tools for basic refinements. Most scanning apps offer one-tap editing options for quick fixes.
For professional editing, Blender (free) and Autodesk Meshmixer provide powerful tools to clean up meshes, fill holes, and optimize models for different purposes.
Specialized software like Agisoft Metashape or RealityCapture excel at processing photogrammetry data with more advanced options for texture mapping and mesh optimization.
Can you outline the steps involved in preparing an object or space for accurate 3D scanning?
Clean the object or space thoroughly—dust, dirt, and debris can appear as texture or geometric errors in your scan. Remove or cover highly reflective parts with temporary matte spray or powder.
Ensure adequate space around the object to move your scanning device freely. For rooms, remove unnecessary items that might complicate the scan process.
Consider adding temporary visual markers for featureless surfaces. Small colored stickers or tape can help scanning software track the surface properly and will be easy to remove or edit out later.
What are the best practices for ensuring precise geometry and texture capture during the 3D scanning process?
Move slowly and methodically when capturing your scan. Rapid movements cause blurry images that reduce accuracy. Maintain a consistent distance from the subject throughout the scanning process.
Capture overlapping areas between each scan position—aim for at least 30% overlap. This helps the software properly align and stitch together the complete model.
Take more photos than you think necessary. Up to 200 images for a single object can be processed by most modern apps, providing better detail and accuracy than fewer images.
How does material reflectivity impact 3D scan quality, and how can it be managed?
Highly reflective materials like glass, metal, and glossy plastics create problems for 3D scanning by producing inconsistent data points and confusing the scanning algorithm with moving highlights.
Apply a temporary matte coating to reflective objects using products like scanning spray, dry shampoo, or corn starch. These create a scan-friendly surface that can be removed after scanning.
Consider capturing the object’s form with the temporary coating, then photographing textures separately to apply during the post-processing stage for materials that cannot be altered.

