Knowing what graphics card powers your computer is essential when troubleshooting performance issues or considering game requirements. You can quickly check your GPU in Windows by opening Settings > System > Display, then scrolling down to Advanced display settings, where your graphics card information will be displayed. This simple process takes just seconds but provides valuable information about one of your computer’s most important components.
If you prefer using the Task Manager for a more detailed view, you can right-click on your taskbar and open Task Manager, then click the Performance tab. Near the bottom of the window, you’ll see a GPU section that displays your model information and usage statistics in real-time. Understanding your graphics capabilities helps you make informed decisions about software compatibility and potential upgrades.
How to Check What GPU You Have (Windows, Mac, Linux)
🔹 On Windows
- Device Manager
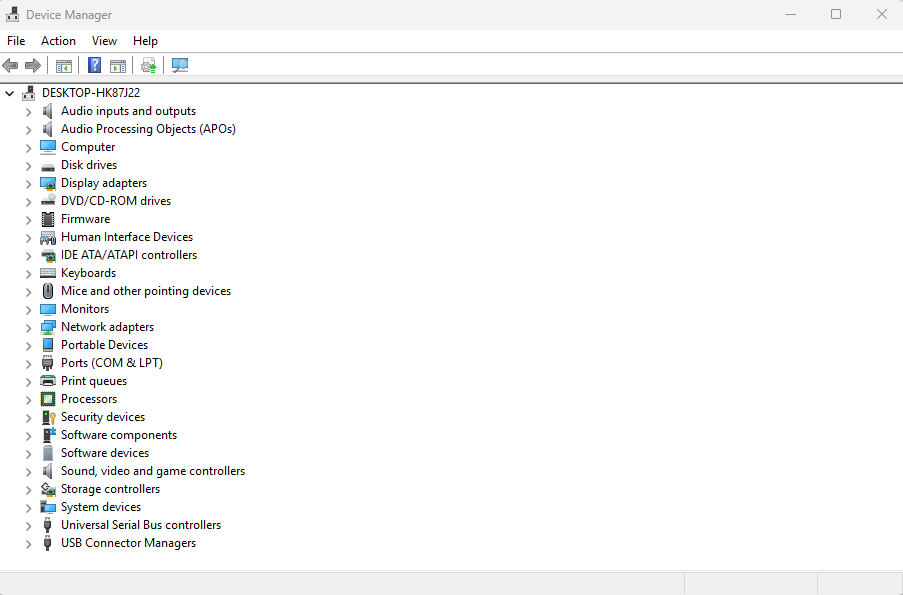
- Press Win + X → select Device Manager.
- Expand Display adapters to see your GPU name.
- Task Manager
- Press Ctrl + Shift + Esc → go to the Performance tab.
- Click GPU to see details like usage, memory, and model.
- DirectX Diagnostic Tool (DxDiag)
- Press Win + R → type
dxdiag→ Enter. - Go to the Display tab for GPU details.
- Press Win + R → type
🔹 On macOS
- Click the Apple menu → About This Mac.
- Under the Overview tab, look for Graphics.
- It will show your GPU model (e.g., Apple M1 GPU, AMD Radeon, Intel Iris).
🔹 On Linux
- Open a terminal.
- Run:
lspci | grep -i vga→ shows GPU info.glxinfo | grep "OpenGL renderer"(if installed) → gives more details.
✅ What You Can Do With This Information
Knowing your GPU helps you:
- Check Game Compatibility
- Compare your GPU against the minimum/recommended requirements of a game.
- Plan Upgrades
- If your GPU is older, you’ll know whether upgrading will improve performance.
- Optimize Performance
- Update drivers from NVIDIA, AMD, or Intel for better performance and fewer bugs.
- Troubleshoot Issues
- If apps crash or graphics look wrong, knowing your GPU helps in diagnosing problems.
- Use the Right Software
- Some creative tools (Blender, Premiere Pro, AI software) need certain GPU features like CUDA (NVIDIA) or Metal (Apple).
- Monitor Health
- With tools like MSI Afterburner (Windows) or
nvidia-smi(Linux), you can track temperature, clock speeds, and memory usage.
- With tools like MSI Afterburner (Windows) or
👉 In short: Checking your GPU tells you what your system is capable of, whether you need upgrades, and how to optimize your performance.
Key Takeaways
- You can check your GPU through Windows Settings under Display > Advanced display or through Task Manager’s Performance tab.
- Knowing your graphics card details helps with troubleshooting game performance issues and meeting software requirements.
- Regular monitoring of your GPU can help identify potential problems before they affect your system performance.
Understanding GPU and its Importance
A graphics processing unit (GPU) is a specialized electronic circuit designed to handle graphical calculations quickly. Your GPU plays a crucial role in how your computer displays images, videos, and handles complex visual tasks.
Differences Between Integrated and Dedicated Graphics
Integrated graphics are built into your computer’s CPU and share system memory. They work well for basic tasks like web browsing, office applications, and watching videos.
Dedicated graphics cards are separate components with their own video memory (VRAM). This setup provides better performance for demanding tasks.
Key differences include:
- Performance: Dedicated GPUs offer 2-10x better performance
- Power consumption: Integrated graphics use less energy
- Cost: Systems with integrated graphics are more affordable
- Upgrade options: Dedicated cards can be replaced/upgraded
To check which type you have, go to Settings > System > Display > Advanced display where your GPU information will appear.
Impact of GPU on Gaming and Graphics Performance
Your GPU significantly affects gaming experiences and graphics-intensive applications. A powerful graphics card delivers smoother gameplay, higher frame rates, and better visual quality.
Modern games require substantial GPU power to render detailed environments and effects. In gaming, your GPU handles:
- Real-time rendering of 3D environments
- Texture processing
- Lighting and shadow effects
- Physics calculations
Video memory (VRAM) is particularly important for gaming at higher resolutions. More VRAM allows your system to store larger textures and handle more complex scenes without stuttering.
When shopping for a gaming PC, prioritize the GPU over other components for the best performance gains. A mid-range GPU with 6-8GB VRAM offers good value for most gamers.
Accessing GPU Information
Checking your GPU information gives you important details about your graphics hardware, including model, memory size, and driver version. This knowledge helps with troubleshooting, upgrading, and ensuring your system meets requirements for games or applications.
Using Device Manager to Check GPU Details
Windows Device Manager provides a straightforward way to find basic information about your graphics card. To access it, press Windows key + X and select “Device Manager” from the menu that appears.
In Device Manager, look for the Display adapters category and click the arrow beside it to expand. You’ll see your GPU listed there.
Right-click on your graphics card and select “Properties.” This opens a window with several tabs containing information about your device.
The “General” tab shows the device status, while the “Driver” tab displays the driver version and date. For more detailed information, check the “Details” tab and select “Hardware Ids” from the dropdown menu.
Exploring Display Adapter Properties
For additional GPU information, you can access display adapter properties through Windows settings. Right-click on your desktop and select “Display settings.”
Scroll down and click on “Advanced display settings,” then “Display adapter properties.” This opens a window with three tabs: Adapter, Monitor, and Color Management.
The Adapter tab shows your GPU model, manufacturer, chip type, and dedicated video memory. This information helps you understand your system’s graphics capabilities without using third-party software.
You can also check available graphics memory, which includes both dedicated VRAM and shared system memory. Click the “List All Modes” button to see supported resolutions and refresh rates for your display setup.
Leveraging DirectX Diagnostic Tool
The DirectX Diagnostic Tool (DxDiag) provides comprehensive information about your system’s graphics capabilities. To open it, press Windows key + R, type dxdiag, and press Enter.
Once launched, the tool analyzes your system. Navigate to the “Display” tab to view detailed information about your graphics card, including the name, manufacturer, and chip type.
DxDiag also shows your display information like current resolution, color depth, and refresh rate. The “Drivers” section lists your driver version, date, and WDDM version.
Pay attention to the “Feature Levels” section, which indicates DirectX compatibility. This helps you determine if your GPU supports specific DirectX features required by modern games and applications.
Utilizing Third-Party Software like GPU-Z
For the most detailed GPU information, third-party utilities like GPU-Z offer comprehensive insights. After downloading and installing GPU-Z, launch it to see an extensive overview of your graphics card.
GPU-Z displays your graphics card model, GPU architecture, manufacturing process, and release date. It also shows detailed memory specifications including type, size, bus width, and bandwidth.
The sensors tab monitors real-time performance metrics like GPU and memory clock speeds, temperature, fan speed, and utilization percentage. This helps identify potential performance issues or thermal throttling.
GPU-Z also provides information about supported technologies like DirectX version, OpenGL support, and hardware features. You can save this information as a text file or screenshot for troubleshooting or when seeking technical support.
Checking GPU Performance and Health
Your graphics card’s performance affects everything from gaming to video editing. Regular checks can help identify issues before they cause crashes or slowdowns.
Analyzing Performance Using Task Manager
Windows Task Manager provides a simple way to monitor your GPU. To access it, right-click the taskbar and select “Task Manager” or press Ctrl+Shift+Esc. Click on the “Performance” tab to see real-time data.
The GPU section shows important metrics like utilization percentage, dedicated memory usage, and temperature. High utilization (near 100%) during normal tasks might indicate a bottleneck in your system.
You can also check which applications are using your GPU resources by selecting the “Processes” tab. This helps identify programs that might be consuming excessive GPU power unnecessarily.
For more detailed information, click on “Open Resource Monitor” at the bottom of Task Manager. This tool provides additional insights into how your system resources are being used.
Identifying Potential GPU Issues
Unusual symptoms like graphical glitches, crashes, or poor performance often indicate GPU problems. Regular monitoring helps catch these issues early.
Check your driver version through Device Manager. Outdated drivers can cause compatibility problems and performance issues. Right-click the Start button, select “Device Manager,” expand “Display adapters,” right-click your GPU, and select “Properties.”
Benchmark testing is essential for comprehensive health checks. Programs like Superposition and Kombuster can stress-test your GPU and compare results with similar models.
Watch for temperature spikes during testing. Most GPUs should stay below 85°C under load. Persistent high temperatures may indicate cooling problems that could shorten your GPU’s lifespan.
Driver Management and Updates
Keeping your GPU drivers up-to-date ensures optimal performance and compatibility with the latest games and applications. Proper driver management can solve many graphics-related issues and improve your system’s stability.
Finding the Correct Driver Version
You can easily check your current GPU driver version through Windows Device Manager. Right-click on the Windows Start button and select Device Manager. Expand the “Display adapters” category to see your graphics card.
Right-click on your GPU and select “Properties.” Then click on the “Driver” tab to view important information including:
- Driver version
- Driver date
- Provider
For NVIDIA users, you can also check driver details through the NVIDIA Control Panel. Right-click on your desktop, select “NVIDIA Control Panel,” then click the “Help” menu and choose “System Information.”
Intel users can identify their product by visiting Intel.com and using their product identification tools to determine which drivers you need.
Updating Drivers via Manufacturer’s Website
The most reliable method for updating your GPU drivers is directly through the manufacturer’s website. Visit the official site for your graphics card brand:
- NVIDIA: nvidia.com/drivers
- AMD: amd.com/support
- Intel: intel.com/support
You’ll need to input your specific GPU model to download the appropriate driver package. Most manufacturer websites include easy-to-use tools to detect your hardware automatically.
After downloading, close all applications before running the installer. Follow the on-screen prompts to complete the installation. A system restart is typically required for the new drivers to take effect.
For professional workstations, consider using the stable driver releases rather than beta versions to maintain system reliability.
Planning for GPU Upgrade
Upgrading your graphics card is a strategic decision that requires careful planning and technical consideration. The right timing and compatibility checks will ensure you get the best performance boost for your investment.
Determining When to Upgrade Your GPU
You should consider upgrading your GPU when your current card can’t handle the latest games or applications you use. Watch for these key indicators:
- Struggling to maintain acceptable frame rates in games
- Unable to run software at desired resolution
- Graphics card is more than 3-4 years old
- New technologies (like ray tracing) that you want to use
If you’re experiencing frequent stuttering or your GPU temperature runs consistently high under normal load, these are also signs it’s time for an upgrade.
Monitor technology trends and performance benchmarks to make informed decisions. For example, if you’re running an older GPU with a newer CPU like a Core i9, you might be experiencing a bottleneck that limits your system’s potential.
Compatibility Checks Before Upgrading
Before purchasing a new graphics card, verify these critical compatibility factors:
Physical Space: Measure your case dimensions to ensure the new GPU will fit.
Power Supply: Check that your PSU has:
- Sufficient wattage for the new card
- Required power connectors (6-pin, 8-pin, etc.)
Motherboard Compatibility: Confirm your motherboard has the appropriate PCIe slot version. Most modern GPUs use PCIe 3.0 or 4.0 slots.
CPU Pairing: Ensure your processor won’t create a bottleneck. High-end GPUs like RTX 3070 Ti need powerful CPUs such as newer Core i9 or Emerald Rapids processors to reach their full potential.
You should also check your cooling system will handle the increased heat output from a more powerful GPU.
Intel Graphics Card Specifics
Intel integrated graphics come with specific features and capabilities that differ from dedicated GPUs. Knowing how to identify and understand your Intel graphics hardware gives you better control over your system’s performance.
Exploring Intel GPU Offerings
Intel offers various integrated graphics solutions across different processor generations. Modern Intel processors like Core i9 typically include integrated graphics that can handle everyday tasks and some light gaming.
You can identify your Intel integrated graphics through Windows Device Manager. Press the Windows and X keys together, select Device Manager, and look under “Display adapters.”
Intel’s naming scheme evolved over generations. Older models like HD Graphics have transitioned to newer Iris Xe graphics in current generations. Ice Lake processors introduced improved graphics performance with Gen11 architecture.
Each Intel GPU generation offers different capabilities in terms of supported displays, resolution, and 3D performance. Higher-end models support features like QuickSync for faster video encoding.
Using Intel’s Support and Ark Resources
Intel provides several tools to help you learn about your graphics hardware. The Intel System Support Utility scans your system and provides detailed information about your Intel GPU.
Intel’s Ark database serves as an excellent reference for specifications. Visit Intel Ark and search for your processor model to find detailed graphics specifications including:
- Base and boost frequencies
- Number of execution units
- Maximum memory allocation
- Supported APIs (DirectX, OpenGL)
- Maximum resolution and multi-display support
For driver updates and optimization, use the Intel Driver & Support Assistant. This tool automatically detects your hardware and suggests the latest compatible drivers.
You can also access specific product support pages through the “Identify My Product” feature on Intel’s website. This provides tailored information for your exact graphics model.
Legal and Privacy Considerations
When checking your GPU, it’s important to be aware of the privacy implications related to hardware monitoring software. Some GPU tools collect data that may raise privacy concerns.
Understanding Cookie and Privacy Notices
GPU monitoring software often includes data collection features that might track usage patterns or system information. Before installing any GPU checker, you should carefully review the privacy notice and cookie policies.
Graphics card manufacturers like NVIDIA have specific privacy policies that outline how they collect and use your data. You can typically manage these settings through your account dashboard.
Some GPU monitoring tools might be considered “borderline spyware” according to privacy advocates. This is especially concerning in regions with strict data protection laws like the EU.
When using cloud-based GPU services, additional privacy considerations apply. These services often require accepting terms that permit data collection for performance optimization.
Tips for protecting your privacy:
- Disable telemetry features when possible
- Use open-source GPU checkers when available
- Review privacy notices before installation
- Consider using offline monitoring tools
Frequently Asked Questions
Checking your GPU information is essential for troubleshooting, upgrading, or ensuring compatibility with new software. These common questions address various methods to identify your graphics card across different systems and platforms.
What is the procedure to identify the graphics card model within a Windows 10 system?
You can quickly check your GPU in Windows 10 through Device Manager. Press the Windows key + X and select Device Manager from the menu. Expand the “Display adapters” section by clicking the arrow next to it.
Your graphics card model will appear right below. This method provides the basic name and model information needed to identify your GPU.
Can the GPU details be retrieved on a Windows 11 operating platform?
Yes, checking your GPU on Windows 11 uses almost identical methods as Windows 10. You can access Task Manager by pressing Ctrl+Alt+Delete and selecting Task Manager.
Once in Task Manager, go to the Performance tab and select GPU from the left sidebar. This will display your graphics card model and current usage statistics.
What steps should be followed to determine the GPU specifications on a laptop?
Laptop GPU specifications can be checked using the same methods as desktop computers. Device Manager is the simplest approach for basic identification.
For more detailed information, you might need to use specialized software like GPU-Z. Laptop GPUs may be integrated or discrete, so Task Manager can help you determine which type you have and how it’s performing.
Which tools are recommended for assessing the health and performance of a GPU?
Several tools can help you check your GPU’s health and performance. For NVIDIA cards, nvidia-smi command provides detailed information about your GPU and running processes.
Other popular tools include MSI Afterburner, GPU-Z, and Heaven Benchmark. These applications can monitor temperatures, usage, clock speeds, and run stress tests to evaluate overall GPU health.
How does one ascertain the manufacturer and model information of a GPU?
The manufacturer and model information can be found through Device Manager in Windows. Expand “Display adapters” to see the name that typically includes both the manufacturer (like NVIDIA or AMD) and the model number.
For more detailed specifications, right-click on your GPU in Device Manager and select “Properties.” The Driver tab will show the driver version and date.
Is it possible to check a graphics card’s details using the ‘Run’ dialog box in Windows?
Yes, you can use the Run dialog box to quickly access Device Manager where your graphics card details are stored. Press Windows key + R to open Run.
Type “devmgmt.msc” and press Enter. This launches Device Manager directly, where you can find your GPU under “Display adapters.” This method is faster than navigating through multiple menus.