Working with Nuke can become overwhelming when your compositions grow more complex. A messy node graph not only wastes your valuable time but also makes troubleshooting nearly impossible. Organizing your Nuke node graph effectively saves hours of frustration and helps you create cleaner, more efficient compositing workflows that are easier to modify, share with colleagues, and revisit months later.
Many compositors struggle with organization until they develop proper habits. Using tools like Backdrop nodes to create visual sections and grouping related nodes together can transform your workflow. Think of your node graph as a visual representation of your thought process – when it’s organized logically, others can follow your creative decisions easily.
Building a modular approach where corrections are kept separate and brought back using Merge nodes gives you more flexibility and control. You can hide unnecessary input arrows and create reusable node setups to maintain consistency across projects, saving you significant time on each new composition.
How to Keep Your Node Graph Organised in Nuke: A Practical Guide
In Nuke, maintaining a clean and well-organised node graph is crucial for efficient compositing, collaboration, and troubleshooting. As your scripts grow in complexity, a messy node graph can slow you down and create confusion. Here’s a step-by-step guide to help you keep your Nuke node graph neat, understandable, and easy to navigate.
1. Use Backdrop Nodes to Group Related Nodes
Backdrop nodes are a powerful way to visually group nodes that belong to the same task or effect.
- Select the nodes you want to group.
- Press Ctrl + B (Cmd + B on Mac) or right-click and choose Backdrop Node.
- Rename the backdrop to describe the group’s purpose (e.g., “Color Correction”).
- Adjust the backdrop size and color for clarity.
This helps visually separate different parts of your comp and makes it easier to locate sections at a glance.
2. Label Your Nodes Clearly
- Rename nodes with descriptive names instead of leaving default names (e.g., rename “Grade1” to “Skin Tone Grade”).
- Use the Label field in the node’s properties to add notes or additional context.
- Consistent naming conventions improve readability and help collaborators understand your workflow.
3. Arrange Nodes Logically and Linearly
- Align nodes horizontally or vertically using the Align menu or by dragging them carefully.
- Keep the main flow of your graph from left to right or top to bottom.
- Avoid crossing connections where possible to reduce visual clutter.
4. Use Dot Nodes for Cleaner Connections
Dot nodes help tidy up your node connections by allowing you to route wires neatly.
- Insert dot nodes at junction points to organize multiple connections.
- Use them to create right-angle bends and avoid tangled wires.
5. Color-Code Your Nodes and Backdrops
- Use different backdrop colors to distinguish between different tasks (e.g., blue for keying, green for color correction).
- While Nuke nodes themselves have fixed colors, backdrops provide an effective way to visually separate areas.
6. Utilize Sticky Notes for Important Information
- Add Sticky Note nodes to leave reminders, instructions, or warnings.
- Place them near relevant nodes or groups to provide context without cluttering the graph.
7. Collapse Complex Node Trees into Groups or Gizmos
- When you have a complex set of nodes performing a specific function, group them into a Group node or create a Gizmo.
- This reduces clutter and allows reuse of complex setups.
8. Regularly Review and Clean Up Your Graph
- Remove unused nodes or disconnected branches.
- Simplify overly complicated sections.
- Keep your script tidy as you work to prevent overwhelming complexity.
Bonus Tips
- Use the Node Tree Search (press Tab and type node names) to quickly find nodes.
- Keep your node graph zoomed out to see the overall structure before diving into details.
- Use version control or save incremental versions to track changes and maintain clean scripts.
Keeping your Nuke node graph organised not only improves your workflow but also makes collaboration and troubleshooting much easier. By following these practices — grouping with backdrops, clear labeling, neat layout, and using groups — you’ll create scripts that are professional, efficient, and easy to understand.
Key Takeaways
- Consistent use of Backdrop nodes and logical grouping creates visual organization that speeds up both your workflow and troubleshooting process.
- Creating modular node structures with separate correction chains makes your compositions more flexible and easier to modify.
- Developing good node graph habits from the start prevents the need for time-consuming reorganization later in complex projects.
Understanding the Nuke Interface
Nuke’s interface is organized to help you create complex composites efficiently. The main areas you’ll work with include the Node Graph where your compositing network is built, and the Properties Panel that controls each node’s settings.
Node Graph Essentials
The Node Graph is Nuke’s visual workspace where you build your compositing script. Each node represents an operation, and the connections between them show the data flow of your composite.
You can navigate the Node Graph by:
- Panning: Middle-mouse drag
- Zooming: Mouse wheel or Ctrl+middle-mouse drag
- Selecting nodes: Click or drag-select multiple nodes
To add nodes, you can use the Toolbar, Tab menu, or right-click menu. The Tab menu is especially useful—just press Tab and type part of a node name to find it quickly.
Keeping your Node Graph organized is critical for complex projects. Using Backdrop nodes helps you group related operations together, while the Group node lets you encapsulate entire sections of your tree for cleaner scripts.
Properties Panel Fundamentals
The Properties Panel displays all adjustable parameters for your selected node. When you select a node in the Node Graph, this panel updates to show its specific controls.
The panel is organized into tabs and sections for easy access to related settings. Common elements include:
- Input fields: For precise numerical values
- Sliders: For visual adjustment of parameters
- Color pickers: For color-based nodes
- Curves: For animation and custom response curves
You can pin important Properties panels open by clicking the pin icon in the upper-right corner. This allows you to see multiple nodes’ properties simultaneously.
For faster workflows, many properties support expressions that can be entered by right-clicking a parameter. You can also copy and paste values between nodes by right-clicking parameters and selecting the appropriate option.
Creating an Efficient Node Graph
Organization is key to maintaining complex compositing projects in Nuke. A well-structured node graph saves time, reduces errors, and makes collaboration with team members smoother.
Node Arrangement Strategies
When arranging your nodes, you can choose between two main approaches: top-down (vertical) or left-to-right (horizontal). Many professionals prefer the left-to-right approach as it matches the natural reading direction and often provides better space utilization.
Keep related operations grouped together visually. For example, place all color correction nodes near each other, and keep roto work in its own section of the graph.
Give yourself plenty of space between node clusters. Cramming nodes together leads to the dreaded “spaghetti graph” that becomes impossible to follow.
Consider using a consistent naming convention for your nodes. This becomes especially important in larger compositions where you might have dozens of similar nodes.
Use color coding to your advantage. Nuke allows you to assign colors to nodes, which can help you quickly identify different parts of your composition.
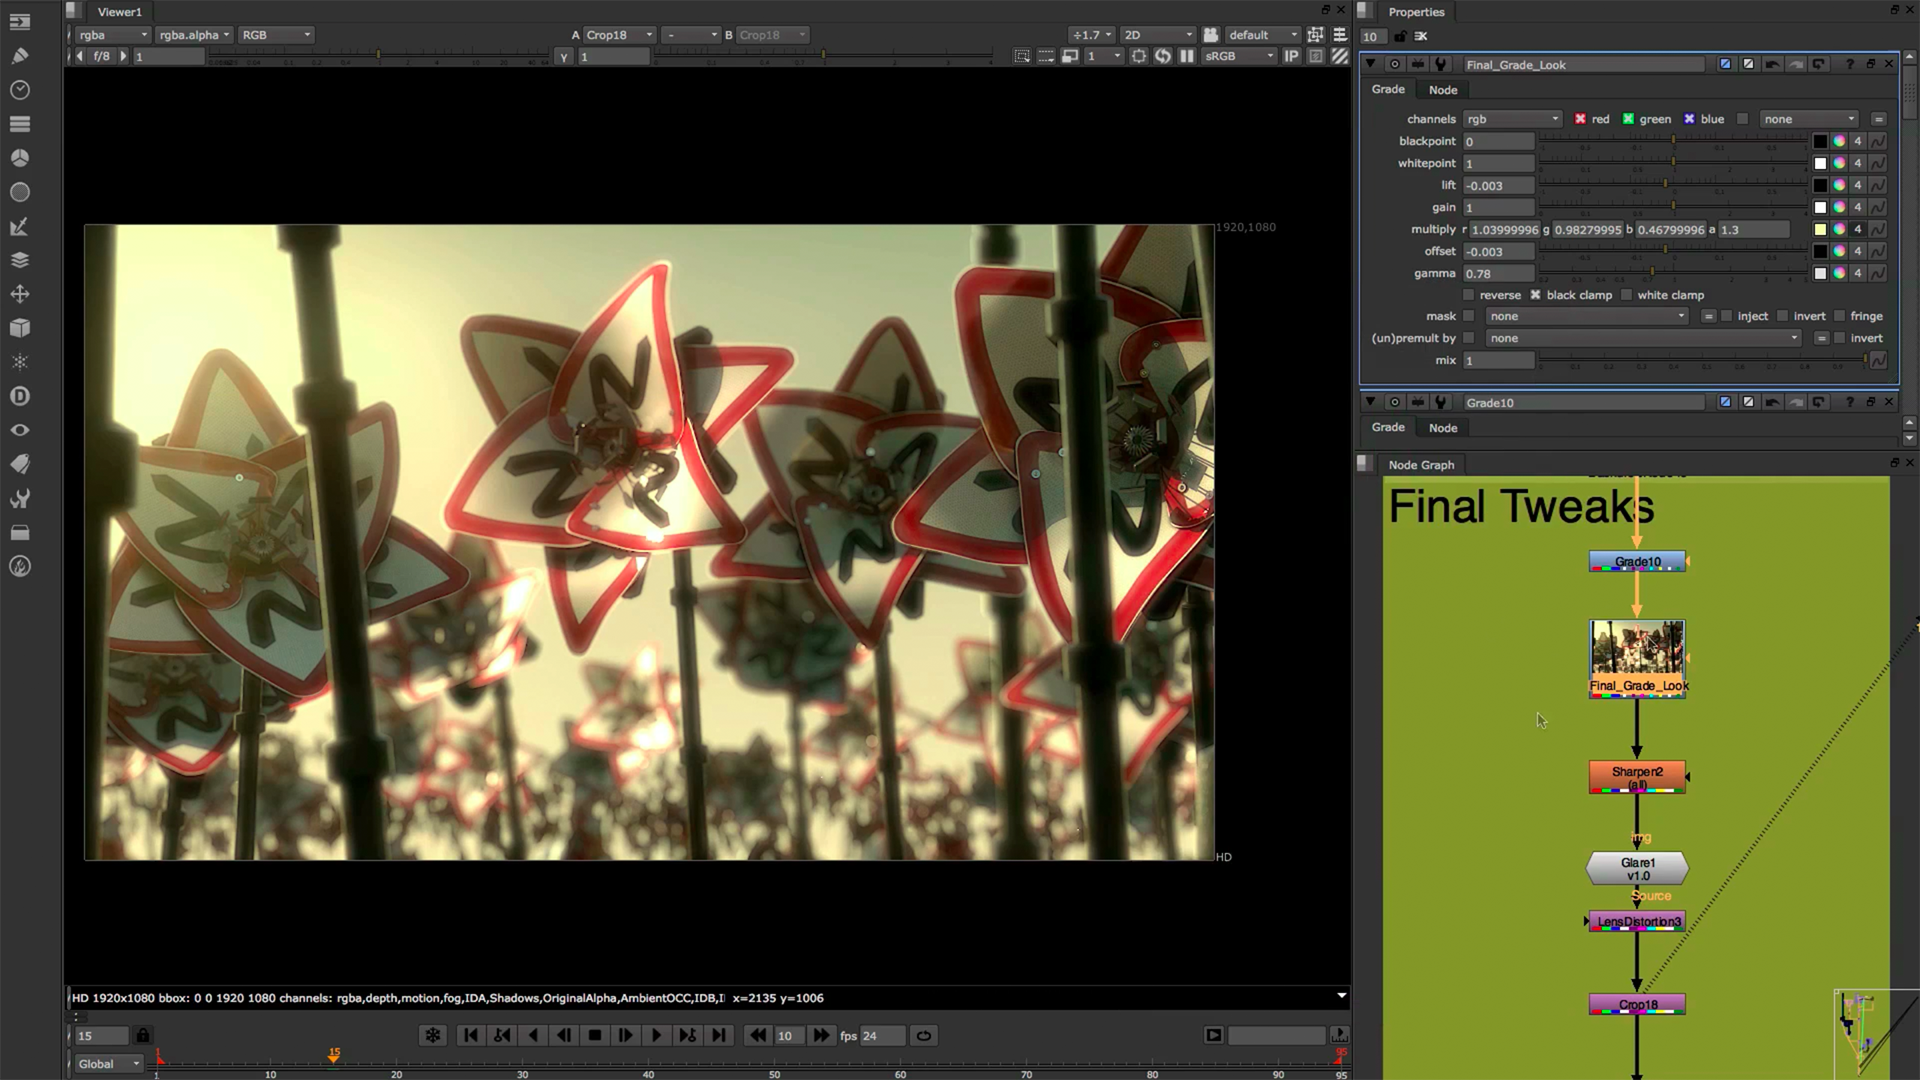
Utilizing Backdrop Nodes
Backdrop nodes are fundamental organizational tools that act as containers for related nodes. They create visual boundaries around node groups and can be labeled and color-coded.
To create a backdrop, select the nodes you want to include, then press Alt+B or right-click and choose Edit > Node > Backdrop > Create New Backdrop.
Give your backdrops descriptive titles that clearly explain what the enclosed nodes accomplish. For instance, “Sky Replacement” or “Grain Removal” are more helpful than generic labels.
Size your backdrops generously to allow for future additions. You can easily resize them later by dragging their corners.
Consider using a color system for your backdrops:
- Green for input/plate preparation
- Blue for key elements
- Purple for effects
- Red for problem areas requiring attention
Grouping Nodes with Group Node
The Group node takes organization a step further by collapsing multiple nodes into a single node, reducing graph complexity. This is especially useful for repetitive operations that you might reuse.
To create a group, select your nodes, right-click and select Edit > Node > Group > Create Group (or press Ctrl+G). You can later edit the group by double-clicking it.
Create input and output nodes within your group to control data flow. These act as connecting points to the rest of your composition.
If you want to keep both the original nodes and the grouped version, use the Copy Nodes To Group option instead of the standard grouping command.
Consider creating custom icons for frequently used groups to make your graph even more visually intuitive.
Incorporating Dot Nodes
Dot nodes are simple but powerful tools for cleaning up your node graph. They act as connection points without modifying your data.
Use dots to:
- Route connections around other nodes
- Create junction points for branching operations
- Break up long connection lines for better readability
- Mark important points in your node graph
To create a dot, press Period (.) on your keyboard or right-click and select Other > Dot.
When handling complex compositions that feed into multiple inputs, dots help clarify the data flow and prevent confusion.
Place dot nodes strategically to create natural “highways” through your composition. This creates visual pathways that are easy to follow when revisiting your work later.
Navigating the Node Graph
Efficiently moving around your node graph is essential for maintaining a smooth workflow in Nuke. The right navigation techniques can save you time and help you better understand complex compositing trees.
Zooming Techniques
Nuke offers several ways to zoom in and out of your node graph. The most common method is using the mouse wheel to zoom in and out while your cursor is over the node graph area. For more precise control, you can press H to frame all nodes or F to frame the selected nodes.
When working with large compositing scripts, you can use the navigation controls in the bottom right corner of the Node Graph panel. These controls include zoom in/out buttons and a zoom slider.
To quickly move to a specific area, hold the Alt key and middle-mouse drag to pan across the node graph. This is especially useful when working with complex scripts that extend beyond your visible workspace.
You can also use the search feature to locate specific nodes. Simply type part of a node name, and Nuke will highlight matching nodes in your graph.
Using Postage Stamps
Postage stamps are thumbnail previews that appear on nodes, displaying the output of that particular node. To enable postage stamps, right-click in the node graph and select “Postage Stamp” or press Alt+P on selected nodes.
These visual previews help you quickly identify what each part of your comp is doing without having to connect viewers or hover over nodes. They’re particularly useful for:
- Identifying different branches of your composite at a glance
- Spotting errors or unexpected results earlier in your workflow
- Keeping track of multiple versions or variations
You can adjust the size of postage stamps by right-clicking in the node graph and selecting a different size from the Postage Stamp menu. For better performance with complex scripts, you might want to disable postage stamps when not needed.
When organizing your node graph, consider using postage stamps strategically on key nodes rather than applying them to every node to maintain clarity without sacrificing performance.
Organizing Nodes for Readability
A clean node graph is essential for efficient compositing workflows in Nuke. Well-organized nodes make your script easier to navigate and help other artists understand your work quickly.
Naming Conventions
Consistent naming is the foundation of an organized Nuke script. When you organize your nodes, always rename your Read nodes to match the source footage they represent. For example, use names like “BG_plate” or “CharA_matte” instead of leaving the default names.
Group nodes should have descriptive names that explain their function. A group called “SkyReplacement” is much clearer than “Group1”.
For complex setups, consider using prefixes to indicate node function:
- KEY_ for keying operations
- GRD_ for grading nodes
- COMP_ for composite operations
This hierarchical naming system makes it easier to locate specific operations when troubleshooting or making adjustments to your comp.
Color Coding
Color coding transforms a chaotic node graph into a visually organized workspace. You can keep your Nuke scripts neat by assigning specific colors to different node types or workflow sections.
A common color system includes:
| Node Type | Suggested Color |
|---|---|
| Read Nodes | Blue |
| Transform Nodes | Green |
| Color Correction | Yellow |
| Keying Tools | Purple |
| Output Nodes | Red |
Backdrop nodes are particularly useful for organization. Create color-coded backdrop nodes to group related operations together. Label these backdrops clearly with titles like “Keying Section” or “Final Composite”.
For beginners learning Nuke, establishing a personal color system early helps build good habits. Your future self will thank you when revisiting complex scripts months later.
Managing Node Properties
Node properties in Nuke are essential controls that let you fine-tune your compositing work. Understanding how to access and customize these settings will significantly improve your workflow efficiency and give you precise control over each node’s behavior.
Accessing Node Properties Panel
You can open a node’s properties panel by selecting the node and pressing P on your keyboard. This keyboard shortcut is one you’ll use constantly while working in Nuke. Alternatively, you can double-click on any node in your graph to open its properties.
The properties panel contains all the parameters you can adjust for that specific node. Different nodes have different controls, but the layout is consistent across Nuke. At the top, you’ll typically find the node name and basic controls.
For many nodes that process images, you’ll see tabs organizing different aspects of the node’s functionality. The most fundamental nodes will have simpler property panels compared to more complex ones like Keyers or 3D nodes.
Customizing Individual Node Settings
Once you’ve opened the properties panel, you can adjust parameters specific to each node type. For color correction nodes, you might adjust curves, levels, or saturation. For transform nodes, you’ll find position, rotation, and scale controls.
Many nodes let you control how they process different color channels. You can often select which of the RGBA channels you want to affect. This is crucial when you need to process only specific channels like working only on the alpha.
To keep your node graph clean, use the “Node” tab in properties panels. Here you can:
- Change the node’s color and label
- Hide input arrows
- Add notes for yourself or team members
- Set custom icons
You can save common property settings as presets by right-clicking in the properties panel and selecting “Save Preset.” This saves time when you repeatedly use similar settings across projects.
Optimizing Node Tree Structures
A well-organized node tree makes your Nuke compositing workflow smoother and more efficient. The right structure helps you work faster and makes your scripts easier for others to understand.
Creating Precomps
Precomps (precompositions) are essential for breaking down complex composites into manageable sections. You can create precomps by selecting multiple nodes and pressing Alt+G to group them together.
Name your precomps clearly to indicate their purpose. For example, use names like “Cleanup_Plate” or “Color_Correction” instead of generic “Group1.”
Backdrop nodes can help visually separate precomps before you formally group them. This gives you a clearer picture of how your elements connect.
Consider creating template precomps for operations you perform regularly. This saves time and ensures consistency across projects.
When working with large teams, standardized precomp structures make it easier for others to understand and modify your work later.
Streamlining Data Flow
Efficient data flow prevents bottlenecks and makes scripts run faster. Start by analyzing your node tree for unnecessary complexity.
Use Dot nodes generously to guide the eye through your node graph. They help clarify connections without adding processing overhead.
Ways to improve data flow:
- Remove redundant nodes
- Merge similar operations
- Process heavy calculations earlier in the pipeline
- Apply effects at appropriate resolution
Avoid crossing pipes whenever possible. Making clear connections helps you understand the logic of your composite at a glance.
When handling heavy processes like particle simulations or 3D renders, consider using Read nodes to cache results rather than recalculating them each time.
Debugging Node Graph Issues
When your Nuke node graph becomes problematic, knowing how to troubleshoot efficiently can save hours of frustration. Finding and fixing issues quickly helps maintain your compositing workflow and keeps projects on schedule.
Identifying and Solving Common Problems
Start by checking for disconnected nodes which often cause unexpected results. You can quickly find these by pressing Tab and typing “disconnected” in the search feature.
When facing performance issues, look for heavy processing nodes like Blur or Defocus with large pixel settings. These can be grouped or replaced with more efficient alternatives.
If you see unexpected visual results, try these steps:
- Add Viewer nodes at different points to pinpoint where issues begin
- Check for incorrect merge operations or alpha channels
- Verify color space settings match throughout your node tree
- Examine all masks and their inverting settings
Changing the display mode to Horizontal can help identify crossing connections that might cause confusion in your debugging process.
Regular Practices for Prevention
Implement naming conventions for key nodes to make debugging easier. Include descriptive terms like “Fix_Edge_Matte” or “Final_Color_Correct” to quickly identify node purposes when troubleshooting.
Create backdrop nodes around functional sections of your node graph. This organization makes it easier to isolate and test specific components when issues arise.
Use disable nodes (D key) instead of disconnecting them when testing fixes. This maintains your node tree structure while letting you compare results.
Make your node graph modular by keeping corrections separate and bringing them in with Merge nodes. This isolation makes it easier to identify which corrections might be causing problems.
Regularly run the “Check for Updates” command to ensure deprecation warnings don’t create unexpected behavior. Outdated nodes sometimes process data differently in newer Nuke versions.
Frequently Asked Questions
Working in Nuke requires efficient organization techniques to manage complex compositions. These practical tips will help streamline your workflow and make navigating your node graph more intuitive.
What are the best practices for node organization in Nuke?
Keep your nodes flowing from left to right whenever possible. This creates a logical reading pattern that mimics how we naturally process information.
Use color coding to identify different parts of your comp. You can keep your node graph organized by assigning specific colors to different elements like foreground, background, or specific effects.
Create clear spacing between different sections of your comp. This visual separation makes it easier to identify each component at a glance.
Name your nodes descriptively. Instead of using default names, rename important nodes to instantly understand their function when revisiting a project.
What shortcuts are available for aligning nodes in Nuke?
Press L to automatically align selected nodes. This creates a clean horizontal or vertical arrangement based on your selection.
Use Shift+L to align nodes horizontally, which helps maintain that left-to-right workflow.
Press Ctrl+L (Cmd+L on Mac) to align nodes vertically when working with stacks of effects.
For quick arrangement, select multiple nodes and press Q to automatically arrange them in a readable tree structure.
How do you create and use Backdrops effectively in Nuke?
Add a Backdrop node by pressing Alt+B or right-clicking and selecting Other > Backdrop. This creates a colored background that helps visually organize related nodes.
Resize backdrops by clicking and dragging their edges. You can use Backdrop nodes to encapsulate related portions of your comp for cleaner organization.
Label your backdrops clearly with descriptive titles. The text appears at the top of the backdrop and provides a quick reference for each section’s purpose.
Use different colors for different backdrop categories. This creates an instant visual language that helps you navigate your comp quickly.
What techniques exist for efficient navigation through a complex node graph in Nuke?
Use bookmarks for frequently accessed nodes. You can jump to bookmarked nodes by pressing J to quickly navigate to important parts of your comp.
Press H to display a node’s full properties panel. This lets you inspect and adjust settings without losing context in your graph.
Use the Tab key to temporarily hide all connections, giving you a clearer view of just the nodes themselves.
Press F to frame selected nodes, or press A to fit the entire node graph in your viewport when you need to see the big picture.
Is there a method for locking node positions to prevent accidental changes in Nuke?
Select nodes and press Ctrl+Shift+L (Cmd+Shift+L on Mac) to lock their positions. This prevents accidental movement while still allowing you to modify their properties.
Use the Node tab in the Properties panel to check or modify a node’s lock status. You’ll find a “Locked” checkbox there.
Create a Group node for sections you want to protect. By grouping nodes together, you can collapse them to prevent accidental modifications.
Remember that locked nodes show a small padlock icon as a visual indicator of their protected status.
Can Python scripting be used to enhance node graph organization in Nuke?
Python scripts can automate organization tasks like color-coding nodes based on their function. This saves time and ensures consistency across projects.
Create custom tools that align and distribute nodes with a single click. Many professionals develop personal toolsets for organization tasks they perform frequently.
Use Python to build node templates with pre-arranged structures. This ensures consistent organization when building common compositing elements.
Implement automated backup systems that preserve different organization states. This lets you try different arrangements without fear of losing your work.