Photoshop’s AI tools are changing the game for creatives—making image editing faster, more intuitive, and surprisingly powerful, even for non-experts. Whether you’re a seasoned designer or a casual user experimenting with digital art, Adobe’s growing set of AI-powered features can help you push your projects further with less manual work.
The most exciting part? You don’t need to be a Photoshop wizard to get stunning results. With tools like Generative Fill, Generative Expand, and Structure Reference, the software now interprets your ideas from simple prompts and intelligently transforms your images in just seconds.
Here’s how to truly get the most out of Photoshop AI—beyond the basics.
🧠 Learn the Core Tools (and What They Actually Do)
1. Generative Fill
This is the flagship feature—just select an area and type what you want to appear. Photoshop uses Adobe Firefly (its AI engine) to fill that space with entirely new content that matches lighting, shadows, and textures. It’s great for:
- Removing or replacing objects
- Adding background elements
- Compositing fantasy or surreal visuals
2. Generative Expand
Crop too tight? No problem. Generative Expand lets you extend your canvas and intelligently fill in the space. It’s perfect for social media crops, banners, or reframing your composition after the fact.
3. Structure Reference
Structure Reference lets you generate AI content that mimics the layout or “structure” of a separate reference image. It’s useful when you want stylistic consistency across different designs or need to create a series with the same visual logic.
💡 Smart Ways to Use Photoshop AI Creatively
- Build custom mockups by generating product scenes or environments around a base object
- Design concept art quickly by generating backgrounds and characters from rough sketches or prompts
- Restore or enhance photos by removing blemishes, artifacts, or entire people from backgrounds
- Speed up client work by filling in missing details, expanding images for print formats, or auto-generating variations
Many professionals now use Photoshop AI for rapid prototyping—a way to explore design ideas quickly before refining them manually.
🔁 Iteration is Key
Photoshop AI doesn’t always get it perfect on the first try—but that’s okay. You can regenerate results as many times as you like. Each prompt can yield several variations, and Adobe encourages experimentation.
Want a new sky that’s more dramatic? Just type “stormy clouds at sunset” and see what comes up. Don’t like it? Hit “generate” again. You’re essentially co-creating with the AI.
🔋 Keep an Eye on Your Credits
If you’re using Photoshop with a Creative Cloud subscription, Adobe currently offers 500 AI generation credits per month on standard plans. This includes both Generative Fill and Expand uses. Heavy users (especially those in commercial workflows) may want to upgrade to a paid Firefly plan to unlock more.
Here’s a rough idea of how those credits break down:
- One generative operation (e.g., a Generative Fill) usually costs 1 credit
- You can preview or retry options before committing, which helps you conserve them
🛠️ Combine AI With Traditional Tools
The best Photoshop pros aren’t replacing their skills with AI—they’re enhancing them. Use AI to:
- Block out an idea fast
- Generate background elements
- Remove tedious cleanup tasks
Then refine it using traditional techniques like adjustment layers, brushes, masks, and layer blending.
For example: Use Generative Fill to place a new subject in a scene, then use lighting effects and blend modes to make the integration seamless.
🔮 What’s Coming Next?
Adobe has teased several upcoming features tied to its Firefly model, including:
- Video and audio generation support
- AI-powered layer suggestions
- Inpainting directly from brushes or stamps
- Enhanced text-to-vector graphics
Photoshop’s AI tools are now part of a broader trend across Adobe’s ecosystem. You’ll see similar Firefly capabilities in Illustrator, Express, and even Adobe’s upcoming video editing tools—meaning a unified AI-assisted workflow across design disciplines.
Photoshop AI isn’t just a cool gimmick—it’s a real productivity tool that can help you work smarter, design faster, and unlock new kinds of creative output. Once you get the hang of prompting, exploring variations, and combining it with your own vision, you’ll find it’s like having a creative partner built right into the software.
Key Takeaways
- Mastering Photoshop’s AI tools like Generative Fill can dramatically speed up your editing workflow and unlock new creative possibilities.
- You can achieve professional results with simple text prompts and a basic understanding of how to guide the AI effectively.
- Adobe’s monthly generation credits give you ample opportunity to experiment with AI features while learning which approaches produce the best results for your projects.
Getting Started with Photoshop AI
Photoshop’s AI tools have revolutionized image editing, making complex tasks accessible with just a few clicks. Adobe has integrated powerful AI features that can save you time and expand your creative possibilities.
Exploring Photoshop AI Capabilities
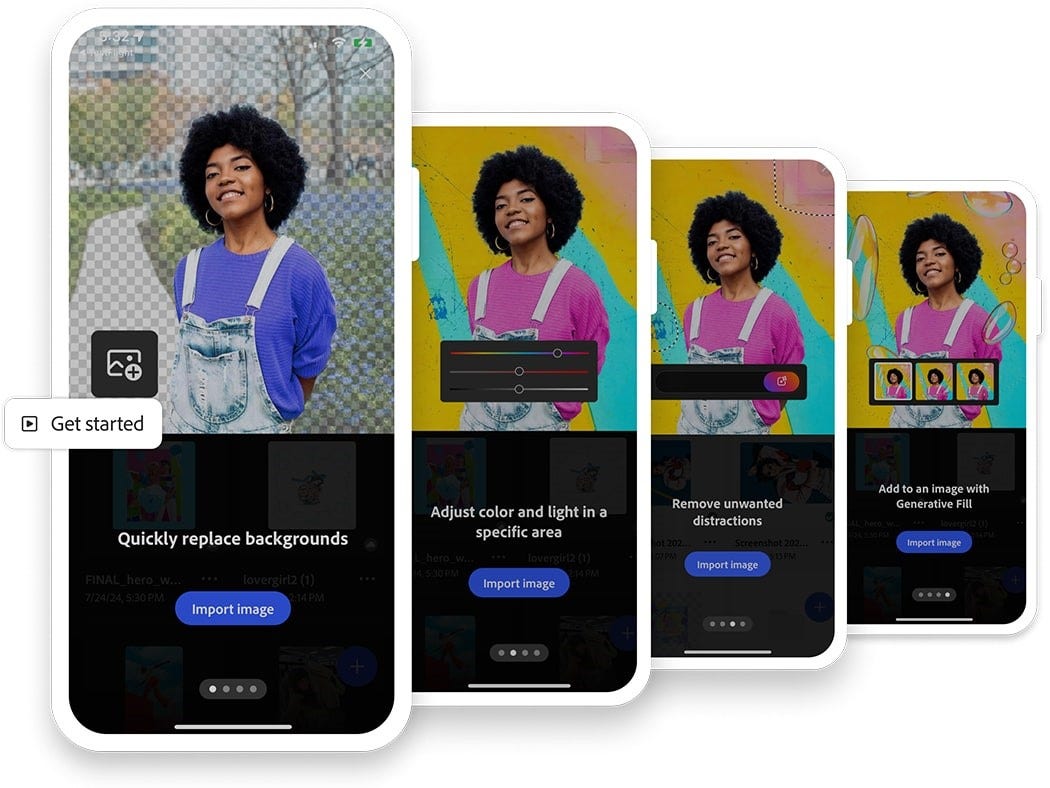
Photoshop AI offers several groundbreaking features to enhance your workflow. The Generative Fill tool allows you to add, extend, or remove elements from your images using simple text prompts. You can create entirely new objects or landscapes within your composition by describing what you want.
Another impressive capability is Generative Expand, which extends your canvas beyond its original boundaries while maintaining visual consistency. This is perfect when you need more room in your composition or want to transform an image’s aspect ratio.
AI-powered selection tools make isolating subjects remarkably easy. The Select Subject feature can identify and select people, animals, or objects with a single click, saving you from tedious manual selections.
Key AI features include:
- Generative Fill
- Generative Expand
- Neural Filters
- Content-Aware Fill
- Sky Replacement
Setting Up Photoshop for AI Features
To access the latest AI tools, you’ll need a current version of Photoshop through an Adobe Creative Cloud subscription. The most cutting-edge features often appear first in Photoshop Beta, which you can install alongside your regular Photoshop.
Once installed, verify that your Generative AI features are activated. Go to Preferences > Technology Previews and ensure the relevant options are enabled. You’ll need an active internet connection since many AI features rely on Adobe’s cloud processing.
For optimal performance:
- Update your graphics drivers
- Allocate adequate RAM to Photoshop (Edit > Preferences > Performance)
- Consider using a computer with a dedicated GPU
If you’re new to Adobe products, you can test these features with a free trial of Creative Cloud before committing to a subscription. This gives you seven days to experiment with Photoshop’s AI capabilities.
Leveraging Generative AI Tools
Photoshop’s AI tools have revolutionized the editing workflow, allowing you to accomplish complex tasks with simple prompts. These powerful features help save time while expanding your creative possibilities.
Using Generative Fill for Efficient Edits
Generative Fill transforms how you manipulate images by letting you add, remove, or replace elements with just a few clicks. To use this feature effectively, start by selecting the area you want to modify with the selection tool.
Once selected, right-click and choose “Generative Fill” or find it in the Edit menu. Type a descriptive prompt of what you want to add, like “blooming flowers” or “fluffy clouds,” and watch AI create contextually appropriate content.
This tool excels at:
- Removing unwanted objects without leaving obvious editing marks
- Extending backgrounds seamlessly to fit new dimensions
- Adding completely new elements that match the image style
For best results, use clear, specific prompts and don’t hesitate to try multiple variations if the first result doesn’t match your vision.
Enhancing Imagery with Neural Filters
Neural Filters provide sophisticated image enhancements that would typically require extensive manual editing. Access them through the Filters menu and select “Neural Filters.”
Popular filters include:
| Filter Name | Best Use Case |
|---|---|
| Skin Smoothing | Portrait refinement without losing texture |
| Style Transfer | Applying artistic styles to photos |
| Depth Blur | Creating natural depth-of-field effects |
| Smart Portrait | Adjusting facial expressions and features |
The real power comes from combining multiple filters. For instance, apply Style Transfer followed by Depth Blur to create artistic images with professional focus effects.
Remember to work on duplicate layers to preserve your original image while experimenting with these AI-powered enhancements.
The Power of Adobe Firefly in Creative Processes
Adobe Firefly integrates directly with Photoshop to expand your creative capabilities through text-to-image generation. This AI system understands both visual concepts and artistic styles.
When leveraging Generative AI for photography, you can use Firefly to:
- Create custom textures and patterns with simple text descriptions
- Generate complementary graphic elements that match your existing artwork
- Explore design variations quickly without starting from scratch
Try using Generative Expand to extend your canvas beyond its original boundaries. This feature intelligently adds new content that matches your existing image.
For complex creative projects, combine Firefly with traditional Photoshop techniques. Start with AI-generated elements as your foundation, then refine them with manual adjustments for truly unique results.
Advanced Editing Techniques
Photoshop’s AI tools have revolutionized the editing process with powerful features that save time while producing professional results. These tools blend seamlessly with traditional editing workflows to enhance your creative capabilities.
Content-Aware Fill for Seamless Integration
Content-Aware Fill transforms how you handle unwanted elements in your images. This AI-powered tool intelligently analyzes surrounding pixels to create natural-looking replacements for removed objects.
To use it effectively, select the area you want to fill using the Lasso or Marquee tool. Then navigate to Edit > Content-Aware Fill or press Shift+F5. The dedicated workspace shows a preview of the fill and lets you adjust sampling areas.
For best results:
- Use smaller selections when possible
- Ensure your sampling area contains similar textures
- Apply multiple small fills rather than one large fill for complex removals
When working with patterns or distinct backgrounds, try using the advanced Photoshop techniques for Content-Aware Fill. Use the Structure and Color sliders to fine-tune how the AI matches the surrounding area.
Sky Replacement to Transform Photos
Sky Replacement is one of Photoshop’s most impressive AI features. It can instantly transform dull skies into dramatic sunsets or clear blue horizons with minimal effort.
Access this feature through Edit > Sky Replacement. The tool automatically detects the horizon line and creates a mask for the sky. You can choose from preset skies or import your own images.
Key adjustment options include:
- Shift Edge: Fine-tunes the sky’s border
- Fade Edge: Controls transition softness
- Lighting Adjustments: Modifies foreground colors to match the new sky
For natural results, adjust the Temperature and Exposure sliders to match the lighting conditions of your original photo. The generative AI capabilities enhance this tool by creating more realistic transitions between sky and landscape.
Utilizing Remove Tool for Cleaner Edits
The Remove Tool represents Photoshop’s AI at its most intuitive. This tool eliminates distractions and unwanted elements with just a few clicks.
Access this by selecting the Remove Tool from the toolbar or using the Spot Healing Brush with Content-Aware selected. Simply paint over the object you want to remove, and watch the AI work its magic.
For complex removals:
- Make a selection around the object
- Use the Remove Tool within that area
- Refine edges with the Healing Brush if needed
The tool works best on objects against relatively uniform backgrounds. For more complex scenes, try combining it with advanced techniques like layer masking and clone stamping.
Smart radius detection helps maintain structural elements while removing distractions. You can adjust the brush size to match the object you’re removing for more precise control.
Optimizing Workflow with AI Image Generator
Photoshop’s AI tools can dramatically speed up your editing process while delivering professional results. These features help you work smarter rather than harder by automating tedious tasks.
Creating Custom Backgrounds with Generative Expand
Photoshop’s Generative Expand feature allows you to extend your canvas beyond the original image boundaries. This tool is perfect when you need more room in your composition or want to create panoramic effects.
To get the best results:
- Start with high-quality images – The AI works better with clear, well-lit photos
- Make small expansions first – Extend your canvas in smaller increments for more control
- Try different prompts – If you don’t like the results, refine your text instructions
You can also use this feature to create seamless panoramic shots by gradually expanding your image. For better outcomes, use reference points in your prompts like “match sky color” or “continue mountain range.”
Quick Mask for Rapid Selections and Adjustments
Quick Mask mode paired with AI capabilities makes selections faster and more precise. This powerful combination helps you isolate complex subjects with minimal effort.
To use this effectively:
- Press Q to enter Quick Mask mode
- Use the brush tool to paint over areas you want to select
- Let the AI refine your selection edges automatically
This technique works exceptionally well for selecting hair, fur, or irregular shapes that traditional selection tools struggle with. You can optimize your workflow further by creating custom keyboard shortcuts for your most-used AI selection tools.
For complex projects, try creating several Quick Masks for different parts of your image. This approach gives you more control while still leveraging AI’s efficiency.
Enhancing Image Quality
Photoshop’s AI tools can transform your low-quality images into professional-looking photos with just a few clicks. These powerful features address common problems like noise and resolution limitations.
Reducing Noise to Achieve Clarity
Noise reduction is essential when working with compressed or poorly lit images. Photoshop’s AI can instantly fix super low-quality compressed images by intelligently removing artifacts while preserving important details.
To reduce noise effectively:
- Open your noisy image in Photoshop
- Go to Filter > Neural Filters
- Select Noise Reduction
- Adjust the strength slider based on your image needs
For particularly challenging images, try working in smaller sections. Apply slight amounts of noise to the fills, then add a gentle noise layer over the entire image to blend all pixels together naturally. This technique helps homogenize all the pixels for a more cohesive result.
Perfecting Image Size and Resolution
Increasing resolution without quality loss used to be impossible, but Photoshop’s AI has changed that. The Super Resolution feature can intelligently upscale your images while maintaining clarity.
To enhance your image resolution:
- Open your image in Lightroom (part of your Creative Cloud subscription)
- Choose Photo > Enhance
- Select Super Resolution
- Click Enhance
This process creates a new DNG file with doubled resolution. For even better results, combine this with Photoshop’s Content-Aware scaling when adjusting dimensions.
You can also take advantage of Photoshop’s Neural Filters like Photo Restoration to improve image quality dramatically. This works especially well for old photos or images with severe quality issues.
File Management and Output
Proper file management is crucial when working with Photoshop AI features. The right output formats ensure your creative AI work maintains quality and compatibility across platforms.
Saving and Exporting Images in Various Formats
When working with Photoshop AI-generated content, you need to choose the right file format for your needs. For web graphics with transparency, PNG is an excellent choice as it preserves the quality of your AI-enhanced images while supporting transparency.
To export your work, go to File > Export > Export As. This gives you control over dimensions, quality, and format options specific to your destination platform.
If you’re working between Photoshop and other Adobe programs, consider using Smart Objects. You can drag Illustrator files directly into Photoshop as Smart Objects, maintaining editability and maximum quality.
For AI-generated content, be mindful of file sizes. Using Photoshop’s “Save for Web” (Legacy) option allows you to compare different compression settings side by side before finalizing your export.
Remember to optimize your workflow by regularly purging your history states and closing unnecessary files to keep Photoshop running smoothly while working with resource-intensive AI features.
Exploring Additional Capabilities
Photoshop’s AI tools extend far beyond basic image editing. These advanced features can transform your creative workflow and open new possibilities for digital artistry.
Embracing the Potential of 3D
Photoshop’s AI now offers remarkable 3D capabilities that were once only available to specialists. You can generate three-dimensional elements using simple text prompts, eliminating hours of manual modeling.
To start with 3D, try converting a flat object into a 3D representation. Select your object, navigate to the 3D menu, and choose “Generate 3D from Selection.” The AI will analyze your image and create depth.
Lighting adjustments in 3D are now intuitive with AI assistance. You can type prompts like “add dramatic side lighting” and watch as the system applies realistic lighting effects to your 3D elements.
Texture generation has also been revolutionized. Instead of searching for or creating textures manually, you can use text prompts to generate custom textures that perfectly match your project’s aesthetic.
Understanding the Role of Blending in Compositions
AI-powered blending features have transformed how you can combine multiple elements in Photoshop. The software now intelligently analyzes lighting, color, and texture to create seamless compositions.
The Content-Aware Blend tool uses AI to match tones and textures between layers. This creates natural transitions where traditional layer blending would leave obvious seams.
Try these blending techniques:
- Use text prompts to guide the blending process
- Combine the Generative Fill tool with layer masks for precision
- Apply smart filters with AI enhancement for texture matching
Color matching between elements has become effortless. The AI can now analyze color schemes across multiple images and harmonize them automatically, maintaining the essence of your original vision.
Testing the Limitations: Stable Diffusion
Generative AI features in Photoshop, particularly those based on Stable Diffusion technology, have opened new creative possibilities. However, understanding their limitations is crucial for effective use.
Complex prompts often yield better results than simple ones. Instead of typing “add a mountain,” try “add a snow-capped mountain with pine trees and morning fog.” This specificity guides the AI toward your exact vision.
Resolution boundaries remain a consideration. While the AI can expand images beyond their original dimensions, quality degradation may occur at extreme enlargements. For best results, stay within 200% of your original dimensions.
Style consistency requires attention. When generating multiple elements, maintain similar descriptive language in your prompts to ensure visual cohesion across your project.
Integration with Adobe Ecosystem
Photoshop’s AI tools work best when connected with the broader Adobe ecosystem. You can enhance your workflow by taking advantage of these connections.
The integration between Photoshop and Adobe Creative Cloud allows for seamless transfers of AI-enhanced assets. This means you can start a project in one application and continue in another without losing quality.
Time-saving benefits include:
- Quick asset sharing between applications
- Consistent AI settings across projects
- Synchronized cloud storage of AI presets
Your AI-generated content in Photoshop can be easily transferred to other editing software like Premiere Pro or After Effects. This is particularly useful when applying AI effects to video frames extracted from videos.
For asset management, you can use Asset Link to find approved assets in seconds. This extension bridges Photoshop with Experience Cloud, streamlining your workflow.
AI features in Photoshop are continuously updated through Creative Cloud. You’ll always have access to the latest AI tools without manual downloads.
Remember to save your AI-generated content to Creative Cloud libraries for reuse across projects. This practice ensures consistency and saves time on repetitive AI generation tasks.
Frequently Asked Questions
Photoshop’s AI features can significantly improve your workflow and creative capabilities. Many users have specific questions about how to maximize these powerful tools.
What are the key features of Photoshop’s AI tools and how can I utilize them effectively?
Photoshop offers several AI-powered features that can transform your editing process. The most notable include Generative Fill, Generative Expand, and various AI-enhanced selection tools.
To use these effectively, start with clear intentions for your edits. Experiment with different prompts when using generative tools to achieve your desired results.
Practice combining AI tools with traditional editing techniques for the most natural-looking outcomes.
Can you provide guidance on using Generative Fill in Photoshop for optimal results?
When using Generative Fill, write specific, detailed prompts to guide the AI. For example, instead of “add a tree,” try “add a tall pine tree with snow-covered branches.”
Make your selections precise before applying Generative Fill. The more accurate your selection, the better the AI can understand what you want to modify.
Consider making multiple generations of the same edit since results can vary. Photoshop allows you to generate multiple options that you can choose from.
What steps are involved in enhancing images through AI-powered features in Photoshop?
Start by identifying specific areas that need enhancement in your image. This could be removing unwanted objects, extending backgrounds, or improving details.
Use the Object Selection tool with AI edge refinement to make precise selections around subjects.
Apply context-aware tools like Content-Aware Fill for simpler fixes, then use Generative Fill for more complex enhancements requiring creative additions.
Finish with subtle adjustments using traditional tools to ensure the AI-generated elements blend seamlessly with the original image.
How do you access and apply the Generative Expand tool in Photoshop?
To access Generative Expand, first ensure you’re using a recent version of Photoshop that includes this feature. Open your image and select the Crop tool from the toolbar.
Drag the crop handles outward beyond the original image boundaries to specify where you want expansion.
With the extended canvas area visible, go to Edit > Generative Expand or use the right-click context menu. Enter a prompt describing what content you want in the expanded area.
Review the results and use the regenerate option if needed until you achieve the desired expansion.
What are the cost implications of upgrading to Photoshop with AI capabilities?
Photoshop’s AI features are included in Adobe Creative Cloud subscriptions, but there are usage limits. Standard subscriptions include 500 generation credits per month.
Additional credits can be purchased if you exceed your monthly allocation. This is important to consider if you plan to use AI features extensively.
Enterprise users typically have different allocation models, so check with your administrator if you’re using a business license.
Are there any professional techniques to achieve better outcomes with Photoshop’s AI functions?
Professional editors often combine multiple AI generations to achieve the best results. Create several variations and merge the best elements from each.
Work in layers when using AI tools. This preserves your original content and allows for non-destructive editing if you need to make changes.
Learn to refine AI-generated content with traditional tools. Techniques like selective masking, color adjustments, and texture blending can help integrate AI elements more naturally into your images.