Changing your Apple ID can feel scary when you worry about losing photos, notes, and other valuable data. Many people share Apple IDs with family members or need to update their email address but hesitate due to fear of data loss. You can change your Apple ID without losing your data by properly signing out of the old ID, creating a new one, and signing back in while maintaining your iCloud data.
The process requires careful steps to ensure your photos, apps, and purchases remain intact. Making a new Apple ID involves backing up important information first, then methodically transferring your digital life to the new account. This approach lets you keep what matters while gaining the benefits of a personal, separate account.
How To Change Apple ID Without Losing Everything
Changing your Apple ID on an iPhone, iPad, or Mac doesn’t mean you have to lose your photos, apps, or data — as long as you do it carefully. Here’s how to switch to a new Apple ID while keeping your information intact.
Step 1: Back Up Your Device
Before making any changes, it’s smart to create a backup.
- Go to Settings > [Your Name] > iCloud > iCloud Backup.
- Tap Back Up Now to ensure your latest data is saved.
- Or connect your device to a computer and back up with Finder (macOS) or iTunes (Windows).
Step 2: Sign Out of the Current Apple ID
- Open Settings and tap your name at the top.
- Scroll down and tap Sign Out.
- Enter your Apple ID password to turn off Find My iPhone.
- Choose Keep a copy of your data on this iPhone (e.g., Contacts, Keychain, Safari, etc.).
- Tap Sign Out again to confirm.
This ensures your personal data stays on the device.
Step 3: Sign In with the New Apple ID
- Go back to Settings and tap Sign in to your iPhone.
- Enter your new Apple ID and password.
- Follow the on-screen steps to complete the sign-in.
- Choose to merge data when asked (this syncs contacts, calendars, etc. with the new account).
Step 4: Reconnect iCloud and Apple Services
- After signing in, go to Settings > [Your Name] > iCloud.
- Toggle on everything you want synced: Photos, Notes, Messages, etc.
- Open the App Store and sign in with the new Apple ID if prompted.
What You Won’t Lose
- Apps and media already downloaded stay on your device.
- Contacts, calendars, photos, and files remain if you kept a copy or backed up with iCloud.
- iMessage and FaceTime will still work once signed in with the new ID.
What Might Be Affected
- Purchased content (apps, movies, music) from the old Apple ID won’t update unless you switch back temporarily.
- iCloud Drive data tied to the old account won’t sync anymore unless moved or backed up.
- Apple subscriptions tied to the old ID will not carry over unless manually re-subscribed.
By backing up your data and choosing to keep a copy during the sign-out process, you can safely change your Apple ID without losing personal files or app data.
Key Takeaways
- Properly signing out of your current Apple ID and backing up data before making changes protects your important information.
- Creating a separate Apple ID improves privacy and security while maintaining access to your purchased content.
- Some data like photos and notes can be saved to your device before switching accounts to ensure nothing important is lost.
Understanding the Importance of Your Apple ID
Your Apple ID serves as the key to your entire Apple ecosystem, controlling access to your data, purchases, and services. It’s crucial to understand how this identifier works and what happens if you need to change it.
The Central Role of Apple ID in Apple Services
Apple ID functions as your digital identity within the Apple universe. It links you to essential services like iCloud storage, which keeps your photos, notes, and documents synced across devices. The App Store relies on your Apple ID for all purchases and downloads, keeping a record of everything you’ve bought.
Your Apple ID also powers FaceTime and iMessage, allowing seamless communication. Apple Music subscriptions, iTunes purchases, and Apple TV+ are all tied to this single account.
Find My service uses your Apple ID to help locate lost devices and share locations with family. Apple Pay and wallet information is secured through this ID as well.
Even your device backups are associated with your Apple ID, making it truly the centerpiece of your Apple experience.
Consequences of Losing Data Associated with Apple ID
Changing your Apple ID incorrectly can lead to significant data loss. Photos stored in iCloud might become inaccessible if the account change isn’t handled properly. Notes, contacts, and calendars could disappear from your devices.
Your purchase history for apps, music, and books could be lost, requiring you to buy everything again. Subscriptions tied to your Apple ID might be interrupted or terminated entirely.
App data and game progress often rely on your Apple ID for cloud saves. Without proper migration, this information vanishes.
Family Sharing settings would need reconfiguration, affecting everyone in your group. Two-factor authentication and security information would require setup again.
The good news is that you can change your Apple ID without resetting your phone or losing data when you follow the correct steps.
Preparing to Change Your Apple ID
Before changing your Apple ID, several important preparations must be made to ensure a smooth transition. Taking these steps helps protect your data and maintain access to all your Apple services and content.
Ensuring Backup Data is Up-to-Date
Creating a complete backup is the most critical step before changing an Apple ID. Users should back up their devices through multiple methods for maximum security.
First, make a full iCloud backup of each device. Go to Settings > [your name] > iCloud > iCloud Backup and tap “Back Up Now.” This process may take time depending on the amount of data and connection speed.
Additionally, creating an iTunes backup provides an extra layer of protection. Connect the device to a computer, open iTunes or Finder, and select the device. Choose “Back up all data” and consider the “Encrypt backup” option to include passwords and health data.
Verify backups are complete by checking the timestamp of the most recent backup in iCloud settings or in iTunes/Finder.
Reviewing Associated Apple Devices and Services
Taking inventory of all devices and services linked to the current Apple ID prevents unexpected disconnections.
Devices to Check:
- iPhones and iPads
- Mac computers
- Apple Watch
- Apple TV
- HomePod
Services to Review:
- App Store purchases
- Apple Music subscriptions
- iCloud storage plans
- Apple Arcade
- Apple TV+
- Apple News+
Sign in to appleid.apple.com and check the “Devices” section to see all connected equipment. Make note of where the Apple ID is being used so nothing is overlooked during the transition.
It’s also helpful to download purchased content that might be tied to the current Apple ID. This includes apps, music, and movies that users want to keep.
Verifying Two-Factor Authentication
Proper authentication settings ensure continued access to the account during and after changes to the Apple ID.
First, check if Two-Factor Authentication is enabled by going to Settings > [your name] > Password & Security. If it’s not already active, it’s recommended to set it up before proceeding.
Make sure all trusted phone numbers are current and accessible. These numbers receive verification codes when signing in on new devices.
Generate and save recovery keys as a backup authentication method. These can be found in Password & Security settings under “Recovery Key.”
Ensure access to trusted devices that are already signed in with the current Apple ID. At least one of these devices should remain signed in during the transition process to maintain data integrity.
Verify that the email address planned for the new Apple ID is working properly and can receive verification emails.
Creating a New Apple ID
Setting up a new Apple ID allows users to have their own personal account for accessing Apple services while keeping their data secure. The process is straightforward and can be completed without losing existing information when done correctly.
Steps to Create New Apple ID
To create a new Apple ID, users should first sign out of their current Apple ID on their device. This can be done by going to Settings, tapping on the name at the top, scrolling down and tapping “Sign Out.” When prompted, they should choose to keep a copy of their data on the device.
After signing out, users can create a new Apple ID by:
- Going to Settings
- Tapping “Sign in to your iPhone/iPad”
- Selecting “Don’t have an Apple ID or forgot it?”
- Choosing “Create Apple ID”
The system will guide users through entering their name, birthdate, and email address. Apple offers a user-friendly interface that makes this process simple even for beginners.
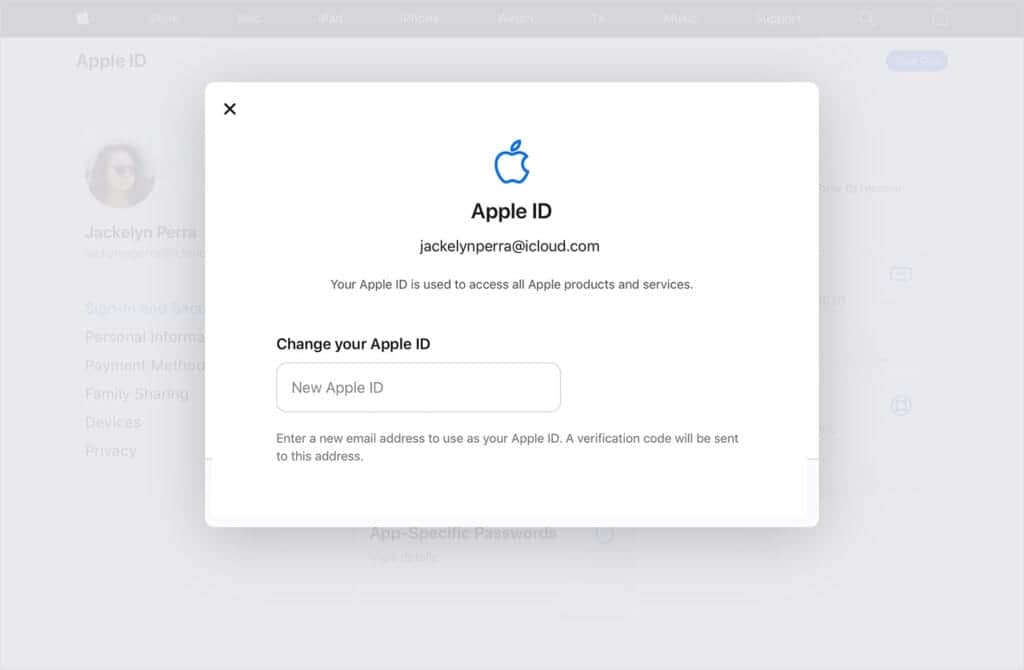
Setting a Primary Email Address for Apple ID
The primary email address serves as the main identifier for an Apple ID. Users should choose an email they check regularly and plan to keep long-term. This email will receive important security notifications and password reset information.
To set or change a primary email address for an existing Apple ID:
- Go to Settings
- Tap on their name at the top
- Select “Sign-In & Security”
- Tap on the primary email address to make changes
Users can add multiple email addresses to their Apple ID, but only one serves as the primary contact. It’s recommended to use a personal email rather than a work or school email that might not be permanent.
Executing the Change of Apple ID on Your Devices
Changing your Apple ID across devices requires careful steps to ensure your data remains intact. The process varies slightly depending on which Apple device you’re using, but with proper preparation, you can update your credentials without losing important information.
Changing Apple ID on iPhone and iPad
To change your Apple ID on an iPhone or iPad, start by opening the Settings app. Tap on your name at the top of the screen to access Apple ID settings. Select “Name, Phone Numbers, Email” and look for the option to edit your Apple ID.
When changing your Apple ID on iOS devices, you’ll be asked to verify your identity. Make sure to choose “keep data” when signing out of the shared Apple ID to preserve your information.
For a complete switch, follow these steps:
- Sign out of the current Apple ID (Settings → Your Name → Sign Out)
- Select the “Keep on My iPhone” option for data
- Create or sign in with the new Apple ID
- Restore your iCloud data as needed
Your apps will remain, but you may need to download purchases again under the new ID.
Altering Apple ID on Mac Computers
On Mac computers, changing your Apple ID starts by clicking the Apple menu in the top-left corner and selecting “System Preferences” (or “System Settings” in newer macOS versions). Click on “Apple ID” or “iCloud.”
Sign out of your current Apple ID first. Your Mac will ask if you want to keep a copy of your iCloud data on this Mac. Select “Keep on This Mac” to preserve important information.
After signing out, you can sign in with your new Apple ID credentials. Your previously downloaded apps will remain on your computer, but you may need to verify licenses for some software.
Remember to update your payment information in the App Store after changing your ID. This ensures seamless purchases going forward.
Updating Apple ID for iCloud and iTunes Services
For iCloud and iTunes services, you’ll need to update your Apple ID separately. Start by visiting appleid.apple.com on a web browser and signing in with your current credentials.
In the Account section, you can edit your primary email address. Apple will send verification codes to confirm the change. Be sure to verify the new email address promptly to complete the process.
For iTunes specifically:
- Open iTunes or the App Store
- Click on your account icon
- Select “View My Account”
- Sign out and sign back in with the new Apple ID
This process ensures your purchased content remains accessible after the change. Your existing purchases may stay linked to your original ID, so maintain access to both accounts during transition if possible.
Handling Subscriptions and Purchased Content
When changing your Apple ID, managing your ongoing subscriptions and previously purchased content requires careful attention. These digital assets represent a significant investment that you’ll want to preserve during the transition.
Transferring Subscriptions to the New Apple ID
Subscriptions like Apple Music, Apple TV+, and third-party apps don’t automatically transfer to a new Apple ID. You’ll need to sign out of the common Apple ID on your device first. Then cancel existing subscriptions on the old Apple ID before they renew.
To manage your subscriptions:
- Go to Settings > [your name] > Subscriptions
- Cancel each subscription you wish to transfer
- Sign in with your new Apple ID
- Resubscribe to the services
Remember that subscription history cannot be transferred. When you subscribe with your new Apple ID, you’ll be treated as a new subscriber, which may affect promotional pricing or free trial eligibility.
Access to Previously Purchased Content
Unfortunately, you cannot transfer purchased content to a new Apple ID. Movies, apps, and other content purchased through the App Store are permanently linked to the original Apple ID.
Instead of creating an entirely new Apple ID, consider these alternatives:
- Change your existing Apple ID email address while keeping the same account
- Use Family Sharing to share purchases between accounts
With Family Sharing, you can add up to five family members and share purchased content without sharing your password. This maintains access to your content library while creating separation between accounts.
Maintaining Data Continuity
When changing your Apple ID, keeping your data intact is a critical concern. The right approach can ensure your photos, contacts, messages, and other important information transfer smoothly to your new account.
Migrating iCloud Data to the New Account
Before switching Apple IDs, it’s essential to back up all your data to prevent loss during the transition. Start by signing into your device with your current Apple ID and verify all data is synced to iCloud.
Create a local backup of your iPhone through iTunes or Finder before making any changes. This provides an additional safety net.
For contacts, calendars, and notes, export them to your device or computer first. These items can then be reimported to the new Apple ID once it’s set up.
Photos and videos require special attention due to their size. Download these to your computer from iCloud.com or use the Photos app on your Mac before switching accounts.
Using EaseUS MobiMover for Data Transfer
EaseUS MobiMover offers a reliable third-party solution when transferring data between Apple IDs. This software specializes in moving data between iOS devices and computers without requiring iCloud.
Install EaseUS MobiMover on your computer and connect your device. Select which data categories you want to transfer (photos, videos, messages, contacts, etc.).
Back up the selected data to your computer first. After changing your Apple ID, use the software to restore this data to your device.
This method works well for larger files or when you have limited iCloud storage. It also helps maintain app data that might otherwise be lost during account changes.
Avoiding Data Loss During the Transfer Process
Never delete your old Apple ID until you’ve verified all data has successfully transferred to the new account. Keep both accounts active during the transition period.
Sign out of your old Apple ID on one device at a time rather than all at once. This controlled approach makes troubleshooting easier if problems arise.
Consider upgrading your iCloud storage plan temporarily during the transfer process. More space allows for comprehensive backups and smoother data migration.
Review your purchased content rights. Some apps, music, and movies may need to be repurchased with your new ID, so document everything before switching.
For shared family purchases, coordinate with family members about how the change will affect their access to content you’ve shared.
Addressing Potential Issues and Restrictions
Changing an Apple ID can sometimes lead to unexpected challenges that need careful handling to prevent data loss. Users may encounter various roadblocks during the process that require specific solutions.
Troubleshooting Common Problems When Changing Apple ID
When changing an Apple ID email address, some users experience verification delays. If this happens, check the spam folder for the verification email and ensure the new email is correctly entered.
Sometimes apps may disappear after the change. This typically occurs when apps were purchased with a different Apple ID. Users should first sign out completely, then sign back in with the new Apple ID.
Purchase history issues might arise where content seems missing. Most content will transfer automatically, but some purchases might need to be redownloaded from the App Store.
Two-factor authentication problems can occur during the transition. If locked out, users can change their password through the Apple ID account page or the “Forgot Apple ID or Password” option.
Overcoming MDM Restrictions and Recovery Mode Challenges
Mobile Device Management (MDM) restrictions can prevent Apple ID changes on company or school devices. Users should contact their IT administrator before attempting any changes, as unauthorized modifications might violate policies.
If a device becomes disabled during the process, entering Recovery Mode may be necessary. This is done by:
- Connect the device to a computer
- Force restart while connected
- Select “Restore” or “Update” when prompted
For devices with Activation Lock enabled, users must sign out of iCloud before changing their Apple ID. Failing to do so can result in being locked out of the device.
Family Sharing complications may arise when a family organizer changes their Apple ID. It’s recommended to temporarily remove family members before making changes, then re-add them afterward to ensure smooth transitions.
Safeguarding Family Sharing and Device Unlock Settings
When changing your Apple ID, protecting your Family Sharing setup and device access settings is crucial. These settings control important functions like shared purchases and device security.
Reconfiguring Family Sharing with the New Apple ID
Family Sharing lets up to six family members share purchases, subscriptions, and more without sharing accounts. When switching to a new Apple ID, users should first check their current Family Sharing status.
If the person is a Family Organizer, they should transfer this role to another adult family member before changing their Apple ID. This prevents disruption to shared services.
For Mac users with macOS 12 or earlier, they can navigate to Apple menu > System Preferences > Family Sharing to manage these settings. On newer systems, the process is similar but through System Settings.
After creating the new Apple ID, users should rejoin their family group as soon as possible. This ensures continued access to shared subscriptions and purchases.
Ensuring Continued Access with iPhone Unlock after Apple ID Change
Device security remains paramount when changing an Apple ID. Users should verify their unlock methods before making any changes.
Before changing Apple ID:
- Ensure device passcode is remembered
- Set up alternative authentication methods
- Backup device data to iCloud or computer
When signing out of the old Apple ID, users should select “Keep Data” when prompted. This retains local device content while removing the iCloud connection.
After signing in with the new Apple ID, users should immediately check Face ID or Touch ID settings. These may need reconfiguration to work with the new account. Two-factor authentication should also be enabled immediately for the new Apple ID to maintain security.
Frequently Asked Questions
Changing your Apple ID safely involves specific steps that help protect your data, purchases, and connected services. Here are answers to common questions about the process.
What steps should I follow to change my Apple ID on an iPhone without losing data?
To change your Apple ID on an iPhone without losing data, first sign out of your current Apple ID in Settings. Tap on your name at the top, scroll down, and select “Sign Out.”
Make sure to select the option to keep a copy of your data on your device before signing out. This preserves your photos, contacts, and other important information.
Next, create your new Apple ID either through Settings or the Apple website. After creating the new ID, sign back in on your device and select which data types you want to merge with iCloud.
Can I update my Apple ID email address without risking the loss of my content?
Yes, you can update just your Apple ID email address without creating an entirely new account. This is the safest approach to change Apple ID without losing data.
To do this, go to Settings > [Your Name] > Name, Phone Numbers & Email. From there, tap “Edit” next to your Apple ID email and follow the prompts to add a new address.
Once verified, you can set your new email as the primary Apple ID and remove the old one if desired. This method preserves all purchases, subscriptions, and iCloud data.
How do I preserve applications and purchases when switching to a new Apple ID?
Unfortunately, app purchases and subscriptions are tied to specific Apple IDs and cannot be transferred between accounts. When you switch to a completely new Apple ID, you will lose access to previously purchased content.
To minimize disruption, keep both Apple IDs active. You can use your old ID for App Store purchases and the new one for iCloud services.
For family sharing situations, consider setting up Family Sharing with your new Apple ID, which allows up to six family members to share purchases without sharing accounts.
Is it possible to retain my photos and media if I modify my Apple ID credentials?
Yes, your photos and media can be retained when modifying Apple ID credentials. The key is backing up your content before making any changes.
Use iCloud backup or create a local backup via iTunes/Finder. Photos can also be saved to your computer directly or through third-party cloud services as an extra precaution.
If you’re only changing your email address (not creating a new ID), your photos will remain intact. If creating a completely new Apple ID, download all photos from iCloud.com first, then upload them after signing in with the new account.
What measures can I take to ensure my Find My iPhone service continues to function after changing my Apple ID?
Before changing your Apple ID, disable Find My iPhone on all your devices. This prevents activation lock issues with your old Apple ID credentials.
Go to Settings > [Your Name] > Find My > Find My iPhone and toggle it off. You’ll need to enter your Apple ID password to confirm.
After switching to your new Apple ID, immediately re-enable Find My iPhone by going back to the same settings and turning the feature on. This ensures continuous protection of your devices.
How can I manage multiple Apple IDs without compromising data associated with each account?
Managing multiple Apple IDs requires careful organization of which services connect to each account. You can use different Apple IDs for different purposes without data loss.
For example, use one Apple ID for iCloud services (photos, contacts, calendar) and another for Media & Purchases. To set this up, go to Settings > [Your Name] > Media & Purchases > Use Different Apple ID.
Remember to note which purchases belong to which account. Using a password manager helps keep track of multiple Apple ID credentials and prevents lockouts due to forgotten passwords.