Sharing photo albums with friends and family is a great way to keep everyone connected through special moments. Apple’s iPhone makes this process simple with its Shared Albums feature, which lets multiple people view and contribute to the same collection of photos and videos. To accept a shared album invitation on your iPhone, you’ll need to have Shared Albums enabled in your Photos settings, then tap on the notification when you receive an invite or find it in the “For You” tab of the Photos app.
Many iPhone users miss out on shared albums because they either don’t notice the invitation or aren’t sure how to respond to it. The good news is that accepting a shared album invitation takes just a few taps. Once accepted, you can immediately view all the photos in the album and even add your own if the album owner has enabled that option.
Before you can join in on the photo-sharing fun, make sure your iPhone has Shared Albums turned on in your iCloud settings. This feature requires an Apple ID and iCloud account, which most iPhone users already have set up. With the right settings in place, you’ll never miss another chance to participate in collecting and sharing memories with your loved ones.
How to Accept a Shared Album Invitation on iPhone
When someone shares an album with you using iCloud Photos, you’ll receive a notification or email letting you know. Accepting the invite is straightforward, but depending on your iPhone settings, the steps may differ slightly. Here’s how to do it.
Option 1: Accepting from the Photos App
- Open the Photos app on your iPhone.
- Tap the “For You” tab at the bottom of the screen.
- You’ll see the Shared Album Invitation listed at the top.
- Tap “Accept” next to the invite.
Once accepted, the album will appear in the Shared Albums section of the Photos app under the Albums tab.
Option 2: Accepting via iMessage or Email
Sometimes you’ll get the invitation in your Messages app or email:
- In Messages: Tap the shared album link and then tap “Join Shared Album”.
- In Mail: Tap the invitation link. Your iPhone will open the Photos app where you can tap “Accept”.
Where to Find Shared Albums After Accepting
Once you’ve accepted the invite, the album doesn’t show up in your main camera roll. Here’s where to find it:
- Open the Photos app.
- Tap the Albums tab.
- Scroll down to the Shared Albums section.
- Tap on the shared album to view photos, videos, and comments.
You can like photos, add comments, or upload your own photos if the album owner has given permission.
What To Do If You Don’t See the Invitation
If you’re not seeing a shared album invite, here are a few quick checks:
| Issue | How to Fix It |
|---|---|
| iCloud Photos not enabled | Go to Settings > [your name] > iCloud > Photos and enable it |
| Shared Albums turned off | Go to Settings > Photos > Shared Albums and turn it on |
| No notification received | Ask the sender to re-share the album or check the Messages app |
| Using a different Apple ID | Make sure you’re signed in to the correct Apple ID |
Can’t Accept the Album? Here’s How to Fix It
Sometimes a glitch or a settings conflict prevents the “Accept” button from appearing. Try these steps:
- Restart your iPhone
- Sign out and back into iCloud:
Go to Settings > [your name] > Sign Out, then sign in again. - Update iOS:
Go to Settings > General > Software Update and install the latest version. - Re-ask for the invite:
Have the album creator remove you and re-add you as a participant.
How to Leave or Delete a Shared Album
If you no longer want to be part of a shared album:
- Open the Photos app.
- Go to Albums > Shared Albums.
- Tap into the album you want to leave.
- Tap the People icon at the top.
- Scroll down and tap Unsubscribe.
The album and its contents will be removed from your device, though you can be re-invited again later if needed.
Key Takeaways
- iPhone’s Shared Albums feature must be enabled in iCloud settings before you can accept invitations.
- Shared album invitations appear as notifications and in the Photos app’s “For You” section.
- After accepting an invitation, users can view, like, comment on, and sometimes add photos depending on the album settings.
Understanding Shared Albums on iPhone
Shared Albums on iPhone provide a convenient way to share photos and videos with friends and family. This feature works through the Photos app and iCloud, allowing multiple people to view, comment on, and contribute to the same collection of images.
What Are Shared Albums
Shared Albums are collections of photos and videos that can be viewed by multiple people through iCloud. These albums exist separately from your personal photo library on your iPhone.
When someone creates a Shared Album, they can invite others to view and, if allowed, add their own photos. The creator controls who has access and what permissions they have.
Notifications appear on your iPhone screen when you’re invited to join a Shared Album. The Photos app manages all shared content through the “For You” or “Shared” tab, depending on your iOS version.
Unlike regular albums, Shared Albums can have comments and likes, making them more interactive. They’re perfect for group events, family collections, or collaborative projects.
Benefits of Using Shared Albums
Shared Albums offer several advantages over other photo-sharing methods. First, they maintain better photo quality than texting or messaging photos.
Users can:
- Share memories with multiple people at once
- Save storage space as shared photos don’t count against iCloud storage limits
- Comment and like photos to engage with others
- Receive notifications when new content is added
- Control privacy by deciding who can view or add content
Shared Albums work even with friends who don’t use iCloud through special web-only access links. This flexibility makes them ideal for sharing wedding photos, vacation memories, or family gatherings.
No more sending dozens of individual photos or creating complicated folders. Everything stays organized in one accessible place.
Compatibility With Other Devices
Shared Albums work seamlessly across the Apple ecosystem. Users can access and manage them on iPhones, iPads, Macs, and even through iCloud.com on Windows computers.
On Macs, Shared Albums can be enabled through the Photos app preferences under iCloud settings. This ensures consistent access across all devices.
For those with non-Apple devices, the album creator can generate a public website link that works on any device with a web browser. This option makes sharing inclusive for everyone.
The experience is optimized for Apple devices, with full commenting and contributing capabilities. Non-Apple users can view images but may have limited interaction options depending on how the album is shared.
Photos sync automatically across all connected devices, ensuring everyone sees the most current version of the Shared Album regardless of which device they use.
Setting Up Your iPhone for Shared Albums
Before accepting shared albums, you need to properly configure your iPhone. These settings ensure your device is ready to connect with others through Apple’s photo sharing features.
Verifying iCloud Account and Apple ID
To use shared albums, users must have an active iCloud account linked to their Apple ID. They should check this by opening Settings, then tapping their name at the top of the screen. The Apple ID email address should be visible at the top of this screen.
If no Apple ID appears, they’ll need to sign in by tapping “Sign in to your iPhone” and following the prompts. In some cases, verification may be required through a code sent to a trusted device or phone number.
Users who are uncertain about their login credentials can tap “Forgot Apple ID or Password” on the sign-in screen. Apple provides several recovery options based on the information provided during account setup.
Ensuring Internet Connectivity
Shared albums require a stable internet connection to function properly. Users should verify their iPhone is connected to either WiFi or cellular data.
To check WiFi connection:
- Go to Settings
- Tap WiFi
- Ensure WiFi is toggled ON
- Connect to a known network
For cellular data verification:
- Go to Settings
- Tap Cellular
- Make sure Cellular Data is enabled
If connection issues persist, users can try resetting network settings by going to Settings > General > Transfer or Reset iPhone > Reset > Reset Network Settings. This action removes saved WiFi networks and passwords, so they’ll need to reconnect afterward.
Enabling iCloud Photo Sharing
Once the account and internet connection are verified, users need to specifically enable Shared Albums on their device.
To activate this feature:
- Open Settings
- Tap on their name at the top
- Select iCloud
- Tap Photos
- Toggle ON Shared Albums
This setting needs to be enabled to receive and accept shared album invitations. Without it, shared album invitations won’t appear on the device.
The Photos app might need to be restarted after enabling this feature. Users can close the app by swiping up from the bottom of the screen (or double-clicking the home button on older models) and swiping the Photos app away, then reopening it.
Accepting a Shared Album Invitation
When someone shares a photo album with you on iPhone, you’ll need to accept their invitation to view and interact with the content. The process is straightforward but can sometimes present challenges for users unfamiliar with this feature.
Receiving and Recognizing Invites
Shared album invitations typically arrive through notifications on your iPhone. When someone invites you, you’ll see a notification that you can tap directly to open the invitation. If you miss the notification, you can still find your shared album invitation in Notification Center.
Another way to access invitations is through the Photos app. Users should open the Photos app and tap the “For You” tab at the bottom of the screen. Any pending shared album invitations will appear at the top of this section.
To accept the invitation, simply tap Accept when prompted. After accepting, the shared album will appear in the “Shared Albums” section of the Photos app, making it easy to access whenever needed.
Troubleshooting Common Issues
If a shared album is not showing up after accepting the invitation, users should first check their internet connection. Shared albums require a stable connection to sync properly.
Users should also verify that they’re signed in with the same Apple ID that received the invitation. If using multiple Apple IDs, this can cause confusion with shared content.
Sometimes restarting the Photos app can resolve display issues. Close the app completely by swiping up from the bottom of the screen (or double-clicking the home button on older models), then reopen it.
If the problem persists, users might need to ask the album creator to resend the invitation. The original invitation may have expired or encountered a technical issue during the sharing process.
Managing Photos and Videos in Shared Albums
Shared albums on iPhone offer a convenient way to organize and share memories with friends and family. Users can add new content, remove unwanted items, and even create special memory collections within these collaborative spaces.
Adding Content to Shared Albums
To add photos or videos to an existing shared album, open the Photos app and navigate to the Albums tab. Find and tap on the shared album you want to add content to. Look for the + button at the bottom of the screen and tap it to select new photos or videos to add.
Users can also add content directly when viewing individual photos. Simply select the photo, tap the share icon, and choose the option to add to a shared album. This works for multiple photos too—just select several items before sharing.
When adding photos, users can include comments to provide context or stories about the images. These comments appear below the photo in the shared album and can help create a more meaningful collection.
Deleting Content or an Entire Shared Album
Removing content from a shared album is straightforward. The user can open the shared album, select the photo or video they wish to delete, tap the trash icon, and confirm the deletion. Only the person who added the content or the album owner can delete items.
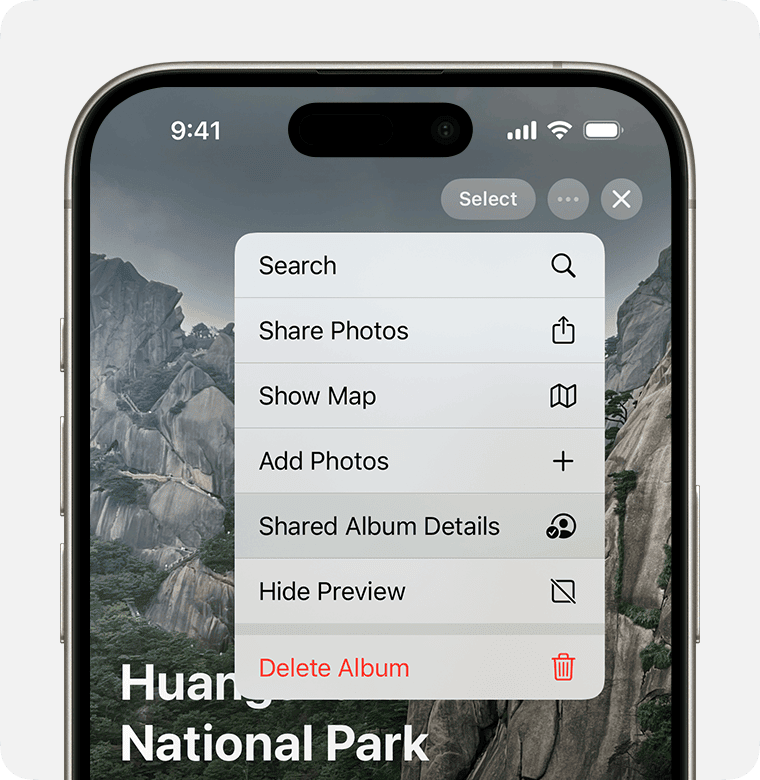
To delete an entire shared album, the owner should go to the Albums tab, find the shared album, and tap the “Delete Shared Album” option in the album’s settings. This action permanently removes the album for all participants.
Users who wish to leave a shared album without deleting it can tap on the People tab within the album, scroll down, and select “Leave this Shared Album.” This removes the album from their Photos app but keeps it intact for other participants.
Creating Memories in Shared Albums
The Memories feature automatically organizes photos and videos in shared albums based on common themes, locations, or dates. These collections showcase special moments through slideshows with music.
To view Memories from a shared album, users can open the album and look for the “Memories” section at the top. Tapping on a Memory plays a curated slideshow that can be customized with different music themes and durations.
Users can share these memory slideshows with others by tapping the share icon while viewing a Memory. This creates a link that can be sent via message or email, even to people who aren’t part of the original shared album.
The Photos app regularly creates new Memories from shared content, providing fresh ways to revisit meaningful moments without manual curation.
Adjusting Privacy and Notification Settings
When using shared albums on iPhone, managing privacy settings and notifications helps you control who sees your photos and when you receive updates. These settings can be customized to match your preferences and comfort level with sharing.
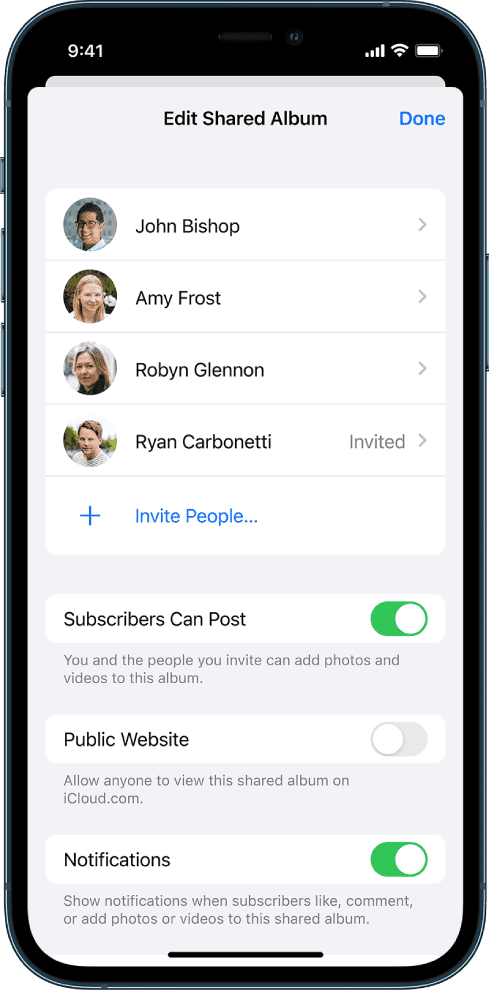
Customizing Visibility and Access
To manage who can view and interact with your shared albums, open the Photos app and select the “Shared” tab. Tap on the album you want to modify, then select “People” to see current members. You can invite people to join by tapping the “+” icon and entering their contact information or email address.
If you want to adjust privacy settings, tap on “Sharing Settings” within the album. Here you can toggle several important options:
- Public Website: Turn this off to prevent access via a web link
- Subscribers Can Post: Determine if others can add photos
- Notifications: Enable or disable alerts for new activity
If someone leaves unwanted comments, you can remove them by swiping left on any comment and tapping “Delete.”
Setting up Notification Preferences
iPhone users can customize exactly which shared album activities trigger notifications. To adjust these settings, go to Settings > Photos > Shared Albums. Make sure Shared Albums are enabled – this is required for receiving notifications.
For finer control over notifications, go to Settings > Notifications > Photos. Here you can set preferences for:
- Alert Style: Choose between banners, alerts, or no visual notifications
- Sounds: Select a distinct tone for shared album activities
- Badge App Icon: Toggle whether unviewed shares show as a number on the Photos app
If a shared album isn’t showing properly, try toggling Shared Albums off and back on in Settings. This often resolves syncing issues without affecting your content.
Resolving Issues with Shared Albums
Shared Albums on iPhone sometimes encounter problems that prevent proper functioning. Troubleshooting these issues typically involves checking system settings, device resources, and connectivity options.
Checking Apple System Status
Before diving into device-specific solutions, it’s important to verify if Apple’s systems are functioning correctly. Apple occasionally experiences server outages that can affect iCloud services including Shared Albums.
To check Apple’s system status:
- Visit the Apple System Status page
- Look for any yellow or red indicators next to “iCloud Photos” or “iCloud”
- If there’s an outage, wait until Apple resolves the issue
System-wide problems aren’t fixable on the user end. If Apple services show as operational but Shared Album concerns persist, move on to other troubleshooting steps.
Ensuring Adequate Storage Space
Insufficient storage can prevent Shared Albums from working properly. The iPhone needs space to process and download shared content.
Steps to check and free up storage:
- Go to Settings > General > iPhone Storage
- Review available space at the top of the screen
- If storage is nearly full, consider:
- Deleting unused apps
- Moving photos to external storage
- Clearing browser cache
- Removing old messages with attachments
The Photos app itself may need space to process shared content. Even if the device has storage, the iCloud account might be full. Check iCloud storage in Settings > [Your Name] > iCloud > Manage Storage.
Disabling Low Power Mode
Low Power Mode restricts background activities to conserve battery, which can interfere with photo syncing and Shared Albums functionality.
To disable Low Power Mode:
- Open Settings
- Scroll down and tap Battery
- Toggle off Low Power Mode
The yellow battery icon indicates Low Power Mode is active. When disabled, Shared Album Activity can resume normal operation. This simple fix often resolves issues with albums not updating or invitations not appearing.
Battery optimization settings might also prevent proper syncing. Ensure Photos has background refresh enabled in Settings > General > Background App Refresh.
Re-establishing Network Connections
Connectivity issues often cause Shared Albums to malfunction. A stable internet connection is essential for iCloud services to work properly.
Try these network troubleshooting steps:
- Toggle Airplane Mode on and off
- Reset network settings through Settings > General > Reset > Reset Network Settings
- Connect to different WiFi if available
- Check cellular data settings for Photos if using mobile data
If Shared Albums invites aren’t showing, try turning the feature off and on again. Go to Settings > Photos > Shared Albums and toggle the switch. Many users report this fixes Shared Albums not working when other methods fail.
When reconnecting to networks, ensure both WiFi and iCloud connections are stable before testing Shared Albums again.
Alternative Ways to Share Photos from iPhone
While shared albums offer a convenient way to exchange photos with friends and family, iPhone users have several other options for sharing their precious memories. These alternatives provide flexibility depending on connection type, recipient devices, and how many photos need to be transferred.
Using iCloud Photo Links
iCloud Photo links make sharing photos quick and simple, even with people who don’t use Apple devices. To create an iCloud link, users can select a photo or album in the Photos app, tap the share icon, and then choose “Copy iCloud Link.” The link can be texted, emailed, or shared through social media.
These links work for anyone with internet access, regardless of what device they use. The recipient simply clicks the link to view shared photos in their web browser.
For single photos, iPhone users can also tap the share button and choose a specific app like Messages or Mail. This method works well for sharing just a few images without creating a full album.
Transferring Photos via EaseUS MobiMover
EaseUS MobiMover is a third-party tool that allows users to transfer photos between iPhones and computers without using iCloud. After installing the software on a Mac or PC, users connect their iPhone with a USB cable to begin the transfer process.
The program lets users select specific photos or entire albums to move. This option is particularly useful for backing up large photo collections or sharing with someone in person.
Unlike cloud-based solutions, EaseUS MobiMover doesn’t require internet connection once installed. This makes it ideal for transferring large photo libraries without worrying about upload speeds or data limits.
Sharing Photos Through iTunes
iTunes provides another method for transferring photos between devices. Users need to connect their iPhone to a computer with iTunes installed using a USB cable. Once connected, the iPhone appears in iTunes, where photos can be synced.
This method works well for transferring entire photo libraries or specific albums. Users select which photos or albums to sync under the Photos tab in iTunes.
The advantage of using iTunes is that it doesn’t count against iCloud storage limits. It’s also helpful when transferring photos to someone who needs physical copies of the images or doesn’t have reliable internet access.
Frequently Asked Questions
Users often face challenges when working with shared albums on their iPhones. These common questions address the most frequent issues and provide clear solutions for successfully managing shared album invitations.
What steps are involved in accepting a shared album invite on an iPhone?
To accept a shared album invite on an iPhone, open the Photos app and tap on the “For You” tab at the bottom of the screen. The invitation should appear there with a notification banner.
Tap “Accept” on the invitation to join the shared album. The album will then appear in the “Shared” section of the Photos app under the “Albums” tab.
If notifications are enabled, users can also tap directly on the notification when it appears to quickly access and accept the invitation.
How can one locate a shared album on an iPhone if the invitation is not visible?
If the shared album invitation isn’t immediately visible, check the “For You” tab in the Photos app where shared album invites typically appear. Scroll through this section carefully as older invitations may be further down.
Another option is to check the “Shared Albums” section under the “Albums” tab. Sometimes invitations appear here directly.
Users should also verify that the Shared Albums feature is enabled by going to Settings > [your name] > iCloud > Photos and ensuring “Shared Albums” is turned on.
What troubleshooting methods can be employed when a shared album invite is not received on an iPhone?
If an invite hasn’t been received, first ensure that the Shared Albums feature is activated in Settings > [your name] > iCloud > Photos. This is a common oversight that prevents invitations from coming through.
Ask the sender to verify they have correctly entered the recipient’s email address or phone number. Even a small typo can prevent the invitation from reaching the intended person.
Check for any pending iOS updates, as outdated software can sometimes cause communication issues with iCloud services. Restarting the iPhone can also resolve temporary system glitches.
Are there any specific considerations for accepting shared album invites on iOS 18?
iOS 18 maintains similar functionality for shared albums as previous versions, but includes enhanced notification management. Users should ensure notifications for the Photos app are enabled in Settings > Notifications > Photos.
The interface in iOS 18 has been slightly redesigned, with shared album invitations sometimes appearing in the redesigned notification center rather than directly in the Photos app.
Users on iOS 18 benefit from improved syncing capabilities, but should allow sufficient time for invitations to propagate through iCloud services, especially when connecting to cellular networks.
Is there a difference in the process of accepting a shared album invite on an iPhone versus an iPad?
The basic process for accepting shared album invites is similar across iPhone and iPad devices, with both requiring users to access the “For You” tab in the Photos app to find and accept invitations.
The iPad’s larger screen provides a different visual layout, with the Photos app interface showing more content at once. This can make locating invitations in the “For You” section slightly easier.
Both devices require the same iCloud settings configuration, with Shared Albums needing to be enabled under Settings > [your name] > iCloud > Photos.
What common issues might prevent a shared album from working on an iPhone, and how can they be resolved?
Insufficient iCloud storage is a frequent issue that can prevent shared albums from functioning properly. Users should check their available storage in Settings > [your name] > iCloud > Manage Storage.
Connectivity problems can impact shared album functionality. Switching from cellular data to a stable Wi-Fi connection often resolves syncing issues with shared content.
Privacy restrictions sometimes block shared album features. Users should verify that the Photos app has necessary permissions in Settings > Privacy & Security > Photos to ensure proper functionality.