Checking someone’s location history on an iPhone can be helpful for various reasons. Whether you’re concerned about a family member’s whereabouts or trying to recall places you’ve visited, iOS offers several built-in options to access this information. You can view someone’s location history through the Find My app by selecting the People tab and choosing the person whose location you want to track, or check your own significant locations in Privacy settings.
The iPhone provides multiple ways to view location data, with privacy controls built into the system. For people who have shared their location with you, the Find My app makes it easy to see where they are in real-time. For your own movements, iOS keeps track of significant locations you frequently visit, accessible through your privacy settings.

How To View Location History on an iPhone
Apple devices have several built-in features that allow users to track and review location history — but with important limitations. iPhones store certain location data primarily to improve services like Maps, Photos, and Siri. If you have access to the person’s device and the necessary permissions, here’s how you can check someone’s location history.
1. Check Significant Locations
The most direct way to see detailed past locations is through the “Significant Locations” feature:
- Open the Settings app.
- Scroll down and tap Privacy & Security.
- Tap Location Services.
- Scroll all the way down and select System Services.
- Tap Significant Locations.
You’ll likely need to authenticate with Face ID, Touch ID, or a passcode. Once inside, you’ll see a list of places the iPhone user has visited, often grouped by city. Tapping on a location will show more detailed maps and timestamps.
Significant Locations are private, encrypted, and only visible on the device itself. Apple uses this data to optimize services like traffic routing in Maps, but it’s a surprisingly detailed log if you’re looking to view location history.
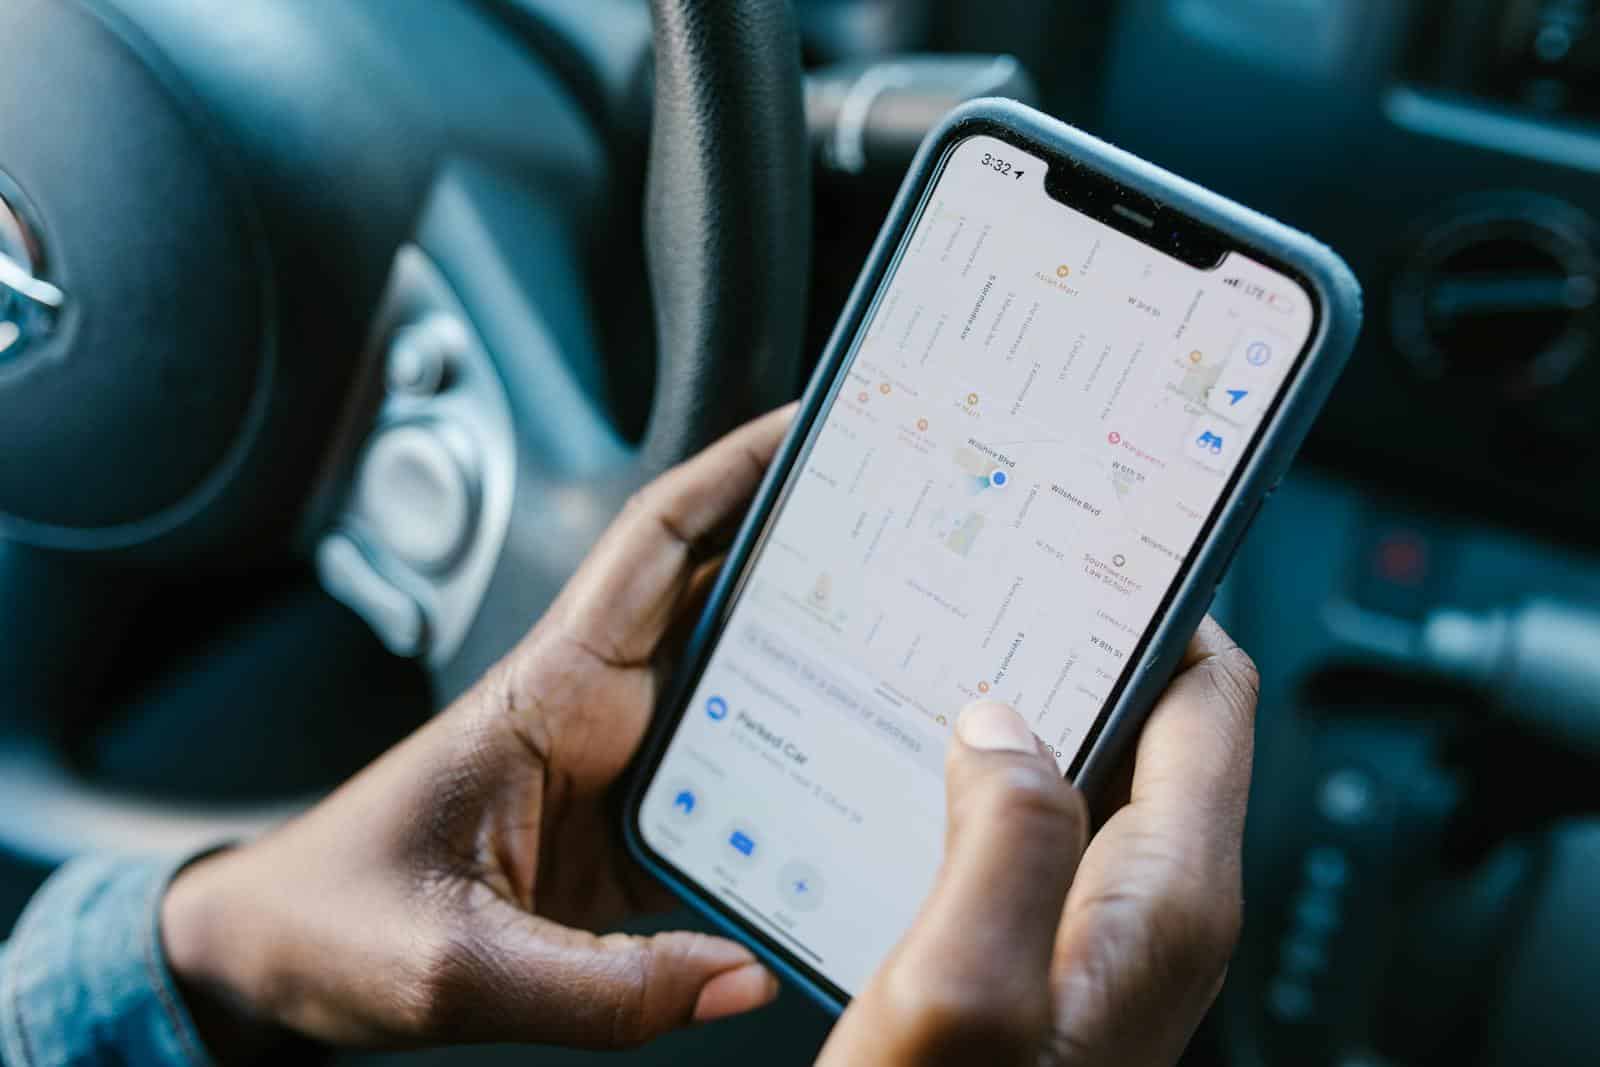
2. Review Location Data in the Find My App
If the person shares their location with you through the Find My app, you can see their current location and, in some cases, get a general idea of where they’ve been:
- Open the Find My app.
- Tap People.
- Select the person’s name.
While Find My focuses mostly on live tracking, if someone’s device has recently moved, you’ll sometimes notice slight “trail” movement that hints at where they were throughout the day. However, it’s not a detailed timeline like Significant Locations.
Keep in mind that users can pause or stop sharing their location at any time through Find My.
3. Check Location Metadata in Photos
Every photo or video taken on an iPhone typically has location metadata attached if Location Services were enabled for the Camera app:
- Open the Photos app.
- Find a photo and swipe up on it.
- If location information is available, you’ll see a map showing where the photo was taken.
By looking at the timestamps and locations on different photos, you can piece together a rough timeline of where the person has been, especially if they take a lot of pictures throughout the day.
4. Review Third-Party Apps
Certain apps, especially navigation or fitness apps like Google Maps, Waze, or Strava, may log location history if the user has granted permission. If you have access to these apps:
- Open the app and go to its location history or timeline settings.
- Look for any travel routes, visited places, or activities.
Some apps keep a surprisingly detailed record of movement, sometimes even better than the native iPhone settings, depending on how the person uses their device.
5. Analyze Screen Time and App Usage
While not a direct method, checking Screen Time reports can give clues about someone’s movements:
- Go to Settings.
- Tap Screen Time.
- Look at App Usage and Pickups.
If you see frequent use of Maps, Uber, or delivery apps at certain times, it might suggest travel activity. This method requires a bit of interpretation but can fill in gaps if location-specific data is limited.
Things to Keep in Mind
- Privacy considerations are crucial. Accessing someone’s private location history without their permission can be a major invasion of privacy and, in some cases, could even be illegal.
- Access requires device permissions. Without Face ID, a passcode, or prior location sharing, it’s nearly impossible to view someone’s detailed location history remotely.
- Significant Locations can be disabled. If the feature has been turned off, there will be no history available to review.
Key Takeaways
- iPhone’s Find My app allows you to track shared locations of friends and family members who have granted permission.
- You can access your own location history through Settings > Privacy & Security > Location Services > System Services > Significant Locations.
- Third-party apps and Google services offer additional options for more detailed location tracking and history on iPhone.
Understanding Location Services on iPhone
While iPhones have powerful tools that track and store location data for user convenience, accessing someone else’s location history usually requires direct access to their device and consent. Whether you’re checking for safety reasons, family tracking, or another purpose, it’s important to approach the situation respectfully and within the boundaries of privacy laws. If location tracking is something both parties agree on, apps like Find My can make it easy and transparent.
Location Services on iPhone provides a framework for apps to access your device’s location information, enabling features like maps and local recommendations. This technology balances convenience with important privacy considerations that users should understand.
How Location Services Work
Location Services on an iPhone uses a combination of GPS, Bluetooth, Wi-Fi hotspots, and cellular towers to determine your precise location. When you use an app that requests location data, your iPhone triangulates your position using these technologies.
GPS is the most accurate but consumes more battery power. In areas with poor GPS reception, your iPhone automatically switches to using Wi-Fi and cellular data for location tracking.
Your iPhone stores this location data in a feature called Significant Locations. This system learns places you frequently visit to provide personalized services and predictions. The data is encrypted and stored only on your device, not accessible to Apple.
Many iPhone features rely on Location Services, including Maps, Find My, Weather, and various third-party applications that deliver location-based content.
Enabling and Disabling Location Services
To manage Location Services, go to Settings > Privacy & Security > Location Services. Here you can toggle the master switch for all location tracking.
For more granular control, you can set permissions for individual apps. Options typically include:
- Never: The app cannot access location data
- Ask Next Time: Prompts you when the app requests location access
- While Using the App: Only allows access when the app is open
- Always: Grants continuous access even in the background
To view your iPhone’s stored location history, navigate to Settings > Privacy & Security > Location Services > System Services > Significant Locations. Authentication with Face ID, Touch ID, or your passcode is required to access this sensitive information.
Privacy Implications
Location data is among the most sensitive information on your device, revealing patterns about your daily life, frequently visited places, and personal habits. Apple designs Location Services with a “privacy by design” approach.
Your location history is encrypted end-to-end and cannot be read by Apple. However, third-party apps may collect and share this data according to their own privacy policies.
Users should regularly review which apps have location permissions. Delete location history by clearing Significant Locations if privacy concerns arise.
The Status Bar displays indicators when an app is using your location: a hollow arrow means an app has used your location recently, while a solid arrow indicates an app is actively using it now.
Some apps may not function properly without location access, requiring users to balance functionality with privacy preferences.
Using ‘Find My iPhone’ to Track Location
The ‘Find My’ app offers powerful location tracking capabilities for iPhone users. It allows people to view where their devices are and can even show location history in some cases.
Setting Up ‘Find My iPhone’
To use location tracking features, users need to properly set up the ‘Find My’ app first. On an iPhone, the setup process is straightforward:
- Open the Settings app
- Tap on the Apple ID name at the top
- Select Find My
- Tap Find My iPhone and toggle it to ON
- Enable Share My Location if desired
For the app to work effectively, Location Services must be enabled. Users can check this by going to Settings > Privacy > Location Services and ensuring it’s turned on.
The setup process requires an Apple ID and password. Once activated, the iPhone will automatically share its location with Apple’s servers, making it possible to locate the device when needed.
‘Find My’ App Features
The ‘Find My’ app includes several valuable location tracking features. Users can check someone’s location if that person has shared their location.
To view someone’s location:
- Open the Find My app
- Select the People tab at the bottom
- Tap on the person’s name to see their current location
Users can also set up location-based notifications. These alerts trigger when someone arrives at or leaves a specific location. This feature is useful for families tracking each other’s movements for safety.
While current locations are easy to view, past location history is limited in the standard ‘Find My’ app. However, users can sometimes see recent locations by opening the app and checking the last known position.
Privacy Considerations in ‘Find My iPhone’
Privacy remains an important aspect of location tracking. The ‘Find My’ app includes several privacy protections:
- Users must explicitly consent to share their location
- People can choose to share location temporarily or indefinitely
- Location sharing can be revoked at any time
- The app shows when someone’s location was last updated
For parents tracking children, additional privacy considerations exist. The Find My app shows notifications when location requests are made, ensuring transparency.
To protect privacy, users should regularly review who has access to their location. This can be done by going to the People tab in the Find My app and reviewing all active location sharing relationships.
Apple encrypts location data and emphasizes user control over who can view their location information.
Leveraging ‘Find My Friends’ for Location Sharing
The Find My Friends feature on iPhone provides a convenient way for users to share their real-time location with trusted contacts. This system works through Apple’s secure network and requires permission from both parties.
How to Share Your Location
To begin sharing location on an iPhone, users need to access the Find My app. The process starts by opening the app and tapping on the “People” tab at the bottom of the screen.
From there, tap the “Share My Location” button and enter the contact information of the person you want to share with. The system allows users to choose how long to share their location: for one hour, until the end of the day, or indefinitely.
Recipients will receive a notification asking them to accept the location sharing request. They must approve this before they can view the shared location.
Location sharing can be stopped at any time by going to the contact in the Find My app and selecting “Stop Sharing My Location.”
‘Find My Friends’ App Usage
The Find My Friends functionality (now integrated into the Find My app) allows users to view shared locations on a map. When someone has shared their location, they appear as a circular icon on the map interface.
Tapping on a friend’s icon displays additional options:
- Contact them via phone or message
- Get directions to their location
- Create notifications for when they arrive or leave specific locations
It’s important to note that the Find My Friends app shows real-time locations only, not historical data. Users cannot view where someone was at a previous time, only their current position.
Privacy settings can be managed through Settings > Privacy > Location Services > Share My Location. Here users can see a list of everyone with whom they’re currently sharing their location.
Exploring ‘Significant Locations’ on iPhone
Your iPhone keeps track of places you frequently visit in a feature called Significant Locations. This data helps provide personalized services but raises important privacy considerations that every iPhone user should understand.
Accessing Significant Locations
To view your iPhone’s location history, you need to navigate through several privacy settings. Start by opening the Settings app on your iPhone. Tap on “Privacy & Security” and then select “Location Services” from the menu options.
Scroll down to find “System Services” near the bottom of the screen and tap on it. Within this menu, locate and select Significant Locations.
Your iPhone will require authentication at this point. Use Face ID, Touch ID, or your passcode to verify your identity. This extra security step ensures that only you can access this sensitive information.
Once authenticated, you’ll see a detailed list of locations your iPhone has recorded, organized by regions and specific places.
Managing Your Significant Locations Data
The Significant Locations screen provides several options for managing this sensitive data. At the top right, users can tap “Clear History” to remove all recorded location data at once, giving them a fresh start.
For more selective management, users can remove individual locations by tapping on a specific place and using the “Delete” option. This targeted approach helps maintain useful location data while removing unwanted entries.
If users prefer to stop collecting this data entirely, they can toggle off the “Significant Locations” switch at the top of the screen. This completely disables the feature without affecting other location services.
Apple employs end-to-end encryption for Significant Locations data. This means the information stays on the user’s device and syncs only across their personal Apple devices, not to Apple’s servers.
Users concerned about privacy should review these settings regularly, as location data accumulates over time with normal iPhone use.
Navigating iPhone’s ‘Location History’ Feature
iPhones keep track of where users go, storing this information for convenience and functionality. This location data can be accessed through different methods depending on whether you use Apple’s built-in services or third-party apps.
How to Access Location History
To view location history on an iPhone, users have several options. The primary method is through the Significant Locations feature. To access this:
- Open Settings app
- Tap Privacy & Security
- Select Location Services
- Scroll down and tap System Services
- Tap Significant Locations
iPhone will require Face ID, Touch ID, or passcode verification for security purposes. This protects location data from unauthorized access.
For Google users, the Google Maps Timeline offers a comprehensive view of travel history. Users must have Location History enabled in their Google account settings to use this feature.
Apple’s Find My app also shows real-time locations of friends who have shared their position, though it doesn’t provide historical data in the same way.
Understanding iPhone’s Location History Data
The iPhone’s location history doesn’t track every movement continuously. Instead, it records significant locations – places visited frequently or for extended periods.
This data includes:
- Frequently visited locations
- Time spent at each location
- Dates of visits
- Travel routes between locations
Apple designed this system with privacy in mind. Location data is encrypted and stored only on the device when using Apple’s services, not on Apple’s servers. Users can delete individual entries or clear the entire history at any time.
Location history helps improve services like predictive traffic routing, Photos app memories, and personalized recommendations. The system learns patterns to provide relevant suggestions, like when to leave for work based on typical commute times.
Using Third-Party Apps for Location Tracking
When built-in iPhone options don’t provide enough location tracking features, third-party apps offer more detailed monitoring capabilities. These apps provide enhanced tracking features, though they often require installation on the target device.
Popular Location Tracking Apps
Several reliable third-party location tracker apps offer comprehensive monitoring for iPhones. AirDroid Parental Control allows parents to view real-time locations and set geofence alerts when children enter or leave designated areas.
mSpy provides detailed location history with timestamps and precise coordinates. The app stores this data for extended periods, allowing users to review past movements thoroughly.
Life360 focuses on family tracking with features like location sharing, driving reports, and place alerts. It’s designed with a user-friendly interface that makes it accessible for all family members.
Find My Kids offers both real-time tracking and location history review, with additional features like SOS buttons and battery monitoring on the target device.
Evaluating App Privacy and Security
When selecting a tracking app, privacy considerations should be paramount. Users must verify the app’s data encryption protocols to ensure location information remains secure from unauthorized access.
Check the app’s privacy policy carefully to understand how collected data is used, stored, and potentially shared with third parties. Reputable apps will have clear, transparent policies about data handling.
Look for apps that offer two-factor authentication and strong password requirements to prevent unauthorized account access. This additional security layer helps protect sensitive location data.
Consider whether the app requires a one-time purchase or subscription, as this may impact ongoing security updates and support. Regularly updated apps typically address security vulnerabilities more promptly.
Using Stealth Mode Features
Many tracking apps offer stealth mode capabilities that allow monitoring without the target’s knowledge. These features often hide the app icon or disguise it as another application.
Before using stealth features, users should understand the legal implications. In most jurisdictions, monitoring adults without consent is illegal and may result in serious penalties. Always obtain proper permission when tracking others.
For parental monitoring, some apps offer semi-transparent approaches that balance oversight with respect. These options notify children they’re being monitored while still providing parents with necessary tracking data.
Configuration options typically include:
- Icon visibility settings
- Notification controls
- Background operation modes
- Discrete installation processes
Responsible use of these features requires clear communication about the purpose and extent of tracking.
Integrating Google Services with iPhone Location Tracking
Google’s location services offer robust tracking capabilities that complement iPhone’s built-in features. These tools provide more detailed location history and greater control over how location data is collected and stored.
Google Maps and Real-Time Location
Google Maps provides powerful location tracking features for iPhone users beyond Apple’s native options. To enable real-time location tracking, users need to download the Google Maps app and sign in with a Google account.
Location sharing allows users to share their current location with specific contacts for a chosen duration. This feature is useful for meeting up with friends or ensuring family members’ safety.
For parents monitoring children, Google Maps offers real-time updates showing their child’s exact position. To use this feature effectively:
- Ensure Location Services are enabled in iPhone settings
- Grant Google Maps “Always” access to location
- Turn on Location Sharing in the app settings
The app also records travel routes and frequently visited places, creating a comprehensive location history accessible through the user’s Google account.
Google Maps Timeline Explained
Google Maps Timeline is a feature that automatically records a user’s movements and visited locations. The Timeline creates a detailed history of places visited, routes taken, and time spent at each location.
To access Timeline on an iPhone, users must first turn it on by granting the necessary permissions. After setup, Timeline can be accessed directly through the Google Maps app by tapping the profile picture and selecting “Your Timeline.”
Timeline offers several useful visualization options:
- Daily view: Shows movements throughout a specific day
- Monthly view: Highlights visited places during a month
- Yearly statistics: Summarizes travel patterns and favorite places
The feature can recognize common destinations like “Home” or “Work” and categorize locations by type (restaurants, stores, etc.). This organization makes it easy to track patterns and find specific locations visited in the past.
Managing Google Location History
Controlling what Google remembers about location activities is simple with several management options. Users can check which devices have Location Reporting turned on under the “Location History” settings in their Google account.
To access these controls on an iPhone, users should:
- Open the Google Maps app
- Tap their profile picture
- Select “Your data in Maps”
- Choose “Location History”
From there, users can pause location tracking temporarily or delete location history entirely. Deletion options include:
- Removing specific days
- Clearing ranges of dates
- Deleting all location history
For privacy-conscious users, Google allows customizing automatic deletion settings. Location data can be set to delete automatically after 3, 18, or 36 months, reducing the amount of historical data stored.
Users should regularly review their location settings to ensure they match current privacy preferences, especially when using shared devices.
Tips for Safely Managing Location Data
Managing location data on iPhones requires regular attention to privacy settings and thoughtful sharing practices. Taking control of this sensitive information helps protect personal privacy while still enjoying location-based services when needed.
Regularly Checking Location Settings
iPhone users should review their location services settings at least once a month. This helps identify which apps have access to GPS data and when they’re using it.
To perform a thorough check:
- Go to Settings > Privacy & Security > Location Services
- Review which apps have Always, While Using, or Never permissions
- Look for the gray or purple location arrow indicators that show recent location access
Users can completely disable location tracking by turning off Location Services entirely, though this limits functionality of navigation apps and other helpful services.
For more granular control, iPhone owners should examine the System Services section at the bottom of Location Services. This reveals which iPhone features track location in the background.
Educating Others on Location Data Privacy
Family members and friends should understand how location sharing affects their privacy. Parents especially need to explain location tracking to children using iPhones.
Key points to communicate include:
- Location data can reveal sensitive information about daily routines and visited places
- Apps may collect location data even when not actively being used
- Third parties might access this information through data sharing agreements
Children should learn to recognize when apps request location permissions and understand when to accept or decline these requests. Parents can use Significant Locations as a teaching tool to show what kind of location history is stored.
For family accounts, discussing when to use features like Find My iPhone helps balance safety with privacy respect.
Safe Practices for Location Data Sharing
When sharing location data with apps or people, several practices enhance privacy protection:
For app permissions:
- Use “While Using the App” rather than “Always” when possible
- Regularly audit and revoke permissions for unused apps
- Consider using location trackers only when necessary
For person-to-person sharing:
- Share location for specific time periods rather than indefinitely
- Use end-to-end encrypted services for location sharing
- Consider alternatives to constant tracking, such as check-ins
Users should remember that location history builds over time. Periodically clearing this data prevents accumulation of sensitive information.
For temporary location sharing needs, time-limited options provide better privacy than permanent tracking arrangements.
Troubleshooting Common Location History Issues
Location tracking on iPhones can sometimes encounter problems that affect accuracy or functionality. When these issues arise, there are specific troubleshooting steps that can help restore proper tracking capabilities.
Resolving Inaccuracies in Location Data
Sometimes iPhone location history may show incorrect information. This often happens when GPS signals are weak or when the device can’t properly connect to cell towers or Wi-Fi networks.
To improve accuracy, users should ensure Location Services is set to “While Using” or “Always” for relevant apps. This setting can be adjusted in Privacy & Security settings.
Calibrating the compass can also help. Users should open the Compass app and complete the calibration process when prompted.
Clearing cache data may resolve persistent inaccuracies. For Google Maps specifically, users can tap their profile picture, select Settings, and then “Clear app data” to refresh location tracking.
Updating iOS to the latest version often includes fixes for location tracking issues and should be one of the first troubleshooting steps.
Addressing Location Tracking Problems
When location history isn’t recording properly, users should first check if Location Services is enabled. This can be verified by going to Settings > Privacy & Security > Location Services.
For Significant Locations tracking issues, users need to ensure this feature is enabled. Navigate to Settings > Privacy > Location Services > System Services > Significant Locations.
Battery optimization settings can sometimes interfere with location tracking. Disabling Low Power Mode may improve continuous tracking functionality.
Third-party apps like Google Maps may require specific permissions. Users should verify app permissions by going to Settings > Privacy > Location Services and selecting the specific app.
Restarting the iPhone often resolves temporary glitches affecting location tracking. Press and hold the side button and either volume button until the power slider appears, then slide to power off.
Frequently Asked Questions
Accessing and monitoring location history on iPhones involves specific methods and considerations. Privacy settings and proper permissions play crucial roles in this process.
What steps are involved in accessing someone else’s location history on their iPhone?
To access someone else’s location history on iPhone, you must first have their permission. The person needs to explicitly share their location with you through the Find My app.
They can do this by opening Find My, selecting the “People” tab, and tapping “Share My Location.” They’ll need to enter your name or phone number to authorize sharing.
Once they’ve shared their location, you’ll receive a notification to accept their invitation. However, Find My app only shows current locations in real time, not past locations.
Is it possible to view the location history of a person’s iPhone through the ‘Find My’ feature?
The standard Find My app doesn’t provide location history viewing capabilities. It only displays where someone is currently located.
Find My focuses on present location sharing rather than creating a historical record of places visited. This limitation is intentional and part of Apple’s privacy-focused approach.
For those needing to view location history, third-party apps with appropriate permissions might be required. These alternatives typically need explicit consent from the device owner.
How can you retrieve historical location data from an iPhone using iCloud?
iCloud itself doesn’t have a direct feature for viewing someone else’s location history. However, iPhone users can check their own location history through their device settings.
To view your own history, go to Settings > Privacy & Security > Location Services > System Services > Significant Locations. This shows places you frequently visit.
This information is encrypted and stored only on the device, not accessible to others through iCloud without the device passcode or Apple ID credentials.
What methods are available to monitor the location timeline of a shared contact on an iPhone?
For location timeline monitoring, Google Maps offers more robust options than Apple’s native tools. Users can turn on Timeline for iPhone through Google Maps.
Family tracking apps like Life360 or AirDroid can also track location timelines with permission. These apps typically show both current and historical location data.
Remember that using these methods requires explicit consent from the person being monitored. Tracking someone without permission may violate privacy laws.
Can I view detailed location records for specific dates on an iPhone?
iPhone’s native Significant Locations feature shows places visited organized by date and time. This feature is only accessible to the device owner.
For more detailed location history, Google Maps Timeline offers a comprehensive view of movements by day, including specific routes taken.
These records can be filtered by date to see exactly where the device was at specific times, provided the location services were enabled during that period.
Are there privacy notifications sent to the user when their location history is checked on an iPhone?
Apple prioritizes transparency in location sharing. When you share locations with others, both parties can see that location sharing is active.
No specific notifications are sent when someone views your current location through Find My if sharing is already enabled. This differs from checking location history.
For significant locations, the data is protected by the device passcode or Face/Touch ID. Any attempt to access this requires authentication, effectively serving as a privacy safeguard.